  |
 |
|
Build an Inexpensive "Bug" Single Lever Paddle |
|
Back when I first became a Ham, around 1980, I used a straight key and actually developed a pretty good fist. I was curious though, how would a keyer sound? I found a pretty simple circuit for a keyer in Ham Radio Horizons and went to work. After a couple of evenings breathing up solder flux I had my keyer. So far so good. Then I realized I didn't have a paddle. I called my brother and borrowed his HamKey HK-3, hooked it up to my keyer and was really surprised how easy it was to send GREAT code with very little effort. I had a blast. Six months or so later my brother called up and asked for his HK-3 back. No problem; I sent it back to him and resumed using my straight key. My fist had deteriorated so badly I could hardly be understood! I realized 2 things right away: I needed to practice with my straight key, and I needed a paddle. My budget was streched to the limit, so buying a paddle (always an expensive proposition) was out of the question. I looked around through my junk box to see what was available. I usually keep scraps of Lexan and Plexiglass handy. These acrylics are relatively inexpensive, amazingly versatile, and quite easy to work with. They cut like wood using a saber saw or fine point handsaw, and are easily joined with hardware fasteners or SuperGlue (I recommend FutureGlue). Once the cuts are made, the parts can be polished with automobile rubbing compound to a beautiful transparent finish. |
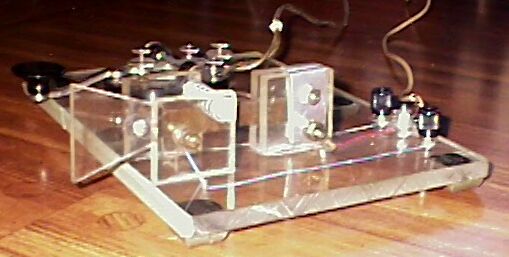
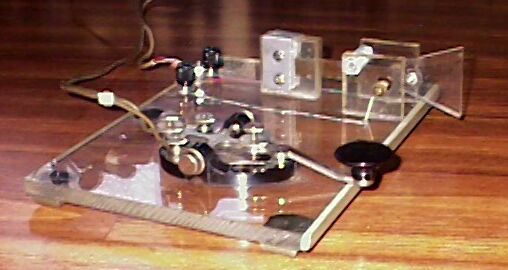
| Now, with most of my materials decided upon, I went to work. This was one of those projects I have mentioned elsewhere that I just started working on without a clear plan. I knew I needed a base, so I used a handsaw to cut a piece of 1/2 inch Plexi to what I thought was a usable size, I then decided to use 3/16 inch for the rest of the project. 3/16" does not cut very well with a handsaw; it tends to chip, so I used a hacksaw. I had been intending to use a thin piece of aluminum for the paddle, but when I broke a hacksaw blade cutting the Plexi, I knew right away that part of the plan had changed (why waste a perfectly good piece of spring steel!). Since I built this about 20 years ago, I don't have step by step photos, but it is so simple that just looking at the finished shots will give you the necessary sense of the design. I have seen several other paddles along this line built of other materials (one even using discarded CD's; thanks AOL!), so feel free to use your imagination. |
|
|
| As you
can see, this serves as the baseplate for my J-37 straight
key as well. I NEVER want to let my fist get that rusty
again! To the details. First I cut the baseplate at 9" X 6"
out of 1/2" PlexiGlass. Then I cut 5 squares at 1-1/2" out
of 3/16" PlexiGlass. The only thing NOT obvious here is that
the bottoms of the 1-1/2" squares MUST be perfectly flat and
perfectly square. This is not hard to do. Just clamp each
pair together with locking pliers (not too tight and use a
soft cloth between the pliers and the material). Use some
150 or so grit sand paper on a flat surface to render the
necessary fit. Do this for each pair. If you desire to put
the polish on, now is the time to do it. first sand the
other sides of the squares, then polish to a transparent
finish using rubbing compound. The fifth square I cut into a
trapezoid and attached to the end of the hacksaw blade.
Assembly is pretty straight forward. You need 4 1" 6-32 brass screws and 6 nuts for them, a small strip of aluminum flashing, and 3 binding posts or a terminal strip. Scribe a line on the base plate where you want to fix the center of your paddle. Cut the flashing into 2 strips and fold them over one pair of the squares. Then carefully clamp them together so the bottoms are flush and square. Drill two holes to accomodate the hacksaw blade. Fix the hacksaw blade in the squares with 2 of the brass screws just tight enough to hold it. Be careful not to deform the squares. I use FutureGlue because it has all the endearing qualities of SuperGlue, but it is much more forgiving. Coat the bottom of the paddle assembly with FutureGlue and press it into place, centered on the line you scribed. After the glue has sufficiently set (about a half hour) you may firmly tighten the hacksaw blade in place. Next, clamp the other pair of squares together and drill a hole through them that will center on the hacksaw blade. There is not a lot of room for error here, so measure twice; drill once. Now, lightly mark the center point of the paddle assembly on the front of the baseplate. Measure 1/2" on either side of center and scribe a guide line for the contact plates. Optionally, hold the contact plate in place and mark a point to drill a hole for the lead to run through to the bottom of the baseplate. Coat the bottom of the contact plate and press it into place with the inside edge of the plate on the line you scribed. Repeat for the other contact plate. For the contacts, solder a small terminal lug on your lead wire, start a nut on the brass screw , fit the lead wire lug over the screw and fit it through the hole in the contact plate. Put another nut on the screw on the inside of the plate and adjust the screw for minimal gap between the screw and the hacksaw blade. Tighten the outside nut to fix it in place. I found this setup worked reasonably well but it was a little bouncy. A shorter length of hacksaw blade would have solved this but I already had the device built around that piece of hacksaw blade. To de-bounce the paddle, I got a fairly stiff compression spring and glued a shirt button on the inside of each contact plate to retain it. I have used this off and on for about 20 years and have never found the need or the desire to buy a commercial paddle. The HK-3 was nice and I have tried a Bencher too, but honestly? I like the feel of my homebrew much better. This is a Homebrew Project. I worked with materials the I had on hand. You may not have these materials or may not feel comfortable with the precision you need to achieve to make this work. Not a problem. Use the materials YOU have on hand that YOU feel comfortable using! Don't let the art of homebrew die. Take the Nike attitude; just do it! |