P.C. BOARD
Etching the board is a process which requires patience. Although the process may take a while to complete, the result of having a professional looking board is well worth the time.ETCHING THE
P.C. BOARD

Safety glasses. It's
a good idea to wear these at all times while working with the etchant.
Gloves. Because
the etchant is a mild acid, it is an excellent practice to wear gloves
at all times when handling the etchant: from pouring the acid into the
etching tray, to working with the board, to cleanup.
Plastic dropcloth.
This protects the working surface from the acid - important since it stains
everything permanently. A plastic trash bag can be used here.
Etching tray.
The etching tray provides a convenient container to process the board.
If you purchased a kit, this is the container for that kit.
Ferric
Chloride. This is the etchant - what actually makes the circuitry.
Ferric Chloride is a mild acid and will permanently stain anything it comes
in contact with (clothing, etc). It will also discolor your skin
and may give you an acid burn. Here's how it works: The acid weakens
the exposed metal (copper) of the p.c. board and literally eats it away.
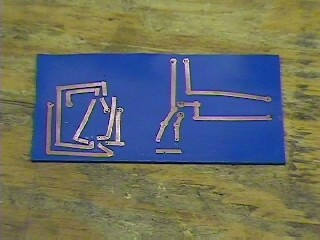
Registering the board prevents the acid from eating away at the copper,
thus leaving the copper traces ready for you to drill the board and insert
the components. Ferric Chloride works best and fastest when it is
hot - above 100F. See Step 2
if you have a dry powder and need to mix the etchant.
Heat Lamp.
Aids in heating the acid to above 100F.
Scouring Pad.
This comes in handy after you have etched the board.
In addition to those materials
pictured, it is suggested that you have:
Stirring Stick. Stirring
the etchant helps to reduce etching time.
Jar of Water. Helps
to clean the etchant from the board and loosen the tape.
Select a clean, level surface to work. This area must have good ventilation because the heated acid gives off some fumes. If you have purchased the dry powder etchant, follow these directions:
This step requires patience
and good timing in deciding when to remove your board. After you
make your first board, you'll know exactly what "clues" to look for.
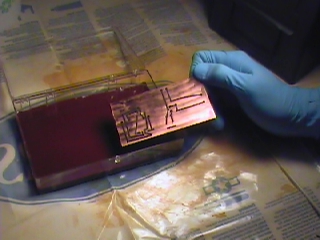
Once the etchant is hot
- and remembering gloves and glasses - place the board into the bath as
shown above. Use the stirring device you selected to stir the acid
frequently (every 30 seconds or so). Stirring drastically reduces
the time it takes to etch the board.
After about 10 minutes,
check the progress of the board. The etching should be noticeable
at this pointespecially at the edges of the board. The copper that
is getting etched will turn in color to almost pink. Once the edges
are noticeably etched, check the board more and more frequently.
After about 5-10 minutes longer the board should be nearly complete.
It is important not to go too long because you can actually start etching
the copper out from under the taped traces! Don't worry if the board
is taking 30 minutes or more to completely etch. If your board is
relatively small, try stirring the etchant more frequently.
When the etching has been
completed you should not see any exposed copper on the board. Only
the taped traces should remain. If you still see a small amount of
copper on the board, go ahead and etch it off but BE CAREFUL not to etch
too long and undercut the traces. Move on to Step 4 when you are
satisfied with the appearance of your board.
For this step you will
need the scouring pad and the jar of water.
Remove the board from
the acid bath and place it into the jar of water to wash off the ferric
chloride. Once the board has been washed, use a dampened scouring
pad to remove all the traces from the board. The taped tracks can
usually be peeled off or scraped off by hand, but the rub-on dry transfer
patterns are easier to remove with the pad. The scouring pad also
helps to clean the board and the traces after the etching process.
Congratulations!
You have just etched a professional looking p.c. board! Now dry the
board well and let's view the finished board which is now ready for drilling....