SECTION 4
COMPONENT REPLACEMENT
STATIC POTENTIALS
Many of the transceiver components are susceptible to higher voltages whether they are in or out of a circuit. Avoid static or AC-line potentials when handling components and circuit boards. Prevent damage from electrically "hot" tips that carry AC-line or static potential by using a grounded soldering iron. The only way to alleviate risk of component damage from static discharge is to make sure all of the objects that touch the circuitry during component replacement carry the same potential. Since the soldering iron is grounded, everything else must be grounded: the bench, the equipment being worked on, and you. There usually isn't a need to wire yourself to your bench unless you work on carpeting on dry-air days. Just touch bench ground when you sit down so that you and the grounded work area are at the same potential.
REPLACING CHIP CAPACITORS AND RESISTORS
This section describes the best way to remove a chip component and install a new one. Chip components | do not have leads; they have metallic film on end-surfaces to solder to. Often the surface is tinned with [solder. Because the metallic film can be easily damaged by contamination and excessive heat, these
components must be soldered very carefully. No chip component can be unsoldered, then resoldered
without damage. Always discard a used component.
• ITEMS REQUIRED:
• Grounded temperature-controlled soldering iron with a 1/32 inch flat-blade tip. The tip temperature must be maintained at approximately 600 degrees Fahrenheit.
• 60/40 electronics-grade solder, 22 gauge or thinner, with rosin flux.
• Tweezers or longnose pliers.
• Thin desoldering-wick.
• Isopropyl alcohol or Freon-TF for solvent.
• Rosin solder-flux. DO NOT USE ACID FLUX.
• Procedure:
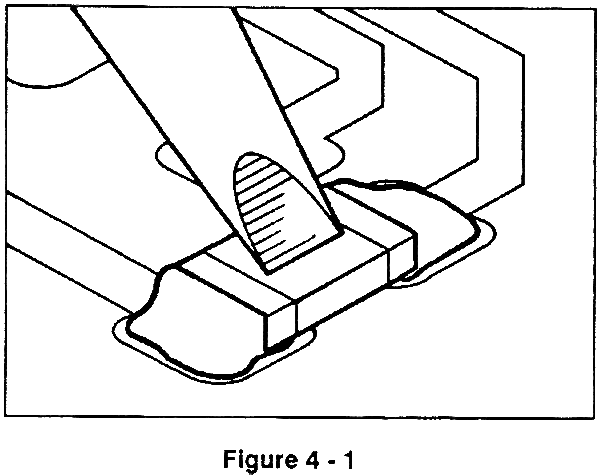
1. Place the solder iron tip directly on the defective component to melt the glue under the component, then solder as shown in Figure 4 -1. Remove the component with tweezers or longnose pliers. Discard the component.
CAUTION: Application of too much solder can create solder bridges between PC patterns under the soldered component and around the pad.
2. Completely remove old solder, old glue, and any other contaminants from the area with desolder-ing-wick and solvent.
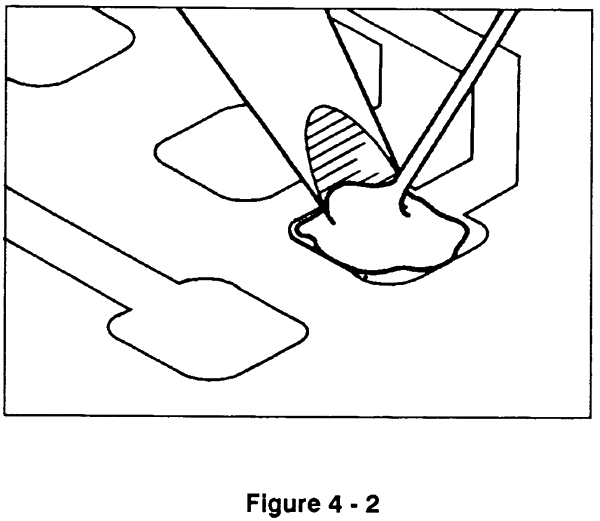
3, Apply only enough fresh solder to coat the clean PC pad as shown in Figure 4-2.
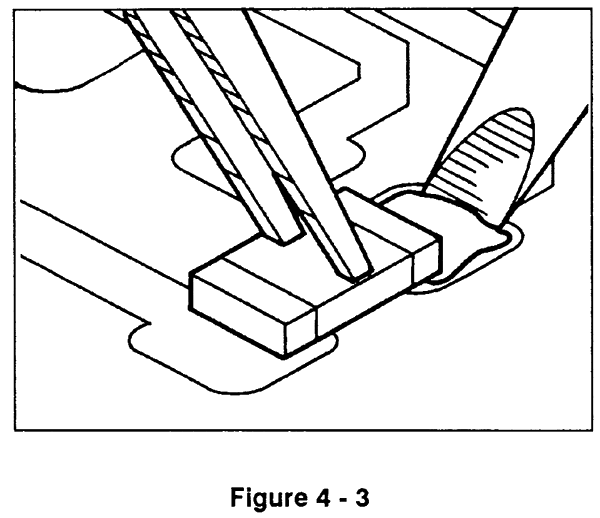
4. Place component and briefly heat the new solder and pad while holding the component with tweezers. Do not touch the new component with the iron. Only heated solder should touch the component to make a light "tack" bond to it. See Figure 4 - 3.
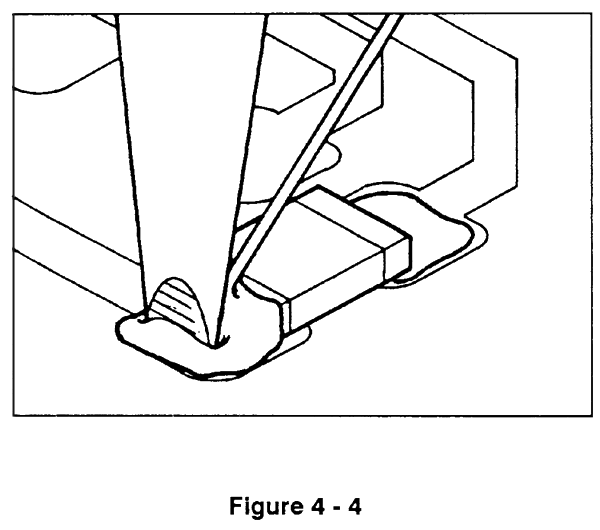
5. With one component end tacked to hold it, the other end can be soldered. Carefully apply heat to the PC pad while adding only enough fresh solder to produce a clean fillet as in Figure 4 - 4—do not apply too much solder, otherwise it may flow underneath and short the pads together. Let the hot solder flow onto the component—do not touch the component with the iron. Repeat to finish the other end of the component. Solder must adhere to all metallic end-surfaces on both ends as shown in Figure 4-5.
CAUTION: Avoid direct contact to the chip component with the iron tip. Too much heat and contamination will break down the metallic film on component ends resulting in loss of internal connection (a capacitor is comprised of several wafer plates that connect through the metallic end-surfaces). If satisfactory solder adhesion does not occur, the metallic end surface has been damaged and the chip component should be replaced again. More soldering will only damage the component further.

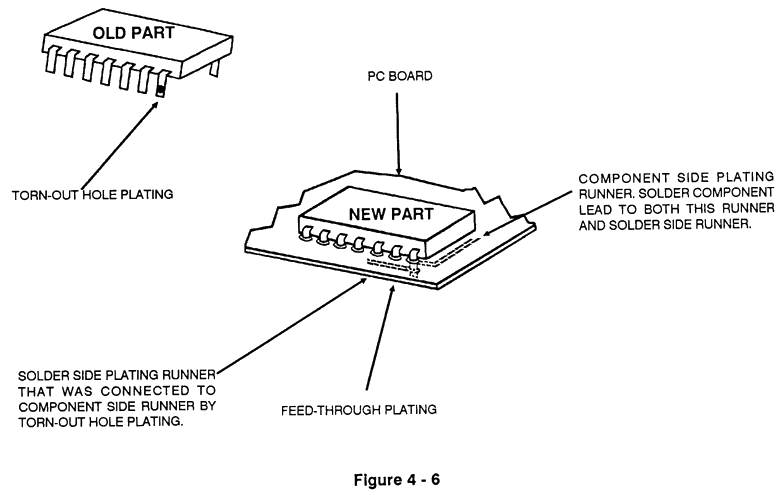
REPLACING COMPONENTS WITH FEED-THROUGH LEADS
Exercise extreme care when replacing components with leads that feed through a PC board. The copper plating on both sides of the printed circuit board and inside component lead holes easily separates and tears from the PC board when heated.
Use a solder suction tool or braided desoldering-wick to remove solder from component leads, one at a time. Solder must be removed carefully and thoroughly so that the 1C can be pulled without resistance. After removing as much solder as possible, use a dental pick or straight-pin to break the leads loose from the inside of the cleaned-out hole. Cutting the defective components away from its leads first makes removing the leads and solder easier.
Before installing a new component, remove all solder from lead holes and make sure the device is oriented properly. Always inspect old part leads for any feed-through plating rings that may have been pulled out of holes. The plating may have completed a circuit. If so, make sure the corresponding lead of the new component is soldered to plating runners on both sides of PC board as shown below.
ELIMINATING RADIO INTERFERENCE
Occasionally, you must contend with interference from somewhere in the automobile. Interference problems are solved by understanding the interference and its path into the transceiver, locating its source logically, then eliminating it in the simplest way available.
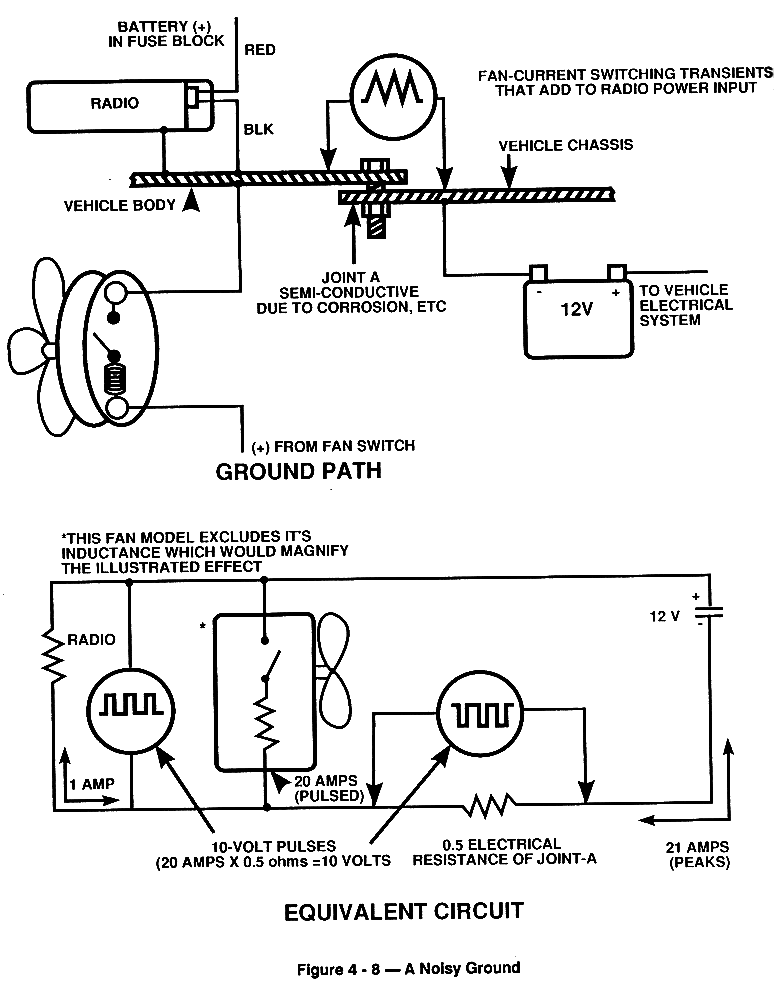
Interference may be conducted into the transceiver directly, or induced into it, or both. Conducted interference passes through the DC power leads or the accessory wiring of the radio. Radiated interference, which can originate from anywhere in the vehicle, simply produces noise voltages on conductors inside the radio or its antenna. See Figure 4 • 7.
Conducted interference is simple noise voltage present in the vehicle electrical system. With many electrical devices turning on and off in a vehicle, current spikes produce voltage drops across wire resistances, causing voltage transients to appear throughout the electrical system. Connecting the radio power leads to this noisy electrical system applies the noise voltage directly to the radio. Most noise voltage is attenuated by power-line filters within the radio; but spikes that are severe enough may become audible.
While interference conducted through power leads affects only transceiver audio circuitry, induced interference often invades the receiver through the antenna by imitating receiver IF frequencies or channel frequencies. Induced interference occurs when an electromagnetic field penetrates the radio. If an electromagnetic field is strong enough, it can induce noise currents on the radio accessory and power wiring.
IDENTIFYING THE INTERFERENCE
The first step toward eliminating interference is to identify and characterize it. Listening to the noise can reveal a lot. For example: if the noise heard varies with engine speed, its source must relate to the engine, such as the alternator, ignition system, or tachometer.
Because you are dealing with frequency-modulated equipment, determining if the noise is at receiver-sensitive frequencies is easy. With all squelch circuits open, simply apply an unmodulated signal to the transceiver that is strong enough (10 mV at the Antenna Jack) to overcome any high frequency noise signal that could invade below. If noise remains, interference is at low frequencies that can enter only by proximity coupling to radio wiring or direct conduction.
Next, power the radio with an independent 12V power source (such as another car battery). Isolate by moving wiring and/or the radio while listening for changes in the noise level. If the noise stopped when you connected the independent power source, noise voltages are conducting through on the positive circuit or the ground (see ELIMINATING CONDUCTED NOISE).
ELIMINATING CONDUCTED NOISE
If noise voltage is present on the power leads, there may be defective equipment in the vehicle electrical system that needs repair. An alternator with a bad diode has a large current ripple on its output, which produces a whine in the transceiver that varies in pitch with engine speed. Its current capacity is limited, but vehicle operation will not be noticeably impaired. Lights that dim during large current demands are a good sign of such a defect.
Another possible source of conducted interference is a fan motor in the same circuit to which the radio is connected. Because a fan also induces interference, confirm that noise is conducted into the radio (see IDENTIFYING THE INTERFERENCE). If the interference is conducted into the DC power leads of the radio, find a power connection point in the electrical system for the transceiver that is further from the fan circuit.
Noise voltages can also be added to the radio DC power input via the ground path. This is a condition where a high, noisy current shares the ground path of the radio equipment. For example:
Ground current of a fan motor finds its way to the vehicle battery through segments of metal body A-frame assemblies (see Figure 4 - 8). If the electrical bond between two parts is weak, and the radio ground current must also travel through this weak joint, a voltage drop induced across the joint by the fan current will appear at the radio power plug.
To avoid a noisy ground, connect radio ground closer to the vehicle battery.
ELIMINATING RADIATED INTERFERENCE
If DC power source substitution proves interference is not conducted into the power leads, two likely sources of radiated interference are sparks and high frequency oscillators. Modern vehicles use many electronic accessories and systems that may produce a hash or whine in the transceiver. Oscillators within these devices, which sometimes are poorly shielded, may radiate an electromagnetic field at frequencies many multiples of the oscillator frequency.
Again, listen to the noise to learn about its source. Unless the interfering automobile accessory is part of engine operation, the noise won't vary with engine speed. The interfering accessory can be isolated by temporarily removing power to it and checking for absence of noise.
Because the lead-in wires of an automobile device can become radiating antennas, induced interference is more often radiated from the automobile accessory wiring than the accessory itself. Such interference can by inductively coupled into nearby radio power and accessory wiring or radiated toward the antenna.
Check that the radio wiring does not run next to, nor parallel with, vehicle wiring. Move the wiring to identify and/or solve this problem.
If necessary, RF chokes can be connected in series with the "hot" lead-in wires of the interfering device, close to its housing to kill the antenna effect. Usually, "hot" wires can be identified if the noise volume changes with wire movement.
Radiated interference may also enter through the antenna. This can be verified by substituting the antenna and its cable with a 50 Ohm RF dummy load and short cable. The dummy load is necessary to properly balance the receiver input and give comparable results. If the noise stops, interference was
entering the antenna. The only way to solve this sort of interference problem is to eliminate radiation at the source with RF chokes as described above. Sometimes, positioning the antenna further from the interfering accessory may help.ELIMINATING INTERFERENCE FROM SPARKS
Sparks produce electromagnetic energy over a large area of the RF spectrum. This energy usually invades the receiver input through the antenna. Therefore, the problem must be resolved at the source.
Modern vehicles use higher voltage ignition systems. As a result, electrical leakage occurs more easily through cracks and contaminants. If the interference produces a buzz while the engine is idling, and the buzz increases in pitch with engine speed, sparks are leaking to ground before distribution to the spark-plug wires. Check the ignition coil, its high voltage wire, and distributor cap for signs of arcing through cracks and burns or over dirt.
If the interference produces a repetitive popping sound while the engine is idling, and it increases in rate with engine speed, a single spark plug or wire are suspect. Check the distributor cap, spark plug wires, and spark plugs for cracks, burns, and dirt.
Spark plug and ignition coil wires in modern vehicles are made with suppressive (resistive) conductors to reduce electromagnetic radiation. This may not be the case in older vehicles. Check with an ohmmeter.
Interference from sparks made by fan motor brushes produces a whine that varies with fan speed. Badly worn brushes or bearings cause excessive sparks, and you may need to replace them. A 0.1 uF coaxial capacitor can be connected to the positive lead as close to the motor as practical to reduce radiated interference. The capacitor body must connect securely to the grounded motor housing.
|
DC VOLTAGE
CHARTS Table 4 - 1 — Transistors |
||||
| NAME | MODE | BASE | COLLECTOR | EMITTER |
| Q1 | RX TX |
0.7
0.0 |
0.0
5.0 |
0.0 0.0 |
| Q2 | RX | 0.0-0.7 | 0.0-5.0 | 0.0 |
| Q101 | RX/TX | 3.1 | 4.8 | 2.6 |
| Q131 | TX | 0.9 | 8.6 | 0.7 |
| Q201 | RX | 0.9 | 8.6 | 0.2 |
| Q203 | RX | 0.8 | 7.6 | 0.6 |
| Q243 | RX | 3.1 | 9.1 | 2.2 |
| Q244 | RX | 2.4 | 4.3 | 1.7 |
| Q301 | RX/TX | — | — | 0.0 |
| Q406 | RX | 3.7 | 5.0 | 3.1 |
| Q410 |
RX BUSY
RX STANDBY |
4.9 0.0 |
5.0 5.0 |
4.2
0.0 |
| Q411 | RX/TX | 13.5 | 13.6 | 13.4 |
| Q501 | TX | 0.6 | 5.4 | 0.0 |
| Q502 | TX | 0.0 | 12.6 | 0.0 |
| Q503 | TX | — | 12.6 | 0.0 |
| Q504 | TX | 12.5 | 5.4 | 13.6 |
| Q701 | RX/TX | 9.0 | 9.1 | 8.2 |
| Q704 | RX | 8.8 | 0.0 | 8.8 |
| TX | 8.1 | 8.4 | 8.8 | |
| Q705 | RX TX |
4.7 0.0 |
0.0
7.9 |
0.0
0.0 |
| Q712 | RX | 1.6 | 7.0 | 0.9 |
| Q732 | TX | 1.0 | 7.6 | 0.4 |
| Q733 | RX/TX | 1.8 | 8.0 | 1.3 |
| Q734 | TX | 1.8 | 8.2 | 1.3 |
| Q774 | RX/TX | 9.0 | — | 9.0 |
| Q775 | RX/TX | 9.0 | 9.0 | 9.0 |
| Q776 | RX/TX | 0.0 | 0.0 | 0.0 |
| Q778 | RX/TX | 4.6 | 0.0 | 0.0 |
| Q901 | RX/TX | 5.5 | 8.4 | 4.8 |
|
Table 4 - 2 - Transistor Packs |
|||||||
| NAME | MODE |
PIN NO. |
|||||
| 1 | 2 | 3 | 4 | 5 | 6 | ||
| Q302 | RX | - | - | 0.0 | - | - | 0.0 |
| Q401 |
RX BUSY
RX STANDBY TX |
4.8 0.0 0.7 |
0.0 0.7 |
0.0 7.6 |
0.7
0.0 |
0.0 0.0 0.0 |
0.0
0.0 0.0 |
| Q403 |
RX TX |
- | - |
12.7 11.6 |
0.0 2.0 |
0.0 1.4 |
- |
| Q702 |
RX
TX |
7.1 0.0 |
7.2 0.7 |
7.8 8.0 |
0.0
7.8 |
0.0
7.2 |
7.8 8.0 |
| Q703 |
RX
TX |
0.0 2.9 |
0.0
2.9 |
0.0 0.0 |
8.6
0.0 |
4.6
0.2 |
0.0 0.0 |
| Q771 | RX/TX | 3.8 | 4.4 | 4.7 | 0.0 | 0.0 | 0.0 |
| Q778 |
RX
TX |
0.0
2.0 |
2.2
2.2 |
0.0
0.0 |
0.0
0.0 |
0.0 0.0 |
0.0 0.0 |
|
Table 4-3 -FET's |
|||||
| NAME | MODE | GATE1 | GATE 2 | DRAIN | SOURCE |
| Q241 | RX | 0.0 | - | 9.0 | 2.2 |
| Q242 | RX | 0.0 | - | 9.0 | 0.52 |
| Q408 |
SQ OPEN
SQ CLOSED |
4.7
0.0 |
- |
5.0
5.0 |
5.0
5.0 |
| Q711 | RX | 3.4 | 4.7 | 7.8 | 3.0 |
| Q731 | TX | 3.4 | 4.7 | 7.8 | 3.0 |
|
Table 4-4 - Integrated Circuits, 8 Pins or Less |
|||||||||
| NAME | MODE |
PIN NO. |
|||||||
| 1 | 2 | 3 | 4 | 5 | 6 | 7 | 8 | ||
| IC401 | RX/TX | 13.5 | 0.0 | 9.1 | - | - | - | - | - |
| IC402 | RX/TX | 13.5 | 0.0 | 5.0 | - | - | - | - | - |
| IC405 | RX/TX | 0.9 | 2.8 | 2.8 | 0.0 | 4.1 | 4.1 | 3.3 | 9.0 |
| IC406 | RX | 6.5 | 6.5 | 6.4 | 0.0 | 6.0 | 13.5 | 6.5 | - |
| IC407 | RX/TX | - | - | - | 0.0 | 4.4 | 4.4 | 4.4 | 9.0 |
| IC902 | RX/TX | 4.9 | 4.9 | 0.0 | - | - | - | - | - |
| IC903 | RX/TX | 0.0 | 0.0 | 0.0 | 8.2 | — | 1.2 | 9.1 | 3.6 |
|
Table 4 - 5 —Integrated Circuits, 13 to 16 Pins |
|||||||||
| NAME | MODE |
PIN NO. |
|||||||
| 1 | 2 | 3 | 4 | 5 | 6 | 7 | 8 | ||
| IC1 | RX/TX | - | - | - | 2.3 | 2.3 | 2.3 | 2.3 | 2.2 |
| IC2 |
TX RX |
- | - | - | - |
5.0
0.0 |
0.0
5.0 |
0.0 0.0 |
2.3
2.3 |
| IC50 | RX/TX | 1.7 | 1.7 | 1.7 | 5.0 | 1.7 | 1.7 | 1.7 | 1.7 |
| IC241 |
SQ OPEN SQ CLOSED |
6.7
6.7 |
6.6 6.0 |
6.6
6.6 |
6.8
6.8 |
6.4 6.4 |
6.4 6.4 |
6.4 6.4 |
6.8 6.8 |
| IC301 | RX/TX | - | - | - | - | - | - | 0.0 | |
| IC302 | RX/TX | - | - | - | - | - | - | - | 0.0 |
| IC411 | RX/TX | 4.4 | 4.4 | 4.4 | 5.0 | 4.4 | 4.4 | 4.4 | 4.4 |
| IC771 | RX/TX | 2.3 | 2.3 | 4.7 | 4.7 | 4.6 | 0.0 | 4.7 | 3.2 |
| IC772 | RX/TX | 0.7 | 0.7 | 0.7 | 0.7 | 9.0 | 9.0 | 0.0 | 0.7 |
| NAME | MODE |
PIN NO. |
|||||||
| 9 | 10 | 11 | 12 | 13 | 14 | 15 | 16 | ||
| IC1 | RX/TX | - | 0.0 | - | 0.0 | 2.3 | - | - | - |
| IC2 |
TX RX |
2.3
2.3 |
2.3
2.3 |
2.3
2.3 |
5.0 0.0 |
0.0
5.0 |
5.0
5.0 |
- | - |
| IC50 | RX/TX | 1.7 | 1.7 | 0.0 | 1.7 | 1.7 | - | - | - |
| IC241 |
SQ OPEN
SQCLOSED |
2.8
2.8 |
0.7
0.7 |
0.8 0.8 |
3.0 3.1 |
0.0 6.3 |
3.0
4.7 |
0.0 0.0 |
1.8
1.8 |
| IC301 | RX/TX | - | - | - | - | - | - | - | 5.0 |
| IC302 | RX/TX | - | - | - | - | - | 5.0 | - | - |
| IC411 | RX/TX | 4.4 | 4.4 | 0.0 | 4.4 | 4.4 | 4.4 | - | - |
| IC771 | RX/TX | 0.0 | 4.8 | 0.1 | - | - | - | 4.6 | 3.5 |
| IC772 | RX/TX | 0.7 | 0.7 | 0.7 | 9.0 | 9.0 | 9.1 | - | - |
TROUBLESHOOTING CHARTS
***