|
The
"Poorboy" CW Filter
The hobby of "chasing" NDB's (Longwave
Beacons) is a fun filled hobby of listening for (relatively) low power
beacons in a sea of noise and radio interference of various
types. This often covers up many desirable beacon loggings.
There are three primary areas the beaconeer has to combat this and to experiment. 1. Antenna construction, experimentation and orientation. This aspect of the hobby is covered elsewhere. 2. The use of a computer and FFT program to display signals on a computer screen. 3. Receiver selectivity. This topic is what we will discuss here. In chasing NDB's, selectivity is 'EVERYTHING'! The narrower the bandwidth of the receiver, the further down in the noise you'll be able to hear a weak beacon. With increased selectivity you will also have less QRM (interference) from adjacent beacons and signals. There are two areas of the receive path where most of the selectivity is obtained. 1. The IF strip of the receiver by the addition of Narrow CW filters, typically having a bandwidth of 125 to 500 Hz. The homebrewed ML receiver featured elsewhere on this site is an example of a set that carries IF selectivity to the maximum. 2. The audio path between the receiver and the headset. These are typically narrow bandwidth "active" audio filters using either Op-amp, Switched Capacitor or DSP technology. Some DSP units such as the Timewave DSP-599zx may provide selectivity on the order of 10 Hz wide. If the receiver uses AGC this can occasionally create problems (see below). There is one CAVEAT in using narrow audio filters. If the receiver in question uses AGC, (and you leave the AGC turned on while listening), it is BEST if the narrow selectivity is contained within the AGC "loop". If it isn't, a strong nearby signal that isn't audible in the headset (speaker) will "pump" the AGC, desensing the set to weak signals, and may actually "key" a steady carrier with what sounds like "inverted CW". This can create many "Negative Idents" that aren't really there, and is a fault with the overall "system design", of not putting the selectivity within the AGC loop. This inexpensive and simple receiver modification came about through the need to improve the "fair" CW selectivity of an Icom IC-751 which had a 9MC 250 Hz CW filter installed. I've long suspected that this filter had problems and wasn't "within spec" in selectivity OR center frequency. The chart below shows that it DOESN'T live up to manufacturer specs of 250 Hz bandwidth at -6dB! It also has excessive Filter "Blowby", allowing very strong carriers to be heard as a "whistle" up to 4 kHz either side of center frequency. I wanted to put a 455KC Narrow CW filter in the rig, probably a 125 Hz Inrad unit, but they're expensive and I can't presently afford it. So, I came up with the "poor boys CW filter", a technique I've used in the past with a good cost/performance ratio. NO, it WON'T match the expensive units, but as shown below it DID make a big difference with virtually no dollar outlay (the Xtal was given to me). How well does it work? It won't compare with a 150 dollar, 125 Hz B/W filter, especially in SKIRT selectivity and ultimate rejection. But it's 3dB selectivity is 69 Hz and the 6dB points came in at 130 Hz! I gave it the "FCH" (local pest) test, turning the preamp gain up to where it's carrier strongly pegged the "S" meter, (Greater than S9+60dB). Without the Xtal in the circuit, the carrier was weakly audible over 4KC on either side, with the Xtal switched in the carrier was inaudible before tuning off 500 Hz on the low side and 700Hz on the high side!!! A large improvement and the rigs IF Notch Filter improves things over this. INSERTION LOSS came in at 3dB, less than one "S" unit. Connecting this Xtal, without any circuit "tweaking", made such an improvement I didn't even try to "optimize" selectivity by tweaking the Xtal "loading". (You can often optimize the circuit by loading the output with fixed resistors). "Ok" you say. "But what about actual specifications and a lab report"? Simple tests, using the HP-5245L frequency counter, True RMS digital DVM (on the dB range) and Fixed Marker Generator, produced the following results. The tests were run with the receiver AGC turned off to eliminate B/W readings from being skewed. The readings only go down to -25dB because the counter quit counting at such low levels. NOTE: The difference in the Reference Frequency in the two tests is due to the fact that the 250 Hz Icom Xtal Filter isn't "Exactly" on the frequency it should be, requiring the Passband tuning to be offset slightly to center the carrier in BOTH the Icom Filter AND the 455kHz Xtal (required for best performance). ICOM 9MHz, 250Hz FILTER ONLY IN CIRCUIT: Reference Level/frequency +5dB at 692Hz. dB/Ref Low High B/W -3dB 501Hz 812Hz 311Hz -6dB 461Hz 871Hz 410Hz -10dB 431Hz 921Hz 490Hz -15dB 400Hz 970Hz 570Hz -20dB 370Hz 1010Hz 640Hz -25dB 310Hz 1039Hz 729Hz ICOM 9MHz, 250Hz FILTER AND 455KC XTAL: Reference Level/Frequency +5dB at 637Hz. dB/Ref Low High B/W -3dB 617Hz 686Hz 69Hz -6dB 596Hz 726Hz 130Hz -10dB 576Hz 766Hz 190Hz -15dB 536Hz 826Hz 290Hz -20dB 486Hz 875Hz 389Hz -25dB 445Hz 915Hz 470Hz HOW
TO DO IT
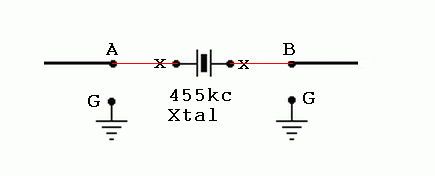
This receiver modification is relatively easy as mods go. FIRST, it makes three assumptions. 1. At least one of the IF stages in the receiver uses the "standard" frequency of 455 kHz. 2. There is an empty slot for an optional 455 kHz filter available. If it doesn't have an optional filter slot, the modification may still be done, but it becomes very dependent on the configuration of the set and is beyond the scope of this article. 3. That you know what you're doing inside your radio, and which end of a soldering iron you hold onto . If you DON'T, get somebody to help you as I will not be held responsible if you damage your set! Ok, the obligatory caveats having been dealt with, let's get started. The following steps are generic in nature and may vary slightly from radio to radio. 1. Dig out the owners manual on your radio and read over the section about installing optional CW filters. We are ONLY interested in the section dealing with 455kHz filters here. 2. Following the manual, disassemble your radio to whatever level is required. 3. Examine the filter area. MOST standard optional filters for the typical ham transceiver/receiver have 4 pins for electrical connection and possibly a pair of mounting screws. They are typically pinned out like this. A. The 4 pins will be in two pairs. One pair is the input TO the filter and 1 pair is the output FROM the filter. B. Of these two pairs, EACH has a GROUND pin and a SIGNAL pin. You MUST determine which pins are the signal pins. You can determine the ground pins with an Ohmmeter, looking for a short to ground, OR examine the PCB board traces and see which are grounded. Once you've determined the ground pins, IGNORE them, we want the other two! C. On some receivers the filter just plugs in, on others, it must be soldered in. On the latter ones, you usually have to remove a number of screws from the PCB board and carefully lift the board up to get to the underside of the PCB. 3. Examine your crystal. It should have two wires or pins and probably a metal case. If it is a plug in unit and you have the mating socket, install the socket as described in procedure "A". IF the Xtal is a solder in unit, use procedure "B". PROCEDURE "A". 1. Solder a short wire to each of the two Xtal socket pins. If the receiver is equipped for a plug-in filter, push one wire into EACH of the SIGNAL sockets (holes) on the PCB board (Points A and B on the schematic below). NOTE. If the wire doesn't fit the hole (same size a factory filter pin would be) find some stiff wire the correct size and make a "pin". You REALLY don't want to fill the hole with solder because you may want to install a different filter some day. 1A. IF the receiver uses solder-in filters, solder a Xtal socket lead to each of the signal holes in the PCB board (polarity doesn't matter, Xtals have no polarity). 2. Plug the Xtal into the Xtal filter socket. 3. Solder one end of a short wire to the metal case of the Xtal and connect the other end of this wire to a nearby ground connection. This to reduce "blowby" around the Xtal. DO NOT get the Xtal too Hot while soldering this ground lead (do it quickly and cool it off with a damp sponge). 4. Secure the Xtal to the PCB board with some Hot Glue or other good adhesive. (I don't recommend JB Weld or other Epoxy as you may want to remove it some day). PROCEDURE "B". 1. This is exactly like procedure "A" above, except that instead of installing an Xtal socket first, you are working directly with the leads on the Xtal. 2. If they fit and reach, put one Xtal lead in each of the two "Signal" holes on the PCB board (Points A and B in the schematic below) If the set uses solder in filters, Solder the connections . 3. Solder a ground lead from the case of the Xtal to a convenient nearby ground point on the PCB. 4. Secure the Xtal as in Procedure "A" above. Move any jumpers the manual says to move to activate that filter position (If it's a newer radio it MAY be a menu item). CHECK YOUR WIRING FOR SHORTS AND BAD CONNECTIONS, GENERAL WORKMANSHIP. Reassemble the receiver, being sure to connect any wires removed to facilitate PCB board work. Test the receiver by tuning in a CW station. USE THE FILTER that you previously used for CW to make sure all is functional as it should. Switch in the new filter and retune your receiver for maximum reading on the "S" meter. It probably WON'T be in exactly the same dial position that it was previously. IF your receiver has PBT (Passband tuning) or IF shift, you may be able to adjust that for better performance. Each rig will perform slightly differently. SCHEMATIC: Points "A & B" are the receiver filter "signal" points while "x" denotes the pins or wires on the Xtal. The red lines depict the connections.
Melt
Some Solder!

|