|
A Quadrifilar Helix Antenna for 137 MHz
By George Goodroe, KF4CPJ
After I became a licensed amateur radio operator in August of 1995, I received a QST magazine which had an article that explained it was possible with the right antenna, the Quadrifilar Helix antenna (QHA), to receive the 137 MHz weather satellite transmissions. The article that I read (1) was by an amateur by the name of Buck Ruperto (2), who one year later wrote another terrific article about a program called WxSat (3), that decodes the satellite transmissions (4). After several e-mails back and forth with Buck, I decided to build it. The antenna had fairly good coverage however it was tough to tune and didn't resonate at the optimum 137 MHz. The received pictures were good however they displayed several deep nulls that always appeared at the same place on the files. I can't lay the blame on Buck; his design was good it was just tough to replicate.
Over the next year I worked hard to find other outlets for antennas and discovered a web-site (5) that offered plans for a QHA that seemed easier to build. The elements were fashioned from 3/8 soft copper and had known dimensions. After studying the bill of materials and spending ½ a day scrounging for parts, the antenna went together in about 2 ½ hours. The first pictures that I received displayed marked improvement and I have subsequently built a 2nd QHA for another WxSat enthusiast here in central Florida.
The web-site is very specific about the details involved in building each antenna and I use their instructions specifically to build each unit. My hat is off to Steve Blackmore who wrote the web-site and provided all of the detailed instructions and illustrations (6) of the John Boyer (7) design antenna that is listed here.
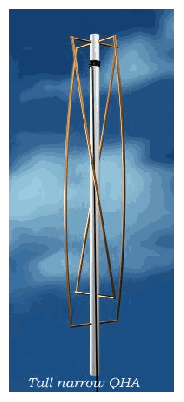
The finished model should look like the one labeled "Tall narrow QHA" at the top of this page.
Element Dimensions
- Mast - 1.5m of 32mm (1 1/4") PVC waste pipe.
- Elements - 8mm (3/8") mini-bore soft copper tube - 8 copper elbows for the corners.
- 2 - 190mm lengths - bottom horizontal tubes
- 2 - 903mm lengths - short helix elements
- 2 - 1002mm lengths - long helix elements
- 4 - 90mm lengths - top horizontal elements
Note - these are cutting dimensions and assume that 90 degree elbows NOT bends are used - The dimensions on the drawing are from center to center of the respective elements - you may have to adjust your cutting sizes accordingly.
- 4 self-tapping screws for feed.
- Suitable length of RG58 or UR43 for balun and feed.
- 32mm cap to plug top end of mast.
Drill 4 - 8mm holes at 90 degrees to each other 25mm from the end of the mast - make sure the holes are Square and in the same plane!
Mark and drill the bottom holes remembering they are in opposing pairs spaced 100mm apart - you're advised to check the measurements at least twice before drilling!!! Drill a 7mm hole near the top of the mast for the cable entry.
Drill pilot holes in the 4 top elements for self-tapping screws and assemble top tubes, push coax through hole and make top connections with screws.
Wrap the coax 4 times around the mast to form the balun and tape/glue in position. Push the elbows onto the top tubes and measure from the center of each leg - it should be 200mm, you may have to cut more off if you used swept bends rather than tight 90-degree elbows. I bought some small cotter pins. During construction they keep the horizontal elements in place...on top I have the cotter pins inside and outside the 1 1/4 PVC...refer to the picture above (8).
Assemble bottom tubes, make sure they are central and square to top tubes. Bend helixes to suit - tip - try and find a former of some type; a suitable log or large pipe makes the bends nice and neat. When your happy with the shape solder up the elbows. It should appear circular when viewed from the end. Check the connections and cap the top end of the pipe. The copper tubes can be fixed to the mast using glue/silicon sealer and/or tape - make sure you seal the coax entry hole. Push a suitable piece of wood up the bottom end to avoid crushing the PVC tube too much when clamping to the mast.
Be sure to build the antenna with the elements twisting in the right direction. The first time I built it I didn't, which resulted in an antenna 180 degrees out of phase…trust me when I say it doesn't help the picture quality!
The NOAA 12 image taken in September 1998 at the end of the article is just one of many fine WxSat images that I have taken down live on the satellites daily passes.
When all is said and done, you should have an antenna that resonates dead on at 137 MHz and will serve you for many years with no real service required.
(1) QST August 1996, Build a Quadrifilar Helix Antenna by Buck Ruperto
(2) Eugene Buck Ruperto, W3KH - [email protected]
(3) WxSat by Christian Bock - http://ourworld.compuserve.com/homepages/hffax/toc20.htm
(4) QST August 1997, An Easy Way to Copy the Weather Satellites by Buck Ruperto
(5) http://www.personal.u-net.com/~pilotltd/qha.htm copyright 1998 Steve Blackmore
(6) All illustrations by Steve Blackmore - [email protected]
(7) John Boyer - [email protected]
(8) Photos and article by George Goodroe - [email protected]
|
|


