Mobile Camera Mount
by Horace Bushnel, W5TAH
Click here to view camera mount pictures
by Horace Bushnel, W5TAH
Click here to view camera mount pictures
Have you ever wished you had a way of using your camcorder while rolling down the highway? After all, it takes two hands to drive safely (unless you are one of those efficient folks who are also smoking a cigarette and using the cell phone while driving). Wish no longer. I have just solved your problem. If you don't mind doing a little fabrication.
Of course, you might wish to fold up a bath towel, or even use a sand bag, placing either one on the dash, then laying your hard-to-come-by camcorder upon it, hoping to collect some good video as you cruise down the highways. Don't do it! First thing you know, something suddenly requires you to stomp on the brake and your precious camcorder becomes an un-guided missile! It is also rough on windshields.
Taking all of the above into consideration, as well as the fact that the XYL is not exactly into camcordering, I decided to see what I could find in the junk box that might be the basis of a safe camera mount. Here is what I found:
One piece of aluminum plate, 3/16 inch thick, by 4-1/2 inches wide by 5-7/8 inches long. It could have been larger or smaller and it would have been just as good.
Going to the local hardware store, I found they stocked aluminum strips, 1/16" thick, 3/4" wide, about 36" long. Thicker, say, about 1/8", would have been much better, but in the end, I found 1/16" thick is usable
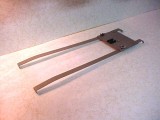
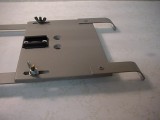
The idea was to make a mount that fits a Pontiac Montana. It should be easy to make the finished product fit just about any vehicle. There had to be a way to loosen or tighten the total length so as to "hook onto and tighten by shortening". You may see how this was done by studying the picture furnished.
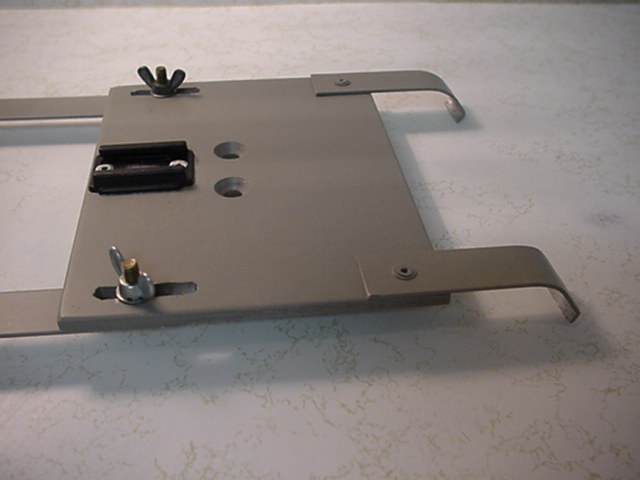
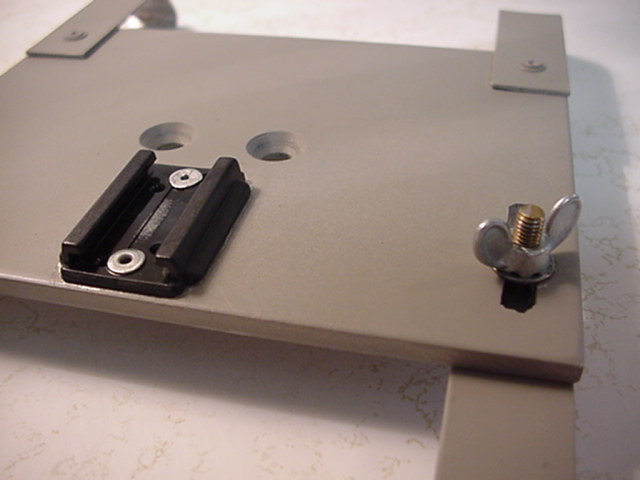
Two (2) 1-1/8" x 3/16" slots are cut in the foward part of the base plate. These slots permit the "forward" arms to be adjusted and tightened.
Two forward arms were then prepared. For my mount, they were cut 16-/12 inches long. 1/2" of the foward ends were then folded down approximately 95�, to permit hooking into the windshield right and left defroster outlets. 3/8" from the rear end of these arms I drilled holes just a fraction smaller than the 3/4" #10-32 machine used to attach the arms to the base plate. A star washer was placed on each screw and the screws were then screwed upward through the arms until snug. The screws were then inserted upward through the slots, and flat washers and wing nuts were attached. The two rear arms were cut 3-1/4" long, before drilling and bending. The arms are attached to the base plate by use of pop rivets. Holes for the rivets are 1/2" from the foward end and the holes in the base plate are 1/2" from the rear of the base plate, so the rear arms overlap the base plate by 1". The arm extends straight back from the base plate 1" before beginning it's 45� downward bend. The last 3/16" of the amrs are then ment sharply, 85� to 90�.
A the extreme ford center of the base plate I attached a camera accessory shoe. You will have to find a source for this. Perhaps any camera store.
After the assembly was completed, I discovered camera mount reflections in the windshield are a problem. I ended up spraying it a dull finish paint nearly the same shade as the dash. The holes behind the accessory shoe are unused. Good place as any to park your chewing gum.
You may find a problem with your camcorder mounted so close to the dash. If so, a camera store may supply you with a extension which raises the camera about 3 inches.
As I stated before, there should be little trouble adapting this mount to any other vehicle. It all depends on how badly one wants a mobile camera mount. Good Luck!
Of course, you might wish to fold up a bath towel, or even use a sand bag, placing either one on the dash, then laying your hard-to-come-by camcorder upon it, hoping to collect some good video as you cruise down the highways. Don't do it! First thing you know, something suddenly requires you to stomp on the brake and your precious camcorder becomes an un-guided missile! It is also rough on windshields.
Taking all of the above into consideration, as well as the fact that the XYL is not exactly into camcordering, I decided to see what I could find in the junk box that might be the basis of a safe camera mount. Here is what I found:
One piece of aluminum plate, 3/16 inch thick, by 4-1/2 inches wide by 5-7/8 inches long. It could have been larger or smaller and it would have been just as good.
Going to the local hardware store, I found they stocked aluminum strips, 1/16" thick, 3/4" wide, about 36" long. Thicker, say, about 1/8", would have been much better, but in the end, I found 1/16" thick is usable
The idea was to make a mount that fits a Pontiac Montana. It should be easy to make the finished product fit just about any vehicle. There had to be a way to loosen or tighten the total length so as to "hook onto and tighten by shortening". You may see how this was done by studying the picture furnished.
Two (2) 1-1/8" x 3/16" slots are cut in the foward part of the base plate. These slots permit the "forward" arms to be adjusted and tightened.
Two forward arms were then prepared. For my mount, they were cut 16-/12 inches long. 1/2" of the foward ends were then folded down approximately 95�, to permit hooking into the windshield right and left defroster outlets. 3/8" from the rear end of these arms I drilled holes just a fraction smaller than the 3/4" #10-32 machine used to attach the arms to the base plate. A star washer was placed on each screw and the screws were then screwed upward through the arms until snug. The screws were then inserted upward through the slots, and flat washers and wing nuts were attached. The two rear arms were cut 3-1/4" long, before drilling and bending. The arms are attached to the base plate by use of pop rivets. Holes for the rivets are 1/2" from the foward end and the holes in the base plate are 1/2" from the rear of the base plate, so the rear arms overlap the base plate by 1". The arm extends straight back from the base plate 1" before beginning it's 45� downward bend. The last 3/16" of the amrs are then ment sharply, 85� to 90�.
A the extreme ford center of the base plate I attached a camera accessory shoe. You will have to find a source for this. Perhaps any camera store.
After the assembly was completed, I discovered camera mount reflections in the windshield are a problem. I ended up spraying it a dull finish paint nearly the same shade as the dash. The holes behind the accessory shoe are unused. Good place as any to park your chewing gum.
You may find a problem with your camcorder mounted so close to the dash. If so, a camera store may supply you with a extension which raises the camera about 3 inches.
As I stated before, there should be little trouble adapting this mount to any other vehicle. It all depends on how badly one wants a mobile camera mount. Good Luck!
The photographs show the mobile camera mount.