Dane County ARESA Standard 12 - Volt ConnectorOperating during an emergency or public service event would be much easier if everyone used the same power connections. Here is a standard that many clubs and individual hams around the country are using. By Michael L. Ardai, N1IST Imagine the following scenario: You're stationed at a Red Cross shelter during a blizzard and your battery dies. You borrow a gel cell from another ham and try to connect your radio. To your dismay, the plugs don't match. It could be worse. What if the plugs match, but the voltage polarity in reversed? BZZZT! Your radio suddenly pours out all "magic smoke" that makes it operate! A Standard Connector To make it easier to share equipment during emergencies and at pubic service events, the Boston Amateur Radio Club adopted the Molex 1545 series two-pin connector as its standard low-current 13.8 volt connector. This connector (also recommended by the ARRL Field Organization) is a polarized connector rated at 12 amps, and can be used on mobile rigs (50 watts or less) as well as hand held radios, TNCs, laptops, and other portable equipment. The 13.8 volt rating is nominal; most portable equipment can handle between 10.5 volts (from an almost dead gel cell) and 14.5 volts (from a running car). If your equipment requires exactly 12 volts, or could be damaged by connecting it to a cars electrical system, you could add a regulator to the power cord. Molex 1545 connectors are available at Radio Shack (part number 274-222) or from any large electronics distributor. The Molex part numbers are:
The Boston Amateur Radio Club, along with the MIT UHF Repeater Association, made a bulk purchase of connectors for resale to its members. They recommended that members adopt this connector as their standard. Its a good idea for you and the members of your club or group too. Wiring the Molex Connector Molex connectors have crimp-on pins. If you don't have the proper crimping tool, you can solder the the pins directly to you power cable. Simply strip an eight of an inch of insulation form the end of each wire. Fold the inner crimp tabs of the connector over the bare wires. Fold the outer tabs over the insulation. Flow solder into the inner set of crimp tabs. Use 18 gauge or thicker wire, making sure the wire can handle the maximum current available from the source. For long cables, use thicker wires to minimize voltage drops caused by the wires resistance. If possible, use two conductor wire, or fasten the two wires together with some sort of sleeving (expandable nylon braid, heat shrink or spiral wrap work nicely). Cable ties work well for short adapters, but shouldn't be used for longer runs, since its too easy for the cable to get tangled or snagged.
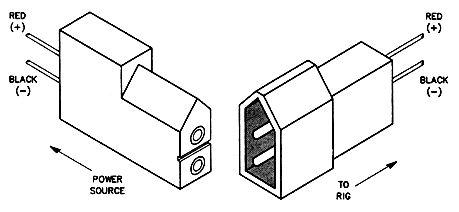
The Molex receptacle with female pins should be placed on the cable connected to the power source (battery, power supply, cigarette lighter plug and so on). The Molex plug with male pins is attached to the cables that connect the various devices you wish to power (the loads).The receptacle is the connector that fits inside the plug. Its pins are closely surrounded by plastic. The plug, on the other hand is a shell with two pins exposed inside. In all cases, the triangular end of the connector should be wired with the positive wire in that end. (see figure 1) In addition to cables for your power supply and radio, make up a cable with a Molex receptacle on one end and medium-size insulated alligator clips on the other. This may come in handy since many trucks and vans used for emergency transport don't have cigarette lighter sockets or other convenient points to obtain power. Always place a fuse in the positive lead of all cables that attach to power sources, and tape spare fuses to the cables. For cables that connect directly to automobile batteries, be sure to fuse BOTH power leads. This prevents starter current from flowing through your radio if the wire between the battery and the cars chassis opens! Label all connectors according to the current capacity of the supply, or the current required by the load. This helps users avoid overloads in the field. Its also a good idea to add your call sign to the label so you will have a decent chance of retrieving it after the event. If you are making an adapter with a non-Molex connector on one end (for a transmitter that uses an unusual power connector for example), label the polarity and indicate the devise the cable was made for. Red nail polish works nicely for marking the positive sides of connectors. The trick to establishing a useful standard is dedication. Don't violate your groups standard by creating cables with reversed polarity or nonstandard voltage specifications. Someone may think its a standard cable and try to use it. (Won't he be in for a surprise...) For safety's sake, always check polarity before using someone else's cables. You can easily destroy your equipment if you don't take reasonable precautions. We as amateur radio operators need to be ready when we are needed to help in an emergency or other situation that requires communications. By using standard equipment like this, we can insure that an event that will go smoothly and provide a useful service to those in need. |