Tips and Tricks to Homebrewing Heavy Duty Mobile Mounts
One of the biggest challenges to running HF mobile
is the installation of the antenna. The smaller monoband whips generally
don't represent a big challenge, but when you move into the class of bugcatchers
and screwdriver antennas, mounting choices seriously decline. Coupled with
the compactness of most automobiles, the problems end being not worth all
the hassles! ALL IS NOT LOST! With some ingenuity, guts, and a couple of
sharp drill bits, it is possible to design, fabricate and install a heavy
duty mount, not leave any visible holes and cost next to nothing! Here's
how you do it:
First Things First
Spend time with the outside of your vehicle. Probably
just as much time, or even more that you did in installing the rig itself.
The margin of error in installing antenna mounts is near nil. One simple
mistake, and you'll owe the YL big time! Start by removing tail lamp assemblies
and looking what's behind them. Pay close attention to fit between the
body and the assembly. The gap(s) there may be enough to wedge a good sheet
of aluminum. Look for any flat surfaces that you can drill and bolt through.
Keep in mind that for the heavy duty mounts, you'll have to brace BEHIND
the body as well. Don't overlook decorative plates, trim, anything that
is screwed into the body. It's always easier if the holes are already present,
but don't be afraid of drilling -- you'll be surprised at just how easy
it is to drill in the family sedan.
Curves Ahead!
You've found a place to install your homebrew mount,
it has a flat place to mount it, but there are some curves and custom shapes
that will need to be cut. Don't worry! ( Are you tired of me saying that
yet?? ) All it takes is some paper and pencil.
What??
Yes, that's right! Don't even think about carving into
your ride just yet, you still have some planning and development to do.
Get yourself some poster board and some pencils. You'll be making a paper
mount and backing first and use that as a template for cutting and drilling
your sheet metal. After some playing around, my paper templates looked
like this:
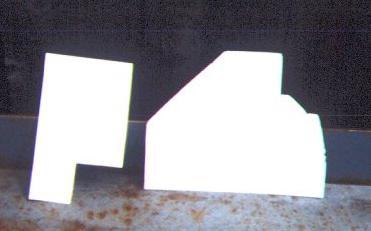
Notice that I had some tough curves inside the tail light assembly.
The template on the left is the backing that braces behind the body for
the mount. The backing template is rightside up BTW. The one on the right
is the actual mount that fits inbetween the tail light and the body. It's
backwards and upside down tho'. The right side of the mount is what goes
inside the body, and the left will be outside. Keep trimming and it will
be evident on where to mark the holes to be drilled for the bolts.
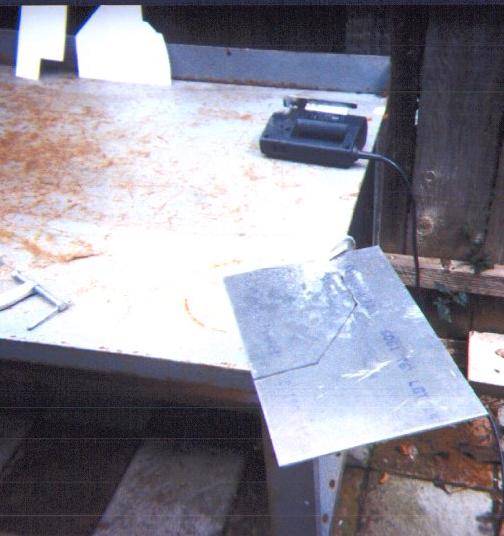
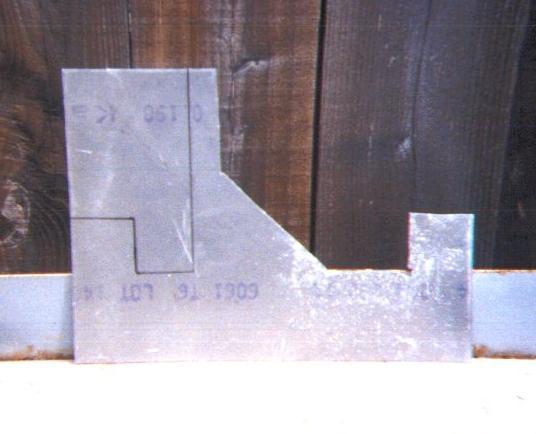
Cutting out the Mount
OK, now it's time to lay the templates out and outline
them onto your sheet metal. What kind of sheet metal?? Well I went down
to my local industrial metal supply house and spent $2 USD for a piece
of .22" T-6061 aluminum sheet. That's about as thick as I can go with using
standard hand tools. YMMV, so use your best judgement. Here's some cutting
pix:
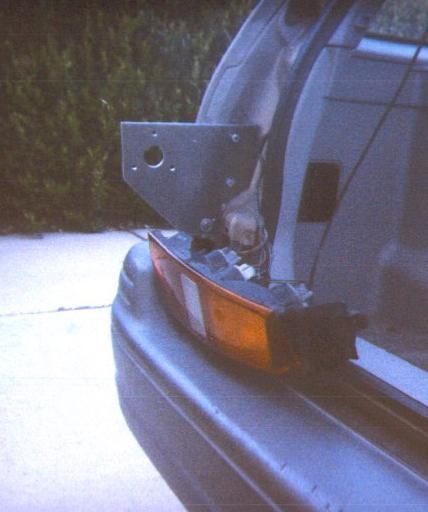
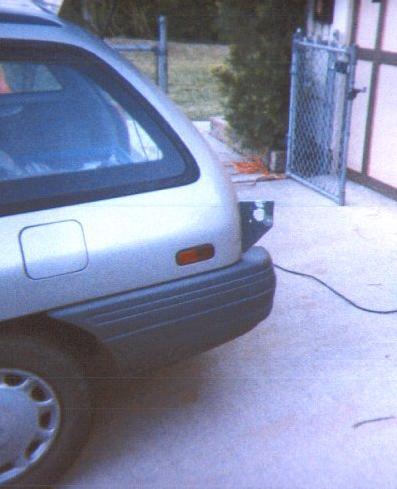
The Installation
Doing the actual installation is the fun part! If
you were careful in designing your templates, then there shouldn't be any
surprises when trying to install it into it's final resting place. When
choosing bolts, nuts, washers, etc. I went for broke and used only stainless
steel hardware. The mount went through a rather wet Southern California
winter just fine. Also, when tightening it for the first time GO SLOW!
Don't crank it all the way tight too fast, you could end up creating creases
in the body. From time to time, check to make sure that it isn't working
it's way loose. Once it was installed, I could actually stand on it and
it would support 195 pounds! Not too bad for $2! With some additional aluminum
angle brackets, I was able to have it fully articulated. That way I could
be sure the screwdriver antenna was plumb. Also, since all the holes in
the body were hidden, when the mount was removed, there was no indication
that anything had been installed.
Here's some more pictures:
Conclusion
Just keep in mind that running HF mobile is a process
that can take considerable time to finish. I can tell you, when you're
finished you'll have a setup that works well, and other will be astonished
at what you've done!