ALL PHOTOS ARE CLICKABLE
FOR A LARGER VIEW.
by
Mark Brueggemann
Albuquerque, NM
This SOC meter has proven to be a very useful addition to my EV. While it doesn't give you an actual amp-hour value of remaining battery capacity, it does tell you your *usable* SOC (State of Charge) at any time while in motion. While driving, all that is required is to glance at the meter and see where the needles cross. If it's green you're fine, yellow, you'd better be on your way to a charge, and red, you'd better stop before you reverse a cell. I've been using this meter since July 2000 and now trust it implicitly.
There are no new concepts or advanced technologies here. I'm using what may be considered an unconventional analog meter to graphically display my EV's state of charge by comparing voltage to current under load. As a lead-acid battery discharges it's internal impedance goes up. Hence, the voltage drop across the pack under load will be less at full charge than when 50% discharged, and much less than when fully discharged. By empirically testing the impedance of the pack in the vehicle, then mathematically extrapolating the points inbetween I plotted on the analog meter what the SOC (State Of Charge) was for any point between full charge and discharged. The same information (current and voltage) is available with standard current and voltmeters most EV's have, but my concept allows the SOC to be determined at a glance, rather than having to interpret the data presented on two separate meters simultaneously.
 |
 |
|
SWR/Wattmeter |
as received from MFJ. |
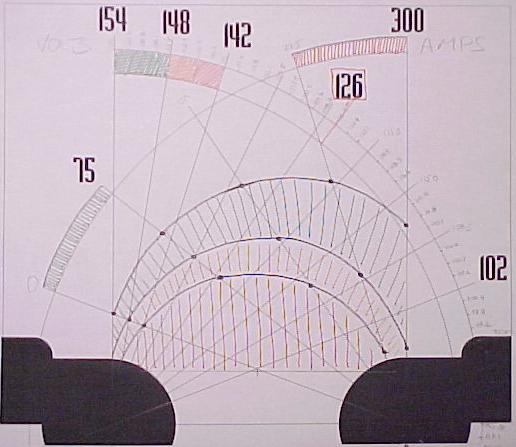
The inspiration to use a cross-needle meter came from my MFJ-817 SWR meter, an instrument we use in ham radio to measure the ratio of transmitted power to power reflected back by the antenna. It has two movements with a common face, each needle with about a 90 degree swing. The meter movements themselves are available as a replacment part from MFJ. One movement I set up to read voltage, the other current. The area where the needles cross in the middle is where I put my computed SOC value graphics. Other data such as power in watts or horsepower could also be put in this area. I chose SOC since getting home is usually the most important to EV'ers! The green, yellow and red shaded areas represent the following states of charge:
GREEN: 100-50%
YELLOW: 50-20%
RED: Less than 20%
These values were derived by empirically testing the pack to determine the 100% SOC voltage drop (so that cables, terminals, contactors and other series components were included), then mathematically calculating the equivalent impedance. The 20% SOC point ("RED" area) wasn't actually measured, it's values were chosen as the "EV rule of thumb" discharge limit of 1.75VPC (Volts Per Cell) at 75A draw.
|
|||||||||||
| SOC | No Load Voltage |
Pack Z | Pack V @X Amps |
0A | 75A | 150A | 225A | 300A | |||
|---|---|---|---|---|---|---|---|---|---|---|---|
| 100% | 153.36 | .13920 Ohms | : | 153.36 | 142.90 | 132.50 | 122.00 | 111.60 | |||
| 50% | 147.60 | .16908 Ohms | : | 147.60 | 134.90 | 122.20 | 109.60 | 96.90 | |||
| 0% | 141.84 | .19920 Ohms | : | 141.84 | 126.90 | 112.00 | 97.00 | 82.10 | |||
Using the table above, I used an old version of Corel Draw for OS/2 to create a new meter face for the MFJ SWR bridge meter movement. I printed it on glossy laser printer stock and glued it over the existing meter face using rubber cement. Colored permanent markers are used to fill in the appropriate colored areas. There are two scales built into the meter. The first is the direct SOC reading in the area where the needles cross. The second is a static voltage graphic on the voltmeter scale. The SOC of a battery that has been idle (not charging or discharging) for at least 3 hours or more may be determined by measuring it's open-circuit voltage. This scale can be used to read the pack's open-ciruit voltage and get a rough idea of the SOC without even turning the vehicle on. This is subject to temperature of the pack, but gives a useful indication of SOC.
 |
 |
|
|
|
The circuitry used is very straightforward. The current meter uses
the
negative-most battery interconnect cable as a shunt, with a 1K ohm pot
in series to set the current reading against a calibrated value. I
would've liked to have used a standard shunt, but these particular
meter movements have an full-scale sensitivity of 165mV, not the 50mV
movement standard shunts require. The voltage side uses an expanded
scale voltmeter circuit commonly found in EV's. Here's the complete
schematic, bill of materials and meter graphics files:
Given the size and quantity of parts, I built the circuit "dead bug" style inline with the cable connecting it to the meter. It looks like a bump of tape in the center of the cable, with the pot adjustment screws peeking out from under the tape (I used 10-turn miniature pots). The assembly should be transferred to a more permanent and waterproof enclosure for long-term installation. Voltage calibration was performed on the bench with a high-voltage power supply and digital voltmeter, the current calibration was performed in the vehicle by matching the readings to a separate 50mV meter and a standard shunt. Since very small changes in the actual shunt used will result in erroneous current readings, I thought it would be best to calibrate it in the vehicle under actual use conditions. That's it! Other than the physical mounting considerations in the vehicle, the "EV Gas Gauge" is ready to use and needs no further user intervention or adjustments.
This is no E-Meter. It will not tell you how efficient your EV is, provide you with streaming data or gather statistics on your pack for you. It doesn't cost $300, either. Even though it's not temperature compensated, I found that it really doesn't matter. When it's cold the meter drops more quickly than when it's warm, thus technically it is reflecting the *effective* SOC you have available to you. Just because it's cold out doesn't mean you reduce your amp-hour draws to compensate. In reality you usually use more amp-hours to overcome stiff tires and lubricants, plus the additional load of a heater. Thus, I've learned to really pay attention to the EV gauge when driving with cold batteries since they deplete that much more quickly. A big plus I've found with this setup is that it reports your SOC after mixed driving and charging cycles. I don't have to do a 100% charge to reset the reading like an E-Meter, I can mix charging and driving during the day and know where my pack capacity is at any given moment. My concept I consider to be the direct equivalent of an ICE's gas gauge. Not an absolute quantitive measurement but a close indication of what I've used and how much is left. Just like in a dino-juice car, if you drive hard and fast the needle goes down more quickly than if you drive slow and easy. More than once I've turned around based on what my EV gauge has told me, and likely prevented me from needing a tow or worse, damaging my battery pack.

Main Page |

Home Page |
