
Two Homebrew Brass Keys
Two Homebrew Brass Keys
This started with the purchase of a surplus parts cabinet that was filled with about 30 pounds of brass pneumatic fittings, regulators, etc. After selling/trading some and giving several pounds away to local club members, the idea of using them to make CW keys surfaced. Brass looks good, it's easy to work with hand tools like a hacksaw, drill, files, and sandpaper and polishes out nicely. The first step was looking and studying the pile of parts to "visualize" a key in there ....somewhere. Once you "see" one, it's time to work out the details. Regardless of how "completely" thought through, all the keys are the result of several tries, finding what works and what doesn't and developing solutions for what didn't work. Maybe throw your hands up and quit for a day or two, but you always come back with something else to try.
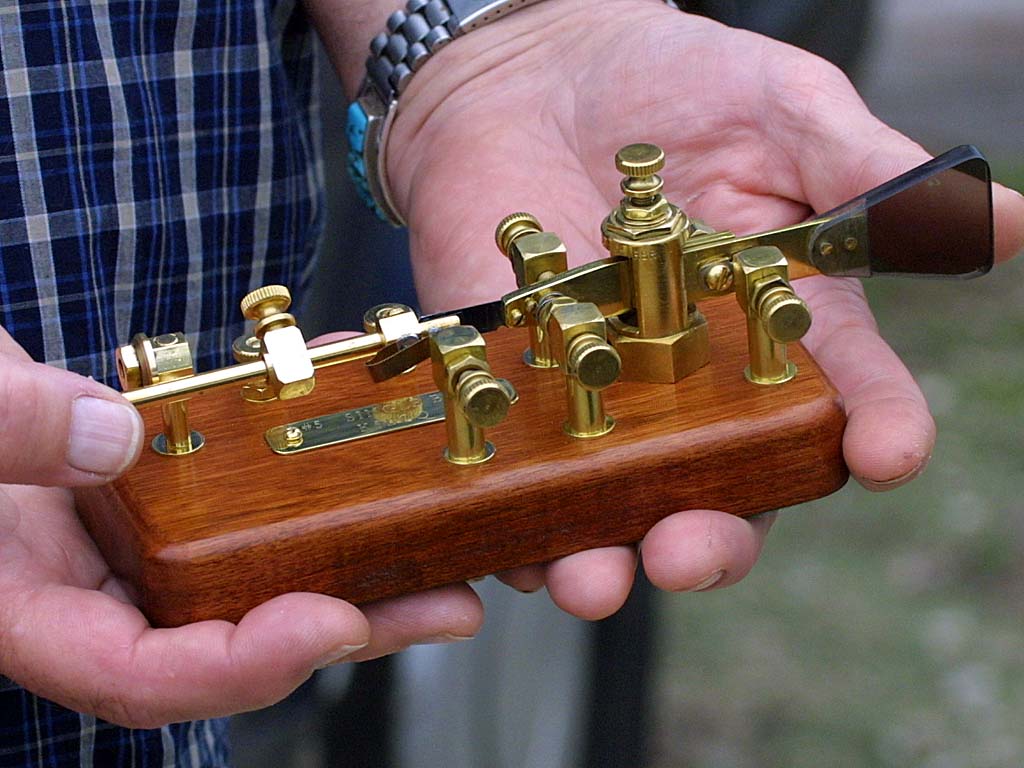
The design point for these first two keys was a set of paddles and a modern J-38 and to build them with minimum rework of the parts on hand and maximum utilization of existing parts (keep additional purchases at a minimum).
These first two brass keys were made from the surplus pneumatic fittings, bearings from the head positioning mechanisms in several scrap PC disk drives (really good bearings), silver contacts off some old relays, pieces of brass brazing rod, some brass flat stock, springs from Credit Union pens (any freebie bank pen will also work), misc brass nuts, screws, and washers from the hardware store, and some Plexiglas. When you scrap out the HDDs take the rare earth (NdFeB) magnets too. You can always use super magnets somewhere. Since relays are plentiful at swapfests, it's also worthwhile to obtain those with real "silver" relay contacts, not those with some kind of plating. Just break the relay apart, drill out the rivet on the contact, and solder it in place. Clean off what solder you might have gotten on the face of the contact with a needle file and 600 sandpaper.
The two paddle iambic keyer has a large brass disk underneath... for weight, and a small picture of Samuel Morse, under the Plexiglas, in the center... for character. The "knob" on the straight key was made from an old military style Bakelite fluted knob by grinding away on it until it "felt right". Drill out one setscrew hole for the shaft; use the other setscrew to tighten. The new knob increased my code speed, but not enough to write home about.
The straight key operation is remarkably smooth and crisp, based on my observations and the comments received from others. The iambic keyer looks a little "bulky" but does work well.

A Homebrew Brass Semi-Automatic Key
Picture with more detail .....picture by John Fisher K5JHF
The design point for this key was to make the "classic" semi-automatic key with substantial rework of the available brass parts as needed, a 3x6 inch base aspect ratio (like the Blue Racer and Speed-X keys), "looks good" hardware proportions (my opinion anyway), and a weighted wooden base. The other, really important, design point was that it work well from 10-20WPM vs the standard Vibroplex 20WPM+. This took some flat spring experimentation. I was able to locate some data on flat spring design, but it was of limited use since I didn't have spring characteristics for my springs but "real hardware does not lie" and lengths of flat spring, clamped in the vise, soon gave me what I wanted.
The brass semi-automatic key is made from the above surplus pneumatic fittings, some brass stock from the hobby shop, silver contacts off relays, a flat spring out of an old radio vibrator, pieces of brazing rod, some misc brass hardware, and a base using some cool looking wood scrap from the local Woodcraft store which I'm told is Brazilian cherry? The main pivot is made from a substantially modified pneumatic pressure regulator. All the knurled knobs also came from pressure regulators. I found that attaching the flat spring to the weight lever can not be done with screws because it will slip (not enough "pinch" force). You must rivet that end and I used small soft nails cut off to the right length with liberal application of hammer. The flat brass stock is attached to the paddle with two small screws after cutting a slot in the available 1/4" Plexiglas with a doubled up hacksaw blade. Pieces of brass tubing hide the 10-32 screws in all the posts.
The work is done with a small drill press, grinder/polisher, hacksaw, several files, sandpaper, and patience. It has lead weight and feet underneath to keep it on the desk. The lead is drilled for access to all the 10-32 screw heads and the bottom is covered with green (classy) stick on felt, available at sewing stores. At first, stick on feet were used but the key rocked side to side. This was changed by cutting holes in the felt and gluing half grommets directly to the lead. Works great, no slip, no rock. It weighs 2-3/4 pounds.
This project was a little more difficult than the others (above) but seems to work well. The next project is a semi-automatic dot AND dash 2X-Bug ??


A Homebrew Magnetic Combination Key
The design point for this key was to make it "two keys in one", use magnetics vs springs, build it onto a brass disk I happen to have, use strap vs wire underneath, be something different, fit in your pocket.
The result is a brass Magnetic Combination Key which is actually two keys in one ....a straight key and a single paddle keyer. It uses the excellent spindle and head positioning bearings from a PC HDD, GOOD rare earth (NdFeB) magnets from a PC HDD, magnetic centering, magnetic tension, a flat spring for the straight key, a large brass disk, and the usual brass parts, silver relay contacts, etc as outlined in the other homebrew keys above. The reason for a "combination" key is that it's something different and to me it's useful. I'll probably find out they had them in 1928 .....
Interesting magnets. They are very hard but can be easily trimmed with a pair of end cutters and the material breaks like ceramic (wear eye protection). You can't cut or drill it with home tools and any heat you generate ruins the magnet anyway. Forgot to remove a brass piece before soldering a silver contact on, it had a magnet on the other side, and sure enough ....the magnet became weaker. The magnet shape is important for centering (you would like two narrow opposing edges) and the best arrangement was two rectangular pieces (1/8" x 3/8") in parallel. With the HDD magnets and the above trimming technique, rectangular shapes are easy to make ....and you will break a few. The only problem encountered was finding a good adhesive for the magnets to the brass. Epoxy failed, super glue has worked "OK" so far. Make sure the surfaces are clean. There will be more projects using these magnets. They are not just for sticking notes to the refrigerator.
The key (shown in the straight key mode) "converted" by turning the rear adjustment until it blocked horizontal movement at the main pivot. The vertical movement, via the flat spring, has a fixed upper limit and contact spacing is controlled by adjusting the lower contact height. Tension is adjusted with a pair of magnets. You can actually turn the top magnet 90deg for "key down" transmitter adjustment. Since the magnets are set to attract, the greatest force is at "0" deflection and the least is at "full" deflection. This gives a crisp feel to the keying. You also don't have the "up" click characteristic of the J-38, just the "down" click. Proper two axis movement at the main pivot is possible due to the physically "long" bearing used.
To convert back to a keyer, release the main pivot stop and set the desired tension, set the correct spacing for the dot and dash contacts, turn the key knob 90 degrees (if you want) and let'r rip. Once you get the right compromise set-up, all you have to do is release the main pivot stop. There is no interference between contact sets since they are separate. That's why four terminals across the back. The underside is clean with only three brass straps for "wiring". Mica insulators, used for power diodes, provide electrical isolation where required. The three feet are stick-ons from Home Depot.

Homebrew Iambic Key Made from Hacksaw Blades
Design point for this key was iambic and fit on an Altoids can with as much lead as I could pack into the base .....and it is quite heavy.
An iambic key which has a really good feel to it. The brass is from various fittings I had laying around. The armatures are made from hacksaw blades, polished, and with the teeth ground off. The interesting thing about this key, in order to make it compact, the contacts go throuh the oposite armature (hacksaw blades are very difficult to drill). The actual contacts are silver relay contacts ....of course. Nice set of paddles and work very well. Same thing the guy who offered me $100 for it, thought. Now I have to make another.

Brown Brothers Iambic paddles
I found the paddles in a junk box and had to do something with them after I found out it was a Brown Brothers mechanismm from the early 60's. Mounted it on a large brass disk (RS/6000 Award) from the IBM Surplus Store.....bought several of them as you can see from the various homebrew keys.
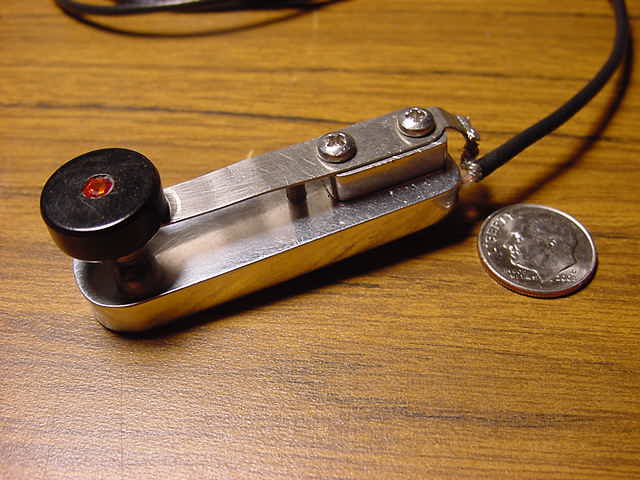
Straight Thumb Key
I wanted to make a key which could be operated in one hand and not require a flat surface to rest it on. You can even operate this one from inside your pocket. N0, it's not called a "Pocket Rocket". This is my first attempt, the next one will be Iambic (more difficult to control the force direction). This one is made out of old relay contacts and a small block of aluminum. The red "jewel" is to give it class.

Homebrew Iambic Touch Key Paddles
Design point for this key was iambic, touch sensitive, and make it as small as possible.
Turns out they have real small Altoids cans too. OK, we'll use that. The electronics are in the base along with as much lead as possible, but the 2-AA cell battery has to be external. The real fun and unusual part is the "touch" contacts. Everyone has seen/used the old FT-243 crystals, so how about that ? If you take two "interesting" faceplates (one has to be from "Texas Crystals) and file the case down to accept two of them .....problem solved. Well, it's a little more difficult, because you have to tap the holes in the phenolic and use very short flat head screws in order to keep the two faceplates insulated from each other. This key works fine, just like it should .....but it takes a while to get used to a "touch key" without any mechanical motion.


Homebrew Iambic Key for the Rock Mite QRP Transceiver
Design point for this key was iambic and fit inside the Altoids can with the RockMite circuitry.
An iambic key on the Rock Mite, INSIDE the Altoids can, would work along the lines of small and self contained ....if it could fit into 1/2" and, sure enough, it will. The construction does get a little tight in there. The Rock Mite PC board has not been added and it also shows the mounting of a microswitch which is used for transceiver selection. Totally self contained except for battery, headphones, and antenna. Those are brass fitting pivot points the relay flat springs are soldered to (after cutting them lengthwise with a jeweler's coping saw).

Sorta Homebrew J-38
This is my original (from 1960) J-38 key with slight modifications. It had the "standard" poker chip under the knob but that got broken somewhere along the way. The key was reversed on the base and back again a few times. A few different screws and terminals, a new knob skirt, and what can't be replaced ...."KN5BCQ" scratched into the bottom of the base.

J-36 Lightning Bug made by Lionel
This is not a homebrew key, it's one of the WWII bugs made by Vibroplex (the "Lightning Bug" design) and also manufactured by other companies to meet wartime requirements. This particular one was made by Lionel, the model train folks. A unique characteristic of the Lionel bug (several minor differences) is that the ID plate was celluloid and is usually missing from the key leaving the 5 small rivets, or the existing label makes a potato chip look flat. This key had no label, so I made one. The artwork is available online, change it to suit, print it on an overhead transparency foil, put a light (white paper) backer on it with heavy clear packing tape, cut it out, locate the rivets relative to the ID plate by indenting it, cut a small hole where each rivet is (smaller than the rivit head), and drive the ID plate over each rivet using a small brass tube which has the inner diameter of the rivet. Took two tries.
When cleaning up some of these keys always start out with soap (Ivory), water, and a toothbrush. Chemicals and cleaners will remove/alter the painted surface texture. Polishing chrome works OK (my opinion), but be careful to not polish through the plating on sharp edges. Be very careful if polishing nickel plate, it's MUCH softer than chrome and easy to "polish through".

Model 1938-B McElroy Standard Speed Key.
This is not a homebrew key either, it's a nice example one of the McElroy bugs manufactured by the McElroy Company. Theodore McElroy was, at the time, the fastest telegrapher in the world (also noted on the ID plate). Historical summaries of the man, the key, and his business are on the Internet. Interesting reading.

J-36 Lightning Bug by Vibroplex
This is not a homebrew key, it's one of the WWII bugs made by Vibroplex (the "Lightning Bug" design) and also manufactured by other companies to meet wartime requirements. This particular one is an excellent example of one made by Vibroplex and it still has the "Signal Corps, U.S. Army" ID plate which many radio operators took home as souvenirs.

Vibroplex Standard Model 1975
This is the most common Vibroplex and many were manufactured.

Vibroplex Non-Iambic Key
This is a non-iambic Vibroplex also known as a "Cootie Key".....I believe.

Special Operations leg key "KY 605/U"

Nice brass key but I don't know what it is ....any ideas ?

Vibroplex Standard DeLuxe Model 1951
A little less common, lots of chrome. This one needs cleaning and polishing.