PK-232 INTERFACING
A PK-232 may be used for CW keying.
See the documentation of that device
for information on connecting the
PK-232 to your computer. If WriteLog will
not communicate with your PK-232,
it may be necessary to do the
editing described below.
Using NotePad edit C:\Windows\writelog.ini
as follows:
In the file, go to the section labeled
[Ports].
Look at the line for the Com port
you intend to use. It will look like this:
COM1:=9600,n,8,1,x
Check to be sure all parameters are
correct, then Delete the final x (but not
the comma). It should look like
this:
COM1:=9600,n,8,1,
Click on File, Save. Then open
WriteLog; this should allow
your PK-232 to communicate with WriteLog.
PORT TYPES
WriteLog is capable of CW Keying your
rig using either a serial or parallel
port and a small interface you can
easily make. So you can use
either type you have free.
Serial ports are designated com1, com2,
etc.,
and use either a 9-pin or 25-pin male
D-shell connector.
Parallel ports (usually used for a
printer) are designated LPT1, LPT2, or
LPT3, and use a 25-pin female D-shell
connectors.
Determine the port you wish to use
for keying and note the type of connector
(male or female) and the number of
pins required, and get a D-shell connector
and D-shell hood for your computer
port.
TRANSCEIVER CHECK
Locate the CW key jack on your transceiver.
The jacks usually require a
¼ inch phone plug. Prepare
a shielded cable with a plug which fits into
your CW key jack which is long enough
to reach to your to your computer port
connector. Plug it into the CW key
jack, and with the transceiver on,
measure the voltage and note the polarity
of your transceiver keying circuit.
Although the vast majority of all
transmitters and transcievers manufactured
over the last 20+ years use positive
TTL or CMOS keying levels, we recommend
that this be verified on your rig
before proceeding. The following circuits
will work for keying voltages up to
about 30 volts; almost all of
recent equipment will be 5 volts.
In all circuit diagrams in this section,
the transmitter connections go to
the CW key jack on your transceiver.
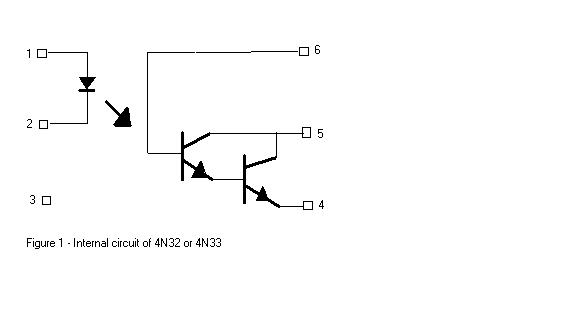
SERIAL PORT KEYING
Either a 4N33 or 4N32 optoisolator
may be used for CW keying of a serial port
(a com port). These two optoisolators
have exactly the same package (6
lead DIPs) and pin connections.
The internal connections for these
optoisolators are shown in figure
1.
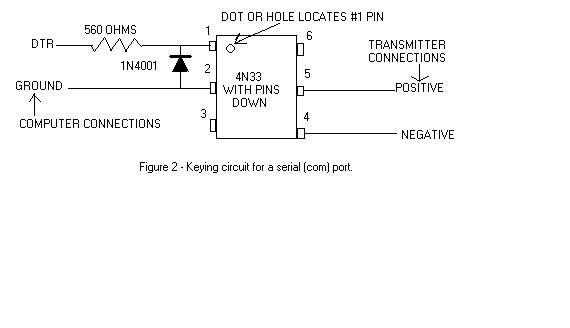
Determine the DTR and GROUND pin numbers
for the serial port you intend
to use by consulting the following
table:
9-PIN 25-PIN
----- ------
DTR
#4 #20
GROUND
#5 # 7
The keying circuit is shown in figure
2.
Pin #3 of the 4N33 (or 4N32) may be
grounded and/or used to support the
unit or components, but pin #6 MUST
have no connection. The circuit may be
mounted in a small metal box (or possibly
inside the D-shell hood). All
cables used should be shielded.
Note that the circuit allows for keeping
the transceiver ground separate from
the computer ground. This is
recommended to prevent RF interference.
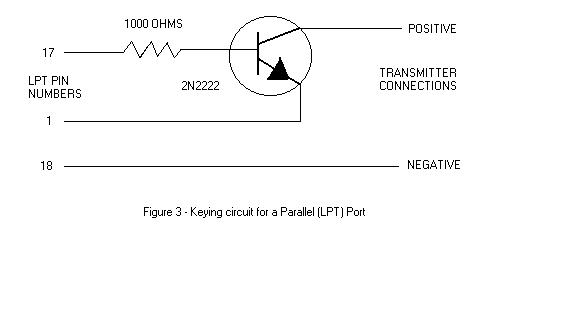
PARALLEL PORT KEYING
A Parallel (or Printer) port is a
25-pin female D-shell connector.
If you desire to key using a parallel
port (LPT1, LPT2, etc.), use the
following circuit: (see figure 3)
Any small general-purpose NPN transistor
may be substituted for the 2N2222.
It should be noted that this arrangement
commons the PC's and the
transciever's ground, and under some
circumstances may lead to RF
interference in the computer.
PROGRAM CONFIGURATION
The WriteLog program must be configured
to operate CW. In order to do this,
click on Setup, Port Setup, under
CW, click on the port you have selected
for keying. Under CW Keyer Type,
click on the the correct keyer type. In
the lower right corner, click on CW
Speeds. Enter the speeds you wish to
use, then click on OK. On Port
Setup, click on OK. Click on Options, then
on Save Configuration to save your
set-up.
On the Entry Window, there is a button
labeled Radio which usually comes up
with 3500 KHz CW when WriteLog is
opened. If the Radio button does not
say CW, click on it, click on CW,
then click on OK before attempting to send
CW. For additional information on
WriteLog CW keying, see these sections
in the manual: "CW Keyboard"
and "CW and RTTY Memory Setup"