Constructing the HAMCOW
The HAMCOW project and web page are both Under Construction, please check back often.
It was determined some number of years ago that the existing radio trailer wasn't going to last forever. The roof had to be repaired almost every year, the walls were rotting from the inside out because of water damage, and it was just too darn cramped inside. So the search began for a new, bigger, better trailer. Patience and some good fortune allowed me to purchase a 1986 mobile office trailer as surplus for a mere $200. The new trailer has a 28 ft. long box on it with a garage door at the rear. Oh the possibilities!
Of course it was going to get torn down and rebuilt nearly from the chassis up. The new trailer originally came with a single axle, and it was mounted too far to the rear which caused a tremendous amount of tongue weight for anybody trying to tow this trailer around. My 2000 Chevy Tahoe squat down almost to the stops when I hooked the trailer up to tow it home. 35 miles or so later, I was home in my driveway, but not without leaving a few scratches in the pavement from the low slung trailer chassis. I wasn't concerned because the trailer itself wasn't very heavy, just the weight was distributed poorly for a regular vehicle to tow around.
The next great score was a free matched pair of trailer axles with the springs, tandem hardware, and several spare tires. I jacked the trailer off the ground, chopped out the old axle, welded in the mounts for the newly repositioned tandem axles, installed a load leveling hitch, and then the Tahoe sat like man's truck should! I think this is going to work!
Of course all of the interior of the trailer was gutted out to the bare studs. Nothing from the old configuration will be used in the HAMCOW.
The next big project was to reinforce the roof. The office trailer was originally constructed with a tin roof laid over 2x4 constructed roof rafters. Since I will be storing antennas and masts on top of the trailer, and will be frequently walking around to load and unload this equipment, this had to be seriously beefed up. This is when W2DAN and myself tore the old tin roof off, replaced some twisted roof rafters, beefed up the attach points of the rafters to the walls, then laid down 1/2" plywood across the entire roof. This was followed up with a single piece of white PVC membrane roofing, which was glued down to the plywood. Now the roof was plenty strong to support a person, durable, and extremely water tight.
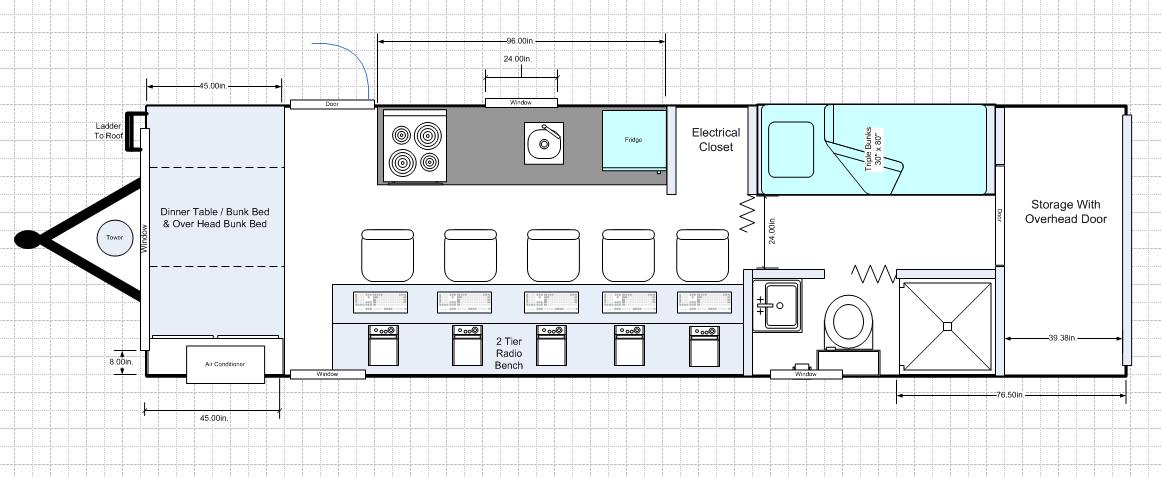
This is the floor plan for the HAMCOW. It includes a triple bunk in the rear, bath & shower, modest kitchen, a dining table that converts to a large bed,
and a large overhead bunk in the front. The radio bench allows room for 5 operating positions, and the electrical closet holds all of the computer
networking, AC load panel, and DC power distribution, along with 525 A/H of batteries. The rear has an overhead garage door and a modest
storage area for things such as generators, BBQ grilles, tools, etc.
The Full List of HAMCOW Features
* Spacious - 28 feet long x 8 feet wide x 7 feet high inside.
* 5 comfortable operating positions, each one has 2 wired Ethernet connections, 4 antenna ports wired
to a coax patch panel, dedicated Astron 50 or 70 Amp power supply, Anderson Powerpole
DC connections,
LED lighting, and AC outlets.
* 3 tier radio bench for power supplies, computers, radios, & accessories.
* 42 foot heavy duty locking pneumatic tower with redundant air compressors (120 VAC & 12 VDC). The tower
guy wires use high quality Aeroquip tension adjusters for rapid deployment, and is topped off with a HAM-IV rotor
and Yagi's for 6M, 2M, 432 SSB/ATV & a tri-band 144/220/440 vertical.
There is a 2nd interchangeable mast
set up for a 5-element Hy-Gain tri-band HF Yagi (10/15/20 Meters) and the 6M
Yagi, or a 903/1295 MHz array.
Tower also sports a canvas cover to keep the elements off the hardware when not in use.
* Antennas for all bands from 160 Meters to
10 GHz!, including a fully automated az/el satellite array.
* 5 Element HF tri-band Yagi for main tower.
* A second 30 ft. guyed tower with rotatable 4-Element tri-band HF Yagi.
* Two 25-foot push up flagpole antenna supports.
* Two roof mounted NMO antenna mounts with 2M/440 whips, but can be used for any
future bands.
* A garage door at the rear with a large storage area.
* Built in
heavy duty ladder to access roof.
* Single piece PVC membrane roof.
* Air conditioning and forced hot air heating.
* Dining area for 4 people that is convertible to bunk space.
* 72 gallons of on board water storage for hot and cold running water.
* Black & Gray water holding tanks.
* Full RV functionality including 5 bunks that can sleep up to 7 people,
a bathroom with a shower, and a fully functioning kitchen. Each bunk has
an AC power outlet, a small fluorescent light, and an Ethernet connection.
* All 12 VDC fluorescent
& LED lighting with 525 AH of on board batteries capable of
powering the entire radio bench if necessary.
Special RFI ballasts have been
installed on primary light fixtures to eliminate noise.
* Multiple fault tolerant DC power supply configuration to insure the
radios always stay on when needed most.
* Redundant AC power generators.
*
Brand New Tandem axles with load leveling hitch, anti-sway bar, and electric brakes.
* Sturdy aluminum roof rack system to store and transport antennas.
* Roof mounted quick-deploy 2M/70cm cross Yagi's with AZ/EL rotor for satellite
operation.
* Dual propane tanks with automatic switching valve when one tank empties.
* Dual pane vinyl windows.
* Privacy doors between operating and sleeping / bathing areas.
* Built in stabilizer jacks.
* 40 Amp continuous duty
switching battery charger with temperature compensation.
*Secondary linear battery charger (Astron RS-70M)
* All oak paneling, trim, and cabinets with Formica counter tops.
* Fully insulated
walls, floor, & ceiling.
* Fold out stairs at entrance.
*
WiFi with high gain external antenna utilizing a up to 5 simultaneous
load-balanced 3G/4G cellular connections
with a Cradlepoint MBL1200 Gigabit router for broadband Internet access.
Dual-Band cellular EVDO
amplifier, band splitter, and dual cellular Yagi's for 800 MHz (Verizon) & 1.9
GHz (Sprint)
* 24 port 10/100/1000 Linksys Ethernet switch.
* Dedicated PC for contact logging & server functions (Utilizing N1MM Logger software)
on it's own UPS.
This server is capable of serving data direct to the Internet over the cellular
Internet connection.
* Roof mounted Raystar flush mounted GPS for feeding the
dedicated APRS station, with Packet, & WinLink.
* HD capable
& XM Satellite stereo system.
* Hurricane anchoring system for entire HAMCOW.
* Commercial grade flooring.
* Vinyl upholstery with custom made cushions & mattresses.
* Smoke / Carbon Monoxide & Propane / Carbon Monoxide detectors.
* Kitchen and camp stove/grill/griddle equipped to feed substantial numbers of people.
* 300 ft. water hose for refilling tanks plus collapsible water jugs for longer
hauls.
* Extensive coax & power patch panel for quick easy hookups.
* Perimeter halogen flood lights & rooftop floods for night deployments.
* Outdoor air chuck with air hose for refilling tires.
* Pneumatic tennis ball launcher for installing wire antennas in very tall trees.
* Portable APRS tracking units.
* Portable 25 Watt UHF Motorola GR-300 Repeater.
* Several Motorola UHF hand held radios for on-site communications
* Two 25 ft. push up flagpole antenna supports on rear of trailer.
* Magic Jack Plus for a dedicated phone line virtually anywhere.
* Samsung 22" 720p LED HDTV
*Ubiquity Bullet High Power WiFi Point-to-Point link.
* Linksys Cable MODEM
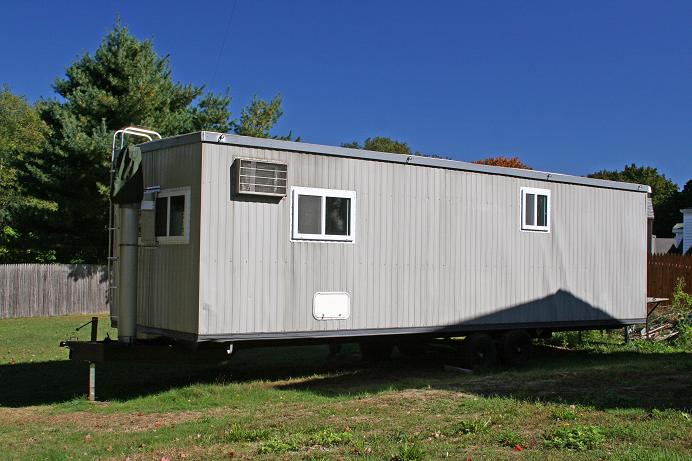
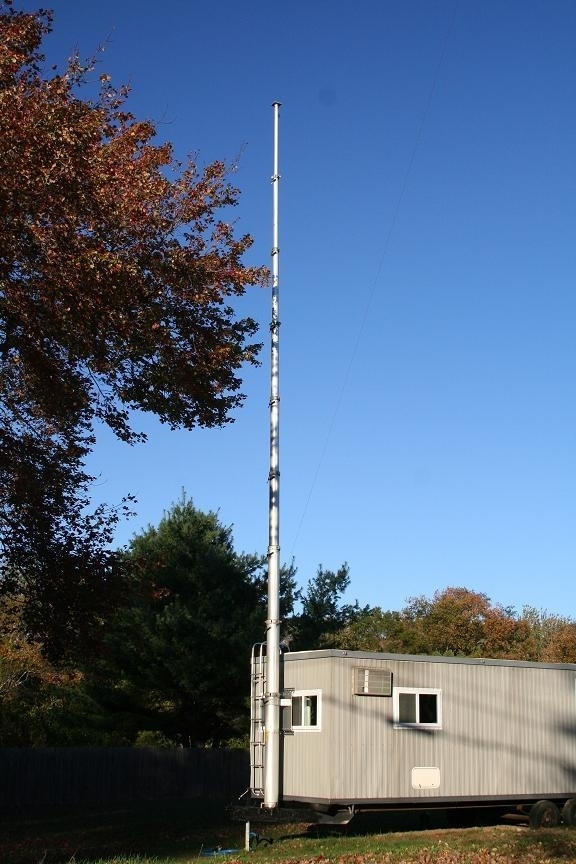
This is the HAMCOW looking fairly finished on the outside. Inside is a totally different story!
Notice all of the brand new Vinyl windows. The hatch door will be the coax cable entry
from the tower.

The trailer was originally built with temporary transport axles, which are the
kind
you use once on a mobile home to deliver it to the trailer park. They were
free
and they got me through 3 seasons. All of that hardware was stripped off
in July of 2010, and brand new Dexter travel axles that were custom engineered
for this chassis, were installed.

Here are the new axles installed with the brand new leaf springs and all new
hanger hardware. Every leaf spring bolt, shackle bolt, and the main pivot
equalizer bolts were fitted with bronze bushings and all points have grease
fittings, which makes for a long life system.
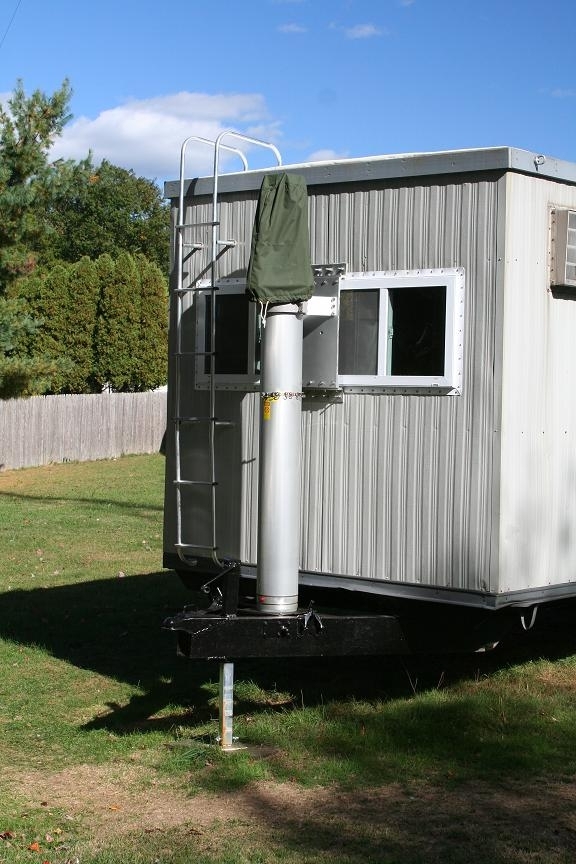
Attached to the front is the awesome Will-Burt 42 ft. locking pneumatic
tower. Each section locks into place. It even comes with a nice canvas
cover to protect the sections from the elements.

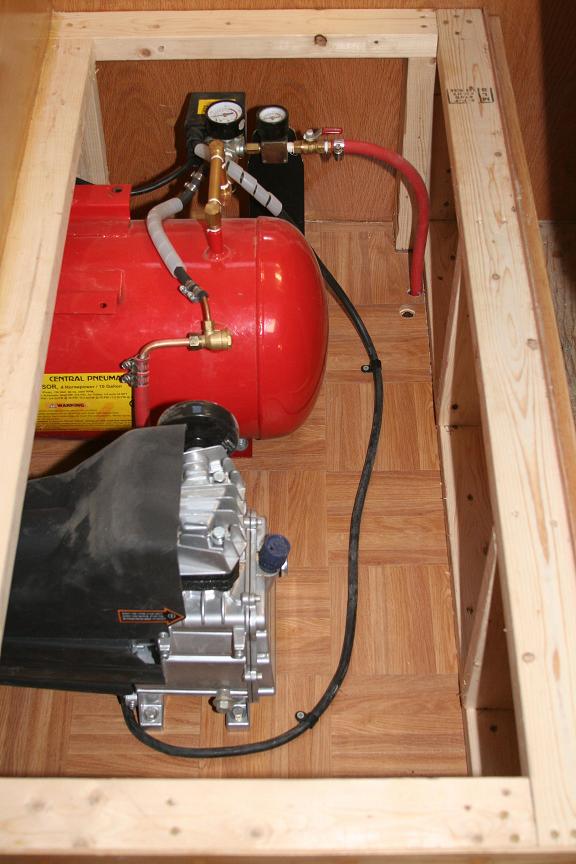
This is the current air compressor and storage tanks for the pneumatic tower. After my
initial test of the tower, it looks like I'm going to need more air storage capacity, but
for now this is fairly adequate. This hardware is installed under one of the dinner
table bench seats.
UPDATE 2/05/2008: The 120VAC 4HP main air compressor is now installed.
The 12 Volt compressor system is now the backup. Telescoping the tower is
mission critical, so dual compressors is a must!
This is the 120 VAC 4HP air compressor that was dismantled and
reinstalled beneath the left bench seat. The wheels on the tank
were removed and I welded mounting tabs in their place. The two
air compressor systems are tied in parallel giving a total of
appx. 16 gallons of storage. The tower deploys so much nicer
with this compressor in place.
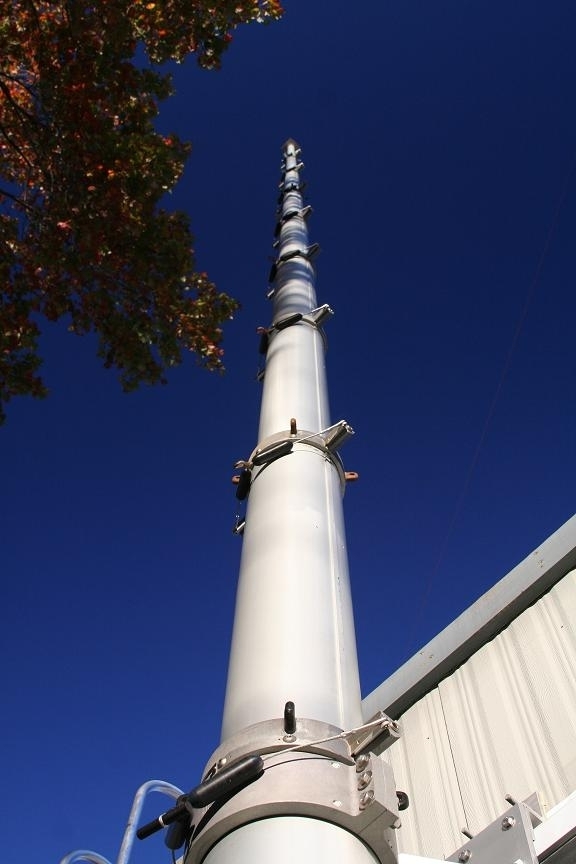
Here is the HAMCOW with a full erection! The tower telescoped up like a dream on my first attempt!
This definitely drew a few looks from the neighbors as they drove by! The fact that it deployed flawlessly
after being in a crate for almost 20 years tells what a quality piece of hardware it really is!
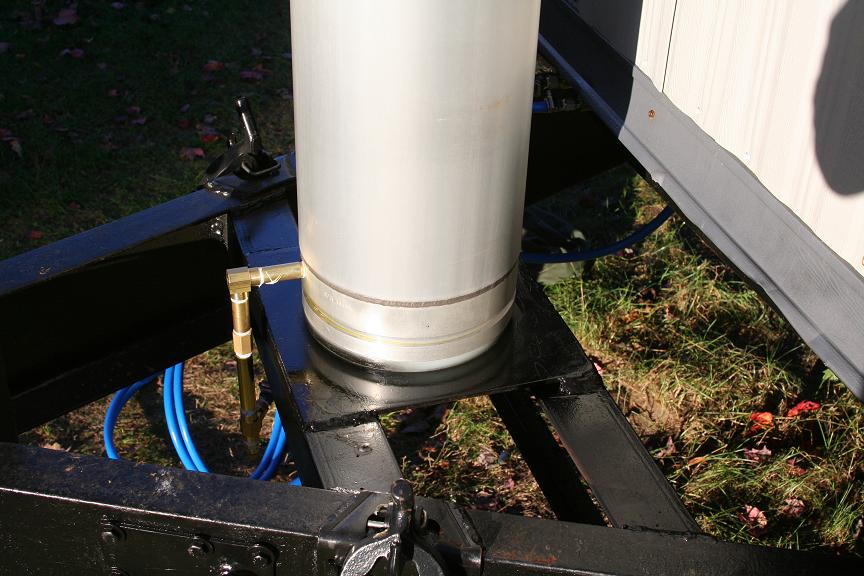
Installing such a heavy tower required a beefy support at the bottom. The bottom of the brass
pipe is the lowest point in the pneumatic system, so I installed a valve to drain any condensation
that develops in the air lines.
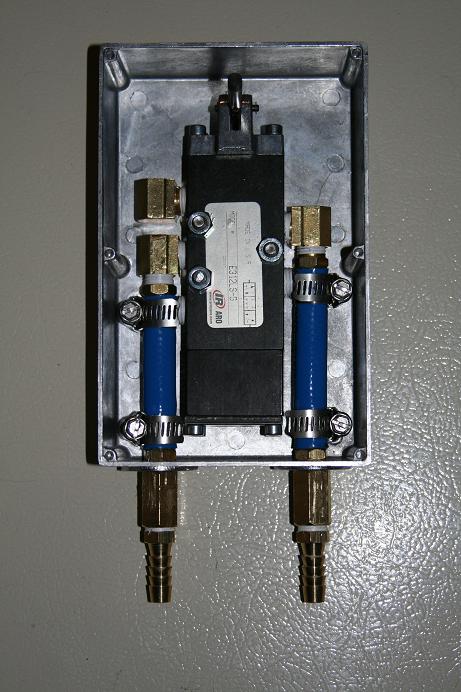

This is my pneumatic control for the tower. It's an Ingersoll Rand industrial air valve installed
in a die cast aluminum Bud Box. This valve allows me to pressurize the tower with the push of a lever, and
release air with a push in the opposite direction. When I release the valve, everything stops.
The hoses attached are long enough so I could actually be standing on the trailer roof and
telescope the tower up and down while doing regular maintenance such as wiping down the
aluminum sections, or lubricating the seals one at a time. The two hoses have standard air chucks
installed that connect to the trailer chassis, and the remote valve can be stored away when not in use.
UPDATE: 5/20/2008 - An air pressure gauge has been installed inside the control
valve so the pressure
inside the tower can be monitored. It's a good idea to make sure the tower
is fully pressurized
before you try to collapse it to prevent a sudden drop when the locking
mechanism is released.
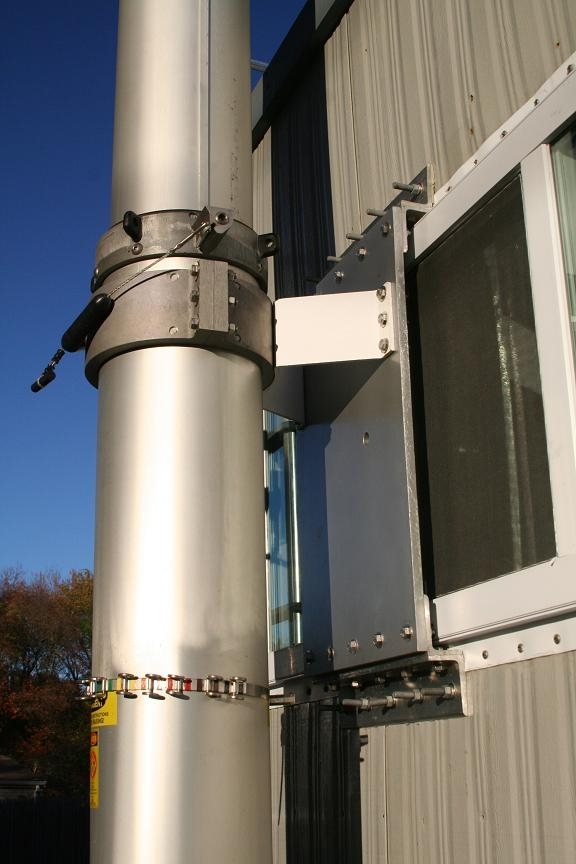
This custom built wall mount was a real hassle. The factory mounting
bracket aligned right in the middle of the window! The offset bracket
is fabricated from a slab of 1/2 inch aluminum plate, and lots of stainless
steel bolts holding lengths of heavy aluminum angle stock together.
The front wall of the trailer is substantially beefed up to handle the
potential loads of the tower being attached.

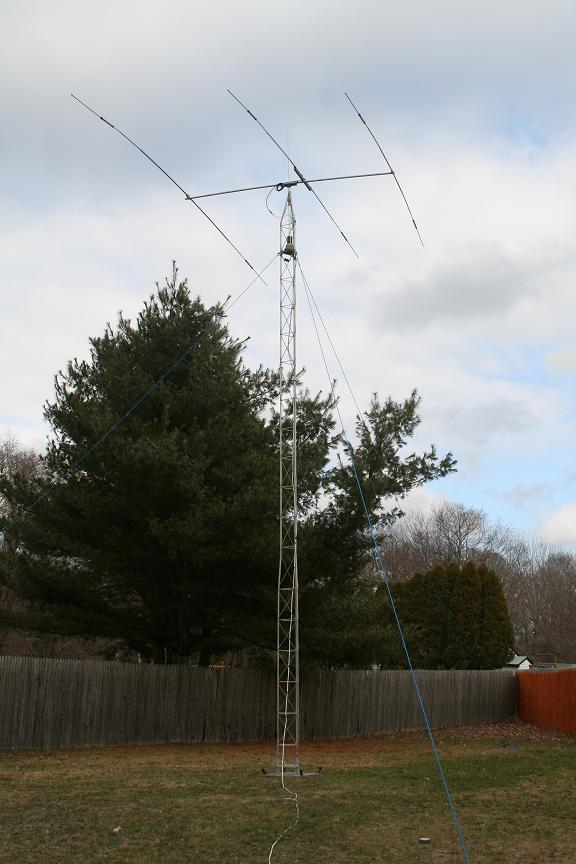
Here is the tower with the VHF/UHF array installed. We have a really cool
snap together 6M Yagi designed by N1JOY, a KLM 13-Element 2M Yagi,
a Directive Systems DSFO-25ATV for 432 & ATV, and a Comet CX-333
Tri-band vertical for 2M/220/440 FM work. Mounted at the base of the
HAM-IV rotor is an SGC-237 antenna tuner configured to drive a
160 Meter dipole, but it easily tunes it on all HF bands for a great
all around HF antenna. The top of the vertical antenna is more
than 60 feet high! The array mast has been configured with
permanently attached U-bolts on clamp saddles, and the Yagi
antennas all have a rectangular boom-to-mast plate installed on them.
Installing the antennas is a matter of laying the antenna plate over
the long U-bolt threads, and applying a set of 5/16" nuts. The
antenna spacing is always correct, the Yagi's always point the same
way, and the prefabricated cables always are the proper length.
One person can assemble or disassemble this array in about 10 minutes!
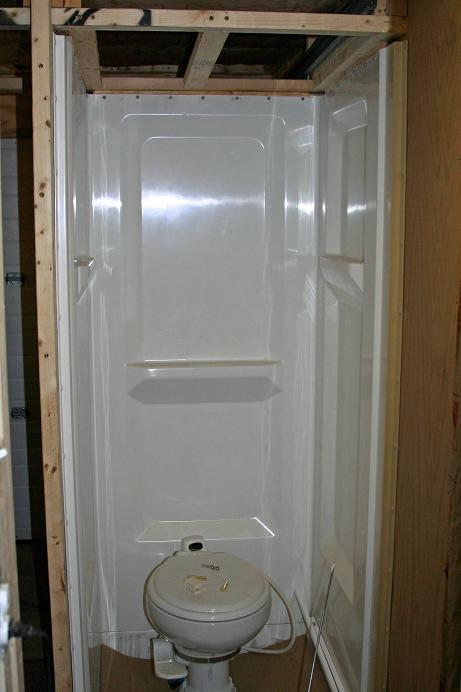
The HAMCOW has a shower! That should help with the
huge problem of stinky Hams on long Vineyard weekends.
Don't mind the toilet, it's only being stored in the shower until
I permanently screw it down after the flooring is installed.
UPDATE 2/05/2008: Just a few minor pieces of molding and the
bathroom is done!
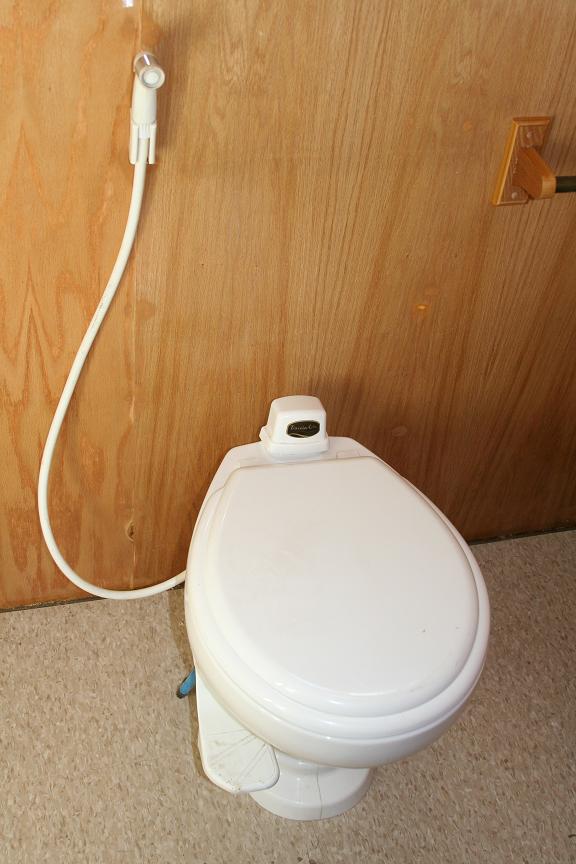
Now the toilet is finally out of the shower stall
and installed permanently.
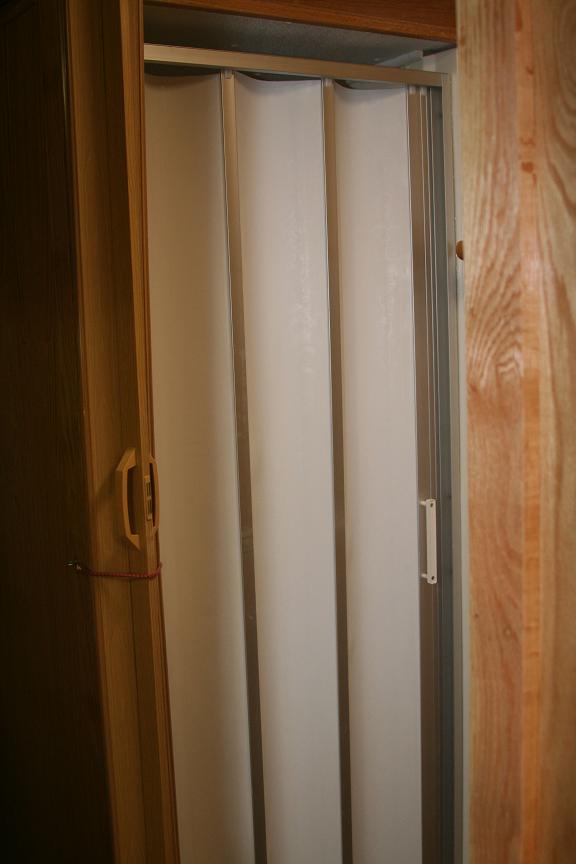
Here you can see the shower door along with the accordion
folding bathroom door.
Check out the hurricane anchors I have installed. They consist
of a 1/2" galvanized threaded rod that goes all the way through
the ceiling in 4 places, to large eye bolts on the outside.
This allows me to secure the trailer to heavy stakes in the
ground all along the roof line.
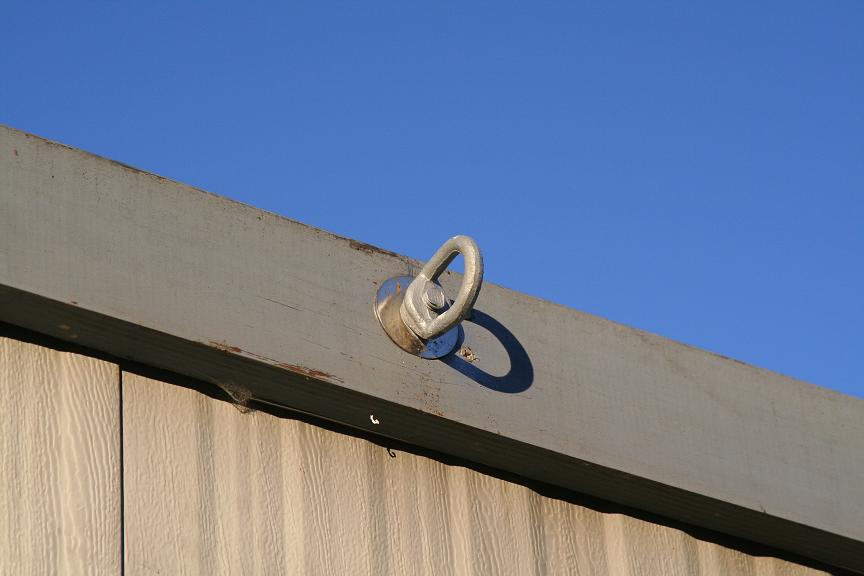
This is the hurricane anchor on the outside. There are 4 on each side of the HAMCOW
to make sure it doesn't blow away or tip over! These in conjunction with heavy duty jack
stands under the chassis will create an incredibly stable platform even in the most
severe weather conditions.
Here are the Black & Gray water tanks waiting for the final plumbing to be done. This was in
the pile of goodies Dave and I cannibalized off a burned out camper at the local RV center.
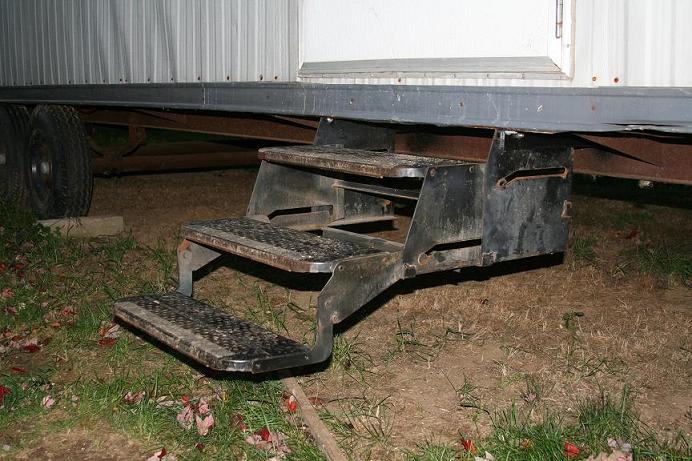
And absolutely the best thing we took off the fried camper was this set of
fold out steps! The HAMCOW is tall and you need them to get in and out! There
is also a 2nd set of steps planned to be installed for the rear garage door, but you
probably won't see that until after the maiden voyage..
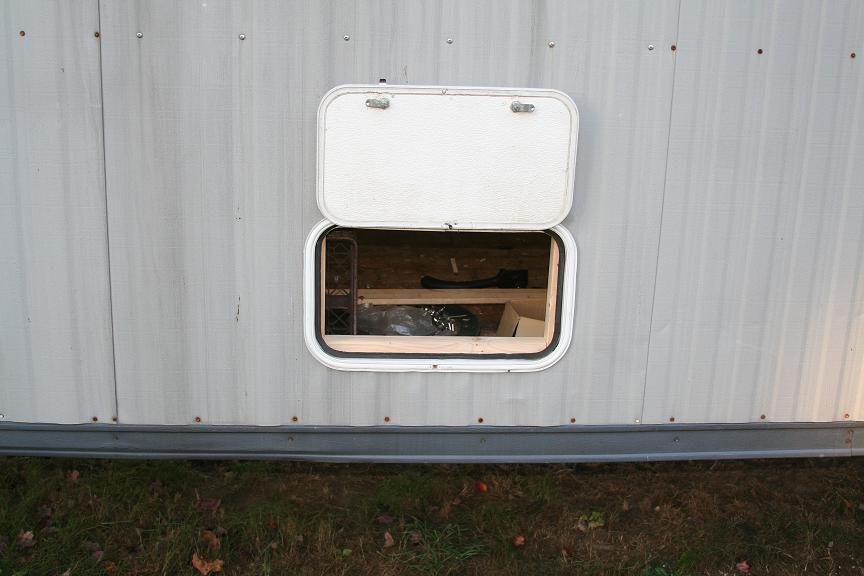
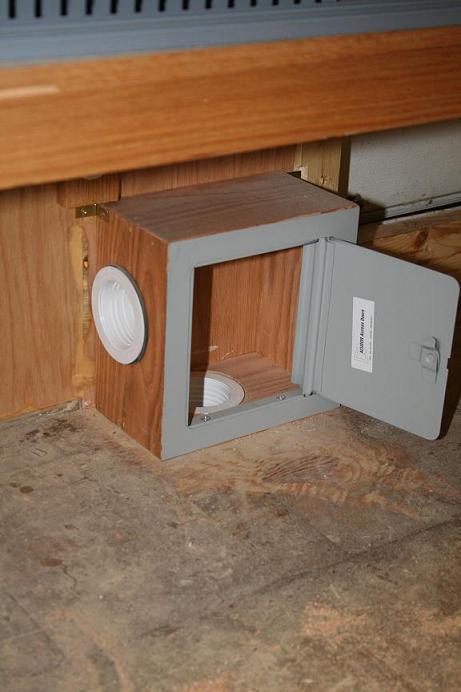
This compartment hatch, also taken from the toasted camper, will soon be the coax cable entry.
Behind the door will be an array of coax connections, DC power, and who knows what else
I'll fit in there. Everything will be designed for quick connections to help speed set up and tear
down times. It's installed directly under what will be the radio bench, so internal coax runs to the
radios will be minimal. I will also have DC power connections that will allow me to recharge the
HAMCOW batteries, or power the radio gear from an external 12 Volt source, such as an
idling vehicle with a set of jumper cables attached. This will be a good contingency plan in
case the generator fails, or we cannot obtain fuel in an emergency situation.
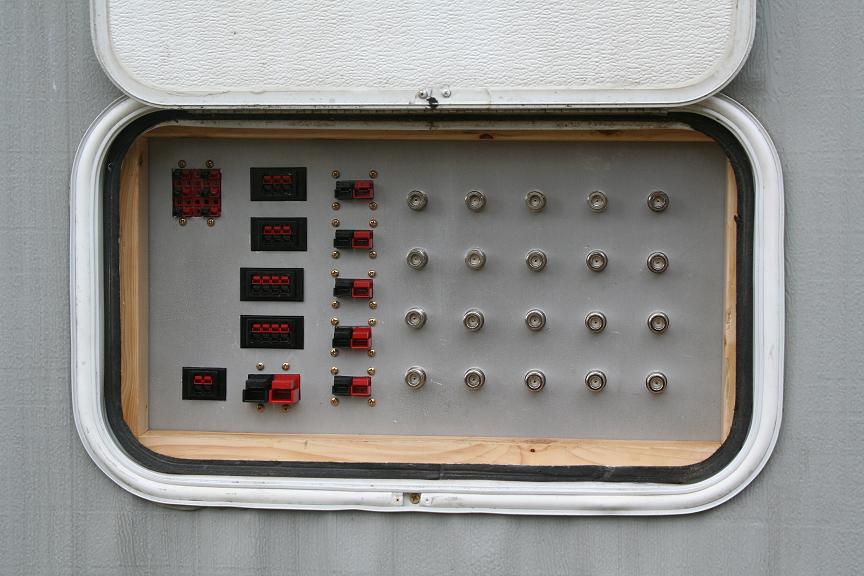
This is the HAMCOW connection to the outside world. The patch panel has 4 coax connections
to each radio operating position, a 70 Amp Anderson Powerpole connection to each Astron
power supply, and a 120 Amp Anderson Powerpole back to the main battery bank. These DC
power connections allow us to do all sorts of cross connecting of the DC power in the event of
a power failure. I have fabricated an "octopus" cable to makes these connections. Failed
power supplies can be paralleled to a good supply, all radios can be easily tied to the battery
bank, or tied to a vehicle for power if the generators have failed. The small Anderson Powerpole
blocks of connections are used to connect in two 8 wire rotors, and the two 6 connector Anderson
blocks are for the Azimuth & Elevation rotors on the satellite array. The remaining block of Anderson
Powerpoles at the top left corner are 12VDC power in case somebody needs 12 Volts to run an
accessory, or wants to set up a rig outside the HAMCOW.
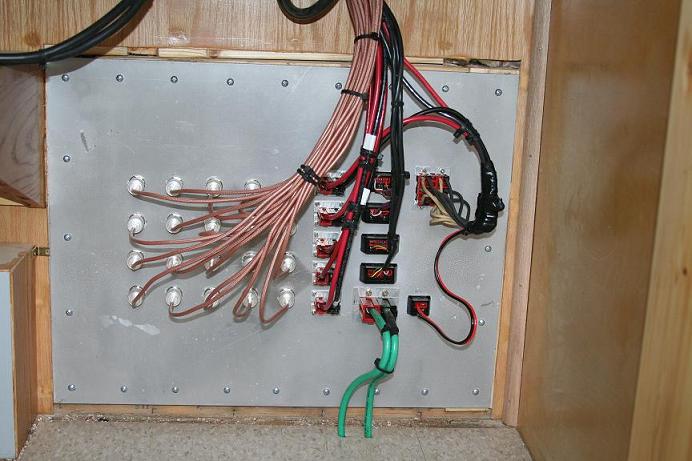
This is the view of the patch panel from inside the HAMCOW. There is a LOT
of wiring going on back there.
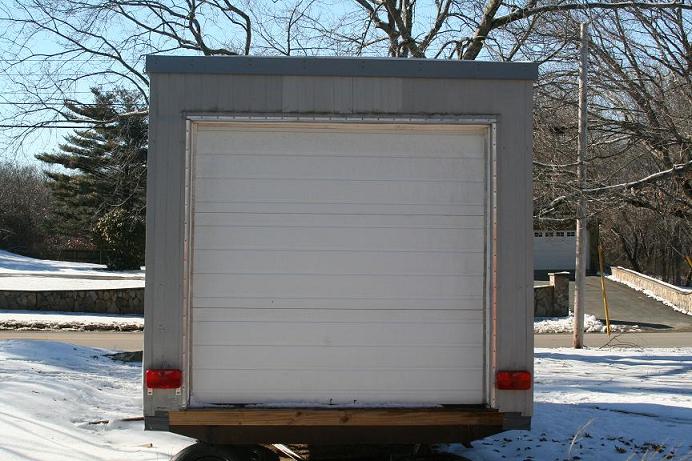
The rear of the HAMCOW has a large garage door for easy loading of the heavy stuff such as generators, fuel,
guy stakes, BBQ, ladder, etc. All I need now is to reinstall the rear bumper.
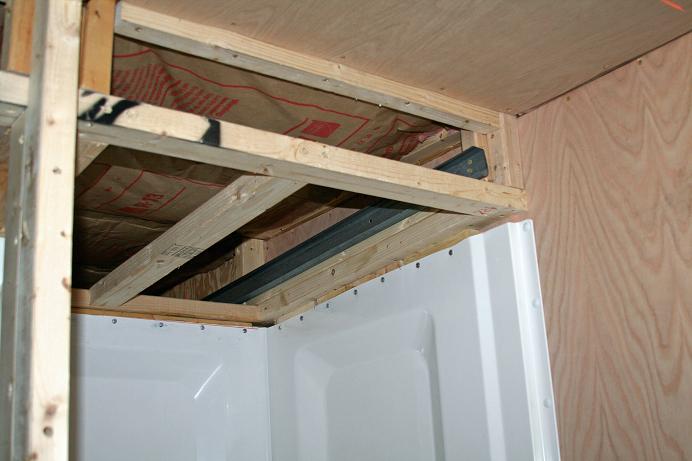
Having a garage door is great, but it caused some problems inside. Notice how the garage door
tracks will be hidden inside the dropped ceiling above the shower stall. The door also
glides over the top bunk bed, and is also hidden in the ceiling.
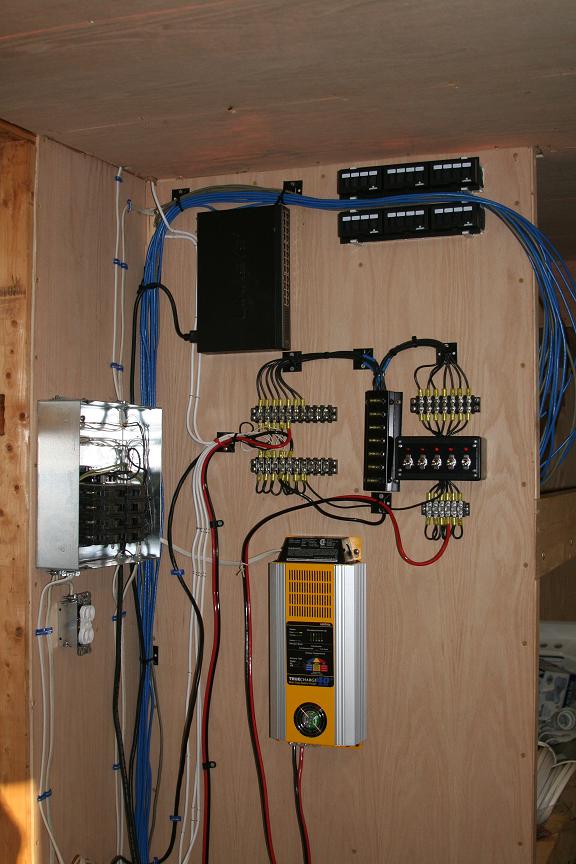
This is the beginnings of the electrical closet. There is an 8 circuit 120 VAC panel and all
of the lighting in the trailer is 12 VDC fluorescent, plus 12 Volts is required for other things
like the backup tower air compressor and the furnace blower motor. Here you can see the Xantrex
40 Amp continuous duty battery charger. There is also a substantial amount of CAT-5
cable running in this closet for computer networking. There are a total of 15 Ethernet
connections to a Linksys 24 port router, and eventually WiFi. I also plan to install
2 cell phone amplifiers (One for Nextel, one for everything else) to help our
phone coverage in remote locations.
UPDATE: 12/26/2007 - The HAMCOW has a Hot Spot! Today I fired up the wireless router.
This router gets its' Internet connection by plugging in my Sprint air card, then it provides a
local WiFi hot spot. One hard wired port of the wireless router then feeds the Linksys
24 port router to provide connectivity to the 15 hard wired connections all around
the HAMCOW. Today I wired and tested 3 of the hard connections.
UPDATE: 1/12/2008 - It took a while to get there, but all 15 Ethernet connections are live! I have also
purchased a 10 dBd gain WiFi external antenna so we can get a wireless signal into the farthest
reaches of any Field Day site! Thanks to W2DAN, we now have a Kyrocera wireless router
that has a slot to plug in my Sprint Air Card for Internet access just about anywhere.
UPDATE: 3/23/2008 - 5 deep cycle batteries are installed and we now have 525 AH of stored 12V energy!
We constructed a triple bunk bed. Each bunk has a small fluorescent
light, a 120 VAC outlet, and an Ethernet connection! During construction
they make a great place to store stuff. Eventually all of the bunks
will have custom cut mattresses installed for comfy sleeping.
UPDATE: 1/27/2008 - All of the mattress's and seat cushions have been ordered.
I can't wait to see the look on the UPS guy's face when he's carrying them
to the front porch.
UPDATE: 2/14/2008 - The mattresses and upholstery has arrived. It was
a bit of a wrestling match getting the foam into the vinyl covers, but
they came out great and will look nice in the trailer.
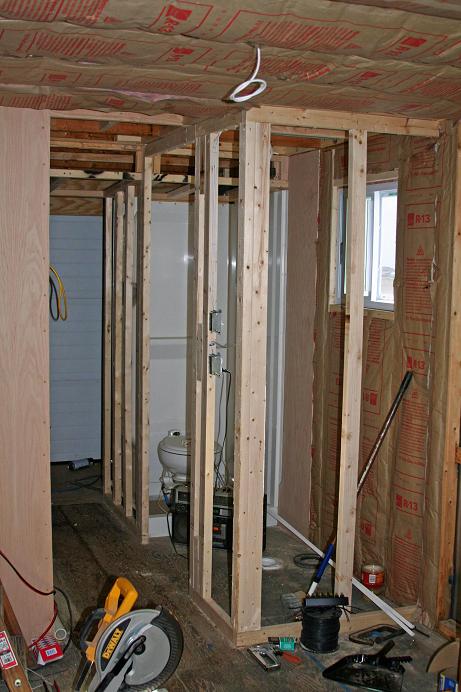
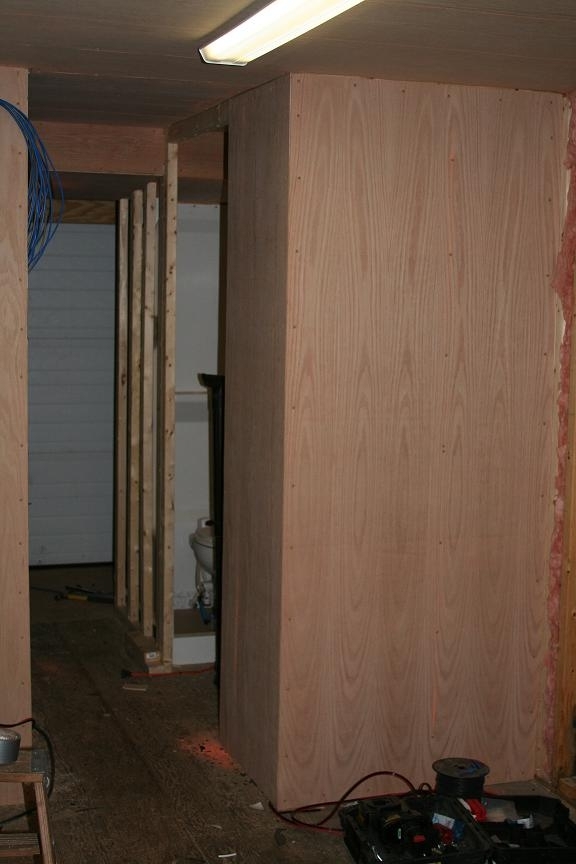
Here you see the rough framing for the bathroom before and after the paneling was hung. Notice the fluorescent light
where the wire was previously hanging. The 12 Volt lighting is working out great!
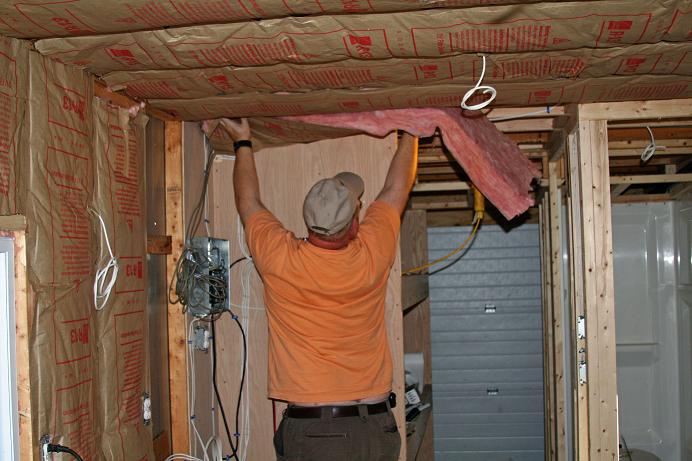
This is W2DAN insulating the ceiling. Dave has been a tremendous help throughout this project!
With Winter upon us, I can say I have thoroughly tested the insulation, and it works! The trailer
stays nice and warm even on the coldest days with just a small propane heater.
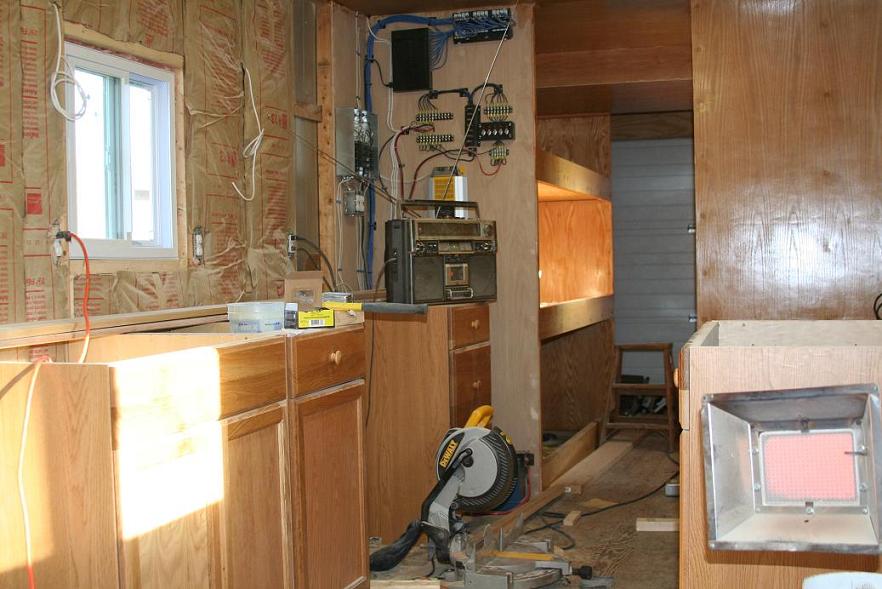
This is the same angle as the previous photo, but now you can see the kitchen cabinets
are starting to be installed and most of the oak paneling has urethane applied. In the
bottom right hand you can see the portable propane heater I am using to warm things up
while I am working.
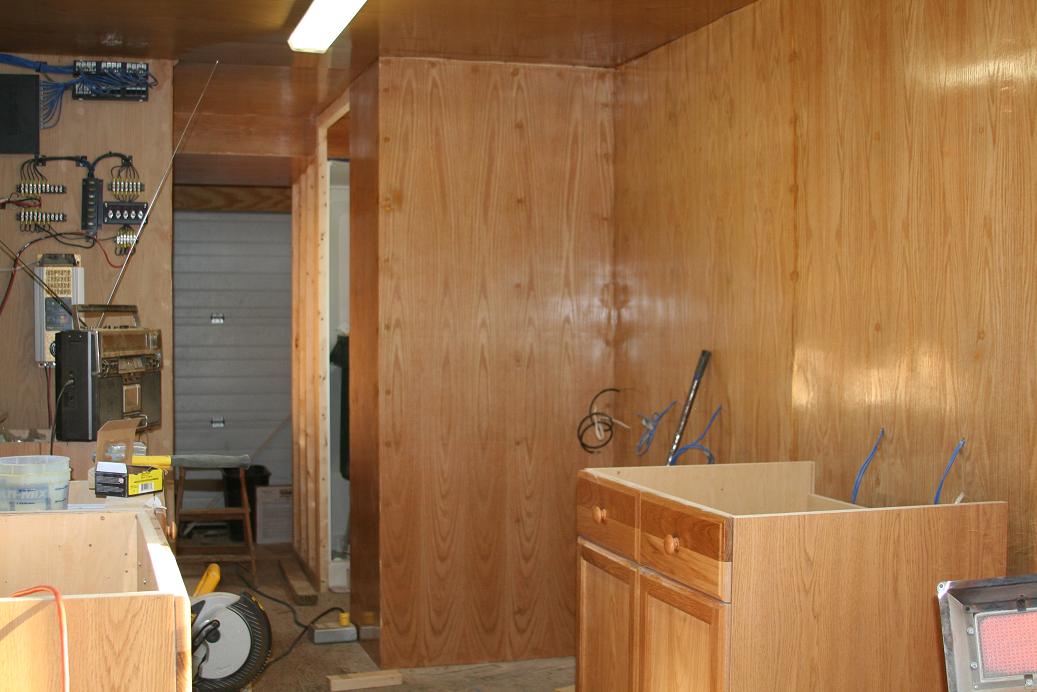
Here you can better see how nice the walls and ceiling look with the urethane applied.
It looks even better in person!
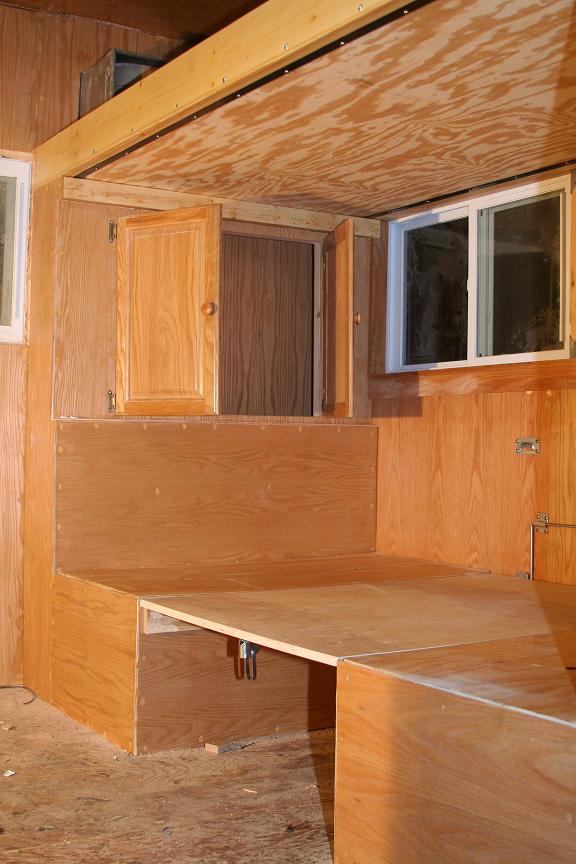
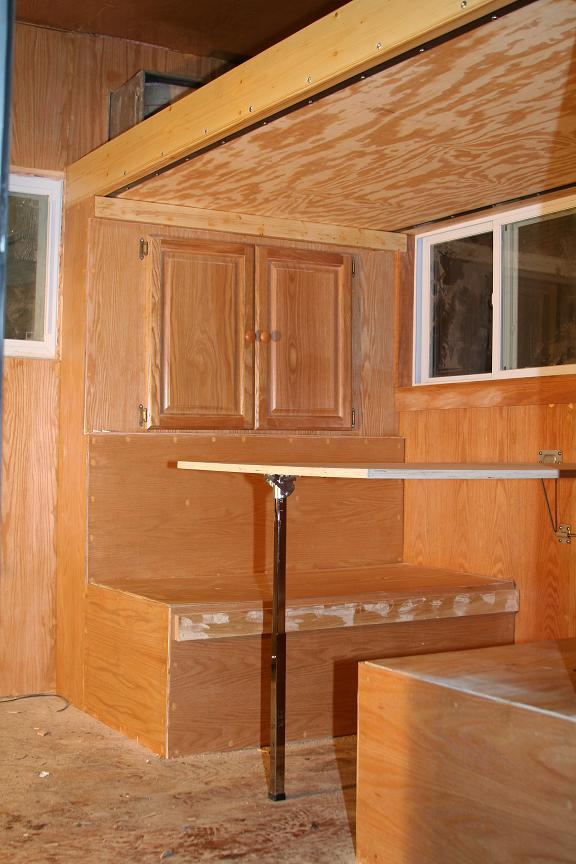
Here you see the kitchen table & bunk almost completed. A little trim work and some cushions is all it needs now.
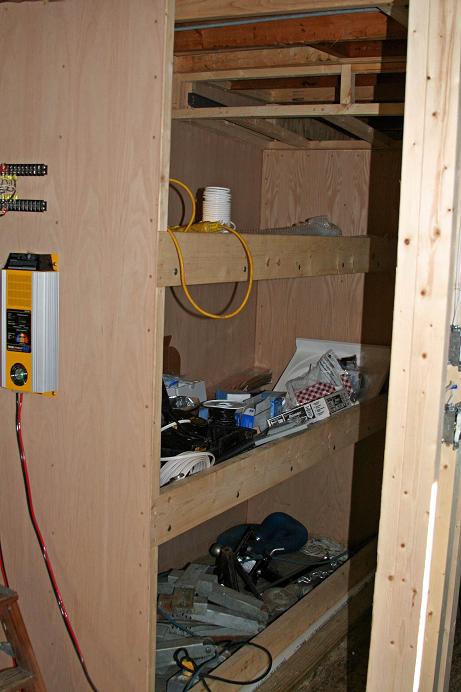
The overhead is also a fairly large bunk bed, and a bit of spare space is used as a storage cabinet.
The bigger 4 HP 120VAC air compressor will soon be installed beneath the left bench seat.
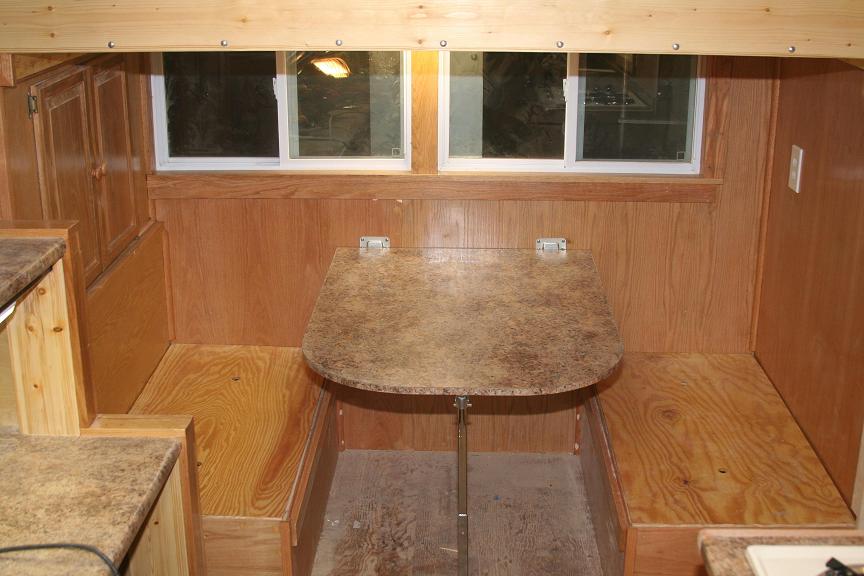
Here you see the matching Formica on the dining table. The seat cushions get rearranged
when the table is folded down to make this into a fairly large bed. The seat cushions and
mattresses are all here, but will not go into the trailer until it's almost 100% complete.
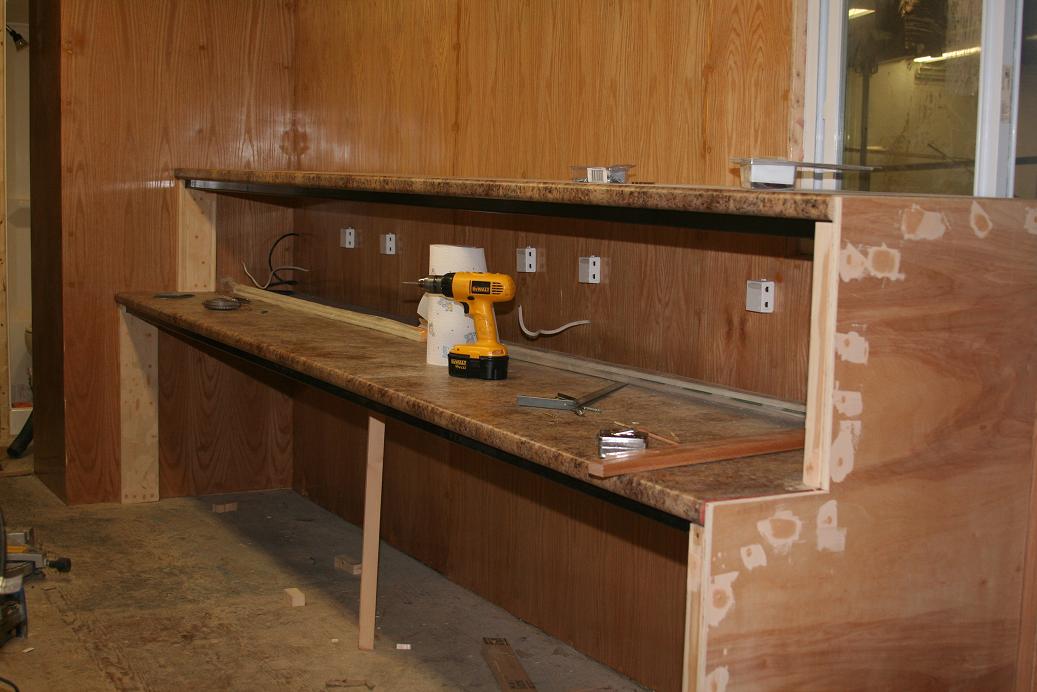
Eleven feet five inches of double-decker radio bench. The plan is to put the laptop PC's on the bottom level,
and the radios will sit at eye level on the top shelf. Under the front edge of the Formica counter tops you can
see the 2"x3" steel box tubing that runs the entire length. This will allow for long spans without vertical
braces to get in the way. Each shelf will be getting a custom welded brace at the mid span to provide
additional support when loaded with equipment. Down below by your knees there will be another
shelf constructed to hold the bulky power supplies, which will be at least an Astron 50 Amp per
operation position.
UPDATE: 1/27/2008 - The bottom power supply shelf is completed, along with a cool hatch
through the floor to route any unplanned wiring. The 5 operating positions all have a small
fluorescent light, and the AC power strips are installed. Stay tuned for a new photo soon.
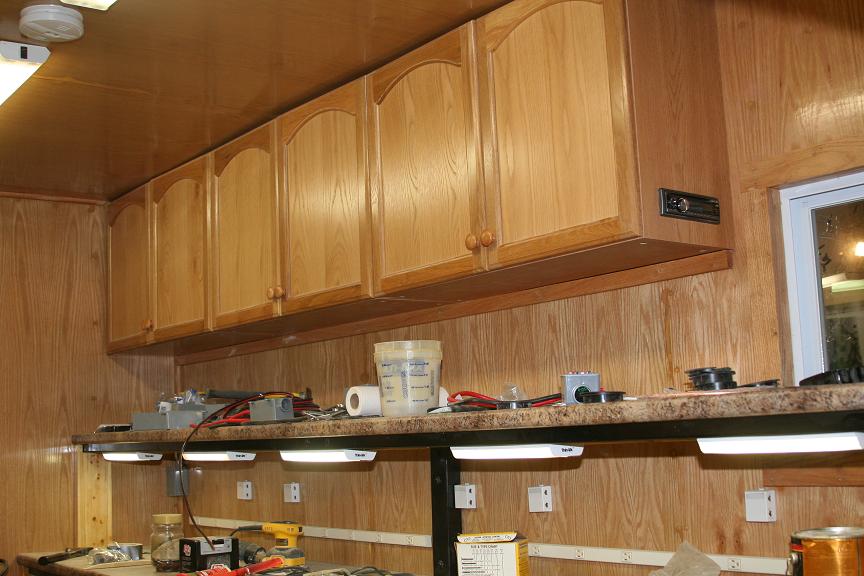
This shows the newly installed cabinets above the radio benches. You can also see the 12 VDC
fluorescent lights at each position, along with the addition of the AC power strips in the wall.
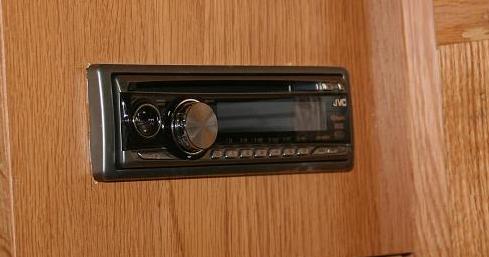
I am also installing an HD ready JVC stereo. I still need to wire it up with DC power, antenna & speakers.
I do have an automatic power antenna that I have yet to figure out how to install.
UPDATE: 3/31/2008 - The stereo has been running for a few weeks and sounds great!
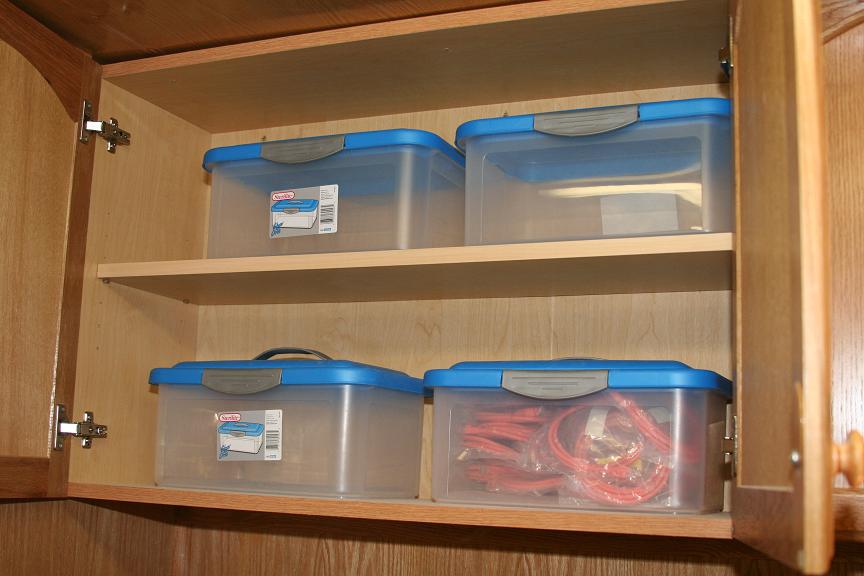
The cabinets will be storing everything we will need to hooks up the radios. One bin is already well stocked
with Ethernet cables, and soon the others will have an assortment of coax patch cables.
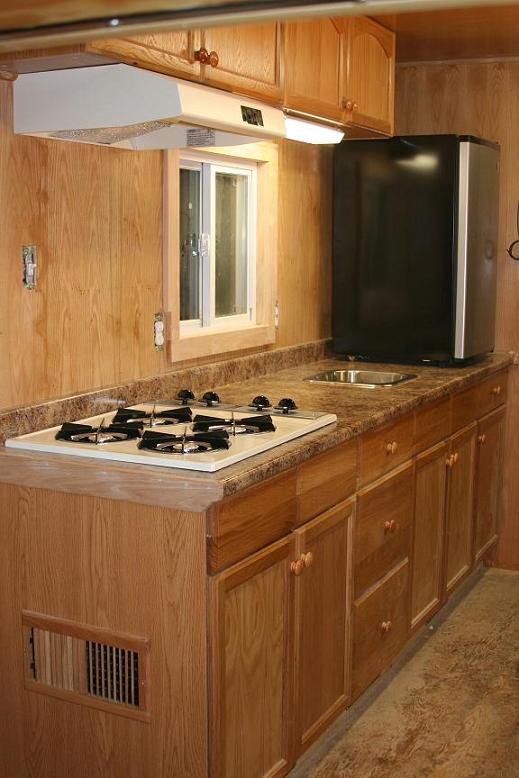
The kitchen is installed! I still have a lot of hooking up of appliances, but
the hardest part is complete. (Finally!) The vent is the air return for the
heating furnace, which is hidden in the cabinet beneath the stove.
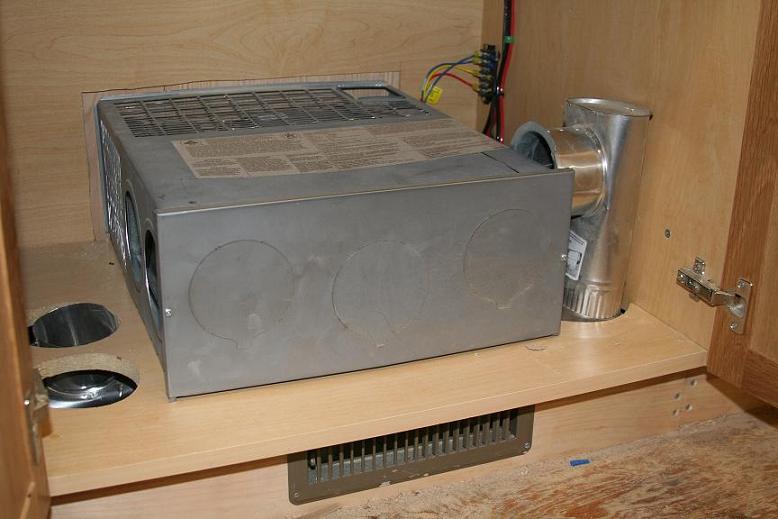
This is the heating furnace tucked inside the cabinet beneath the stove. 3 of the 4 ducts exit below
kitchen cabinets, and a 4th will run beneath the chassis and exit warm air into the bathroom.
Getting the duct work to cooperate was a tricky task.
UPDATE" 3/19/2008 - The propane lines are all run and the stove top & furnace now work!

This is the propane hot water heater hidden in one of the
smaller kitchen cabinets.
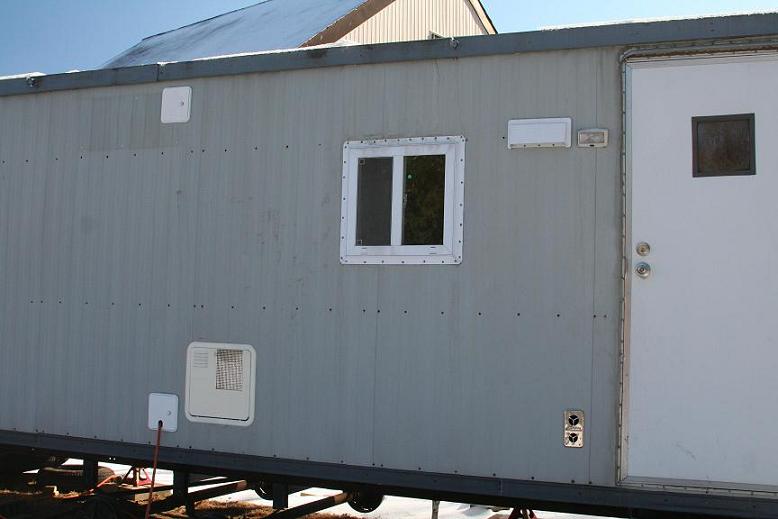
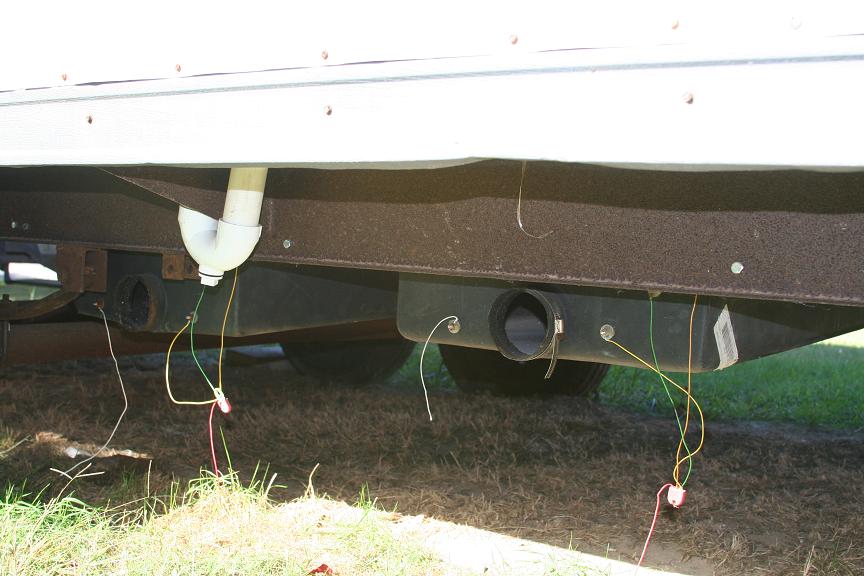
Here you can see all of the outside wall penetrations that were required for the AC power feed, Hot Water heater,
Furnace, the WiFi/BDA antenna port, and the stovetop vent. This is the outside wall of the kitchen and electrical
closet. The window and outdoor light were also additions from the original trailer.
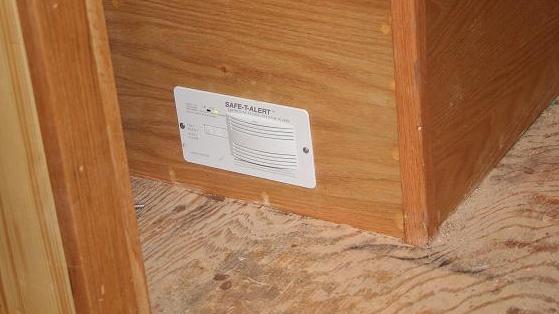
All of these propane appliances can be risky, so I have installed a propane/carbon monoxide detector
that is powered off the main HAMCOW batteries. I also have a smoke/CO detector on the ceiling.
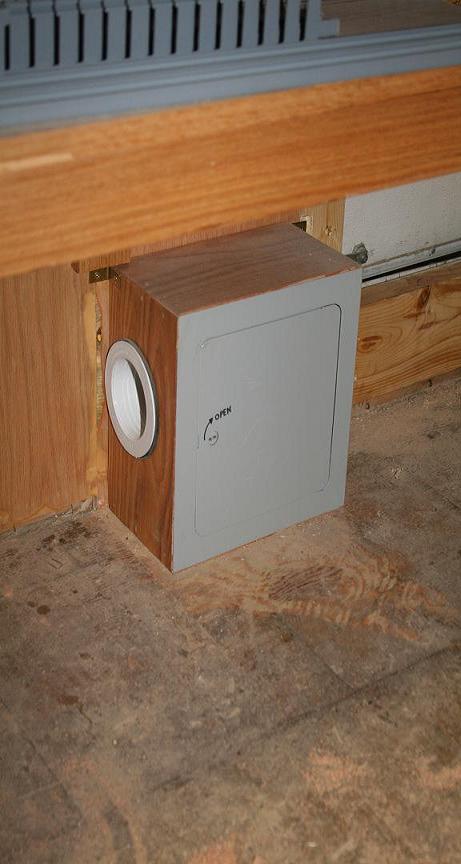
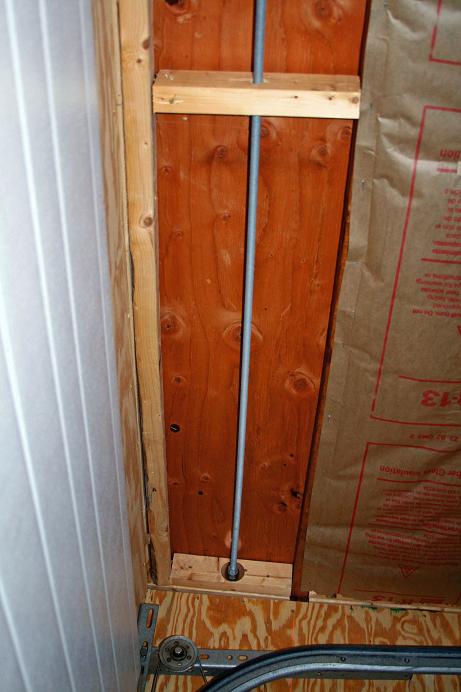
Here is a special cable port that I fabricated to accommodate any unplanned wiring that needs to enter the HAMCOW.
There are two 3 inch PVC ports. One goes though the floor, and the other enters the HAMCOW just above the floor.
Once the desired cable is routed, there is a plug of soft foam that gets inserted to prevent drafts on windy days.
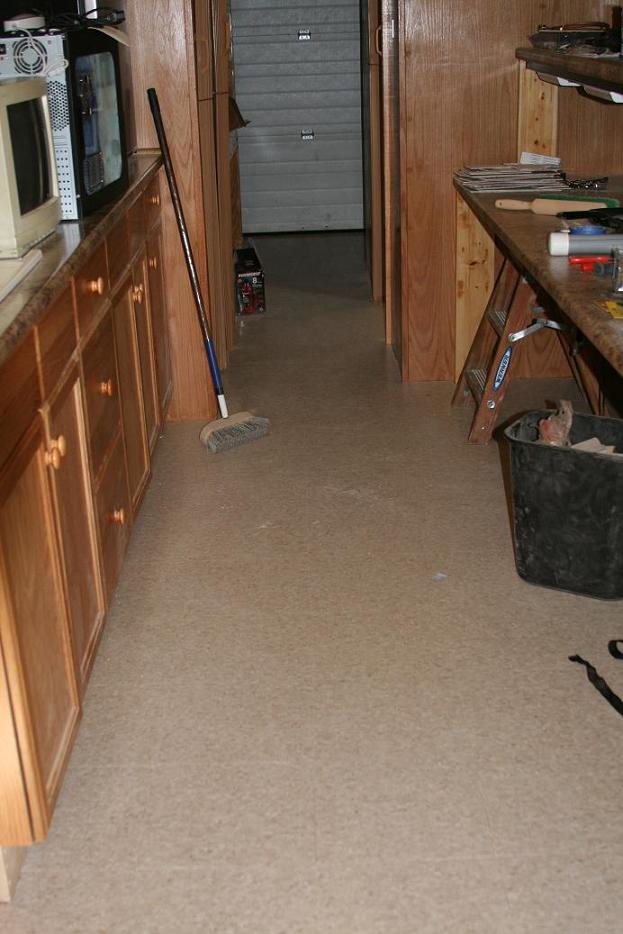
Here you see the completed commercial floor tile installed
throughout. This was difficult because of so many cuts
and edges to follow, plus I could only install about
4 feet at a time because I couldn't reach any farther
without getting into the adhesive I was spreading
on the floor.

The Atomic Clock is installed and keeping perfect time. As soon as I mount the
outdoor sensor we will have that temperature displayed too.

This is the flat screen monitor attached to the HAMCOW server PC.
Here you see it running N1MM Logger and everybody can monitor
our contest progress at a glance. The PC is tucked under the bench
and a wireless mouse & keyboard allow us operate if from just
about anywhere inside the HAMCOW. In the near future we plan
to install a PC-TV card for television reception.
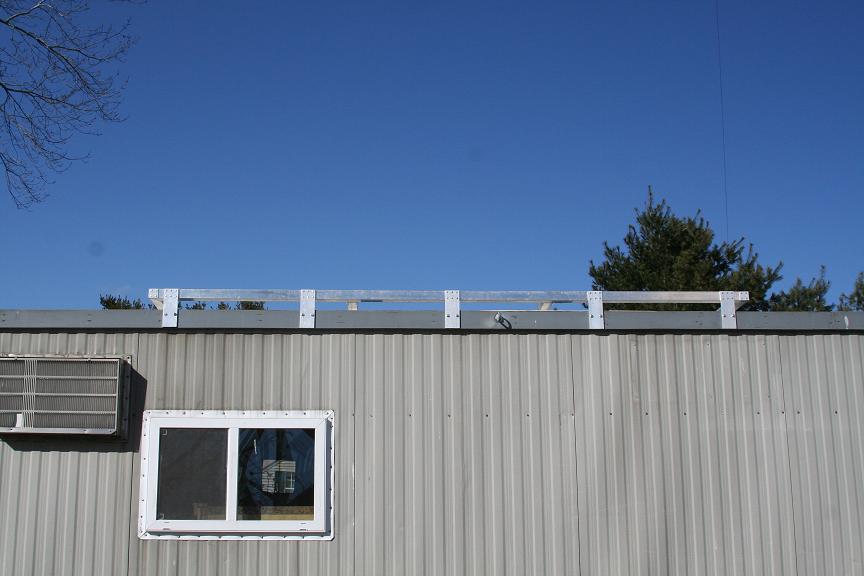
Here is the roof rack that we will stow the antennas on while under way. A smaller one will
soon be fabricated aft of this one to store the satellite array separately. Having such a
spacious roof will make for storing and off loading the antennas much nicer.
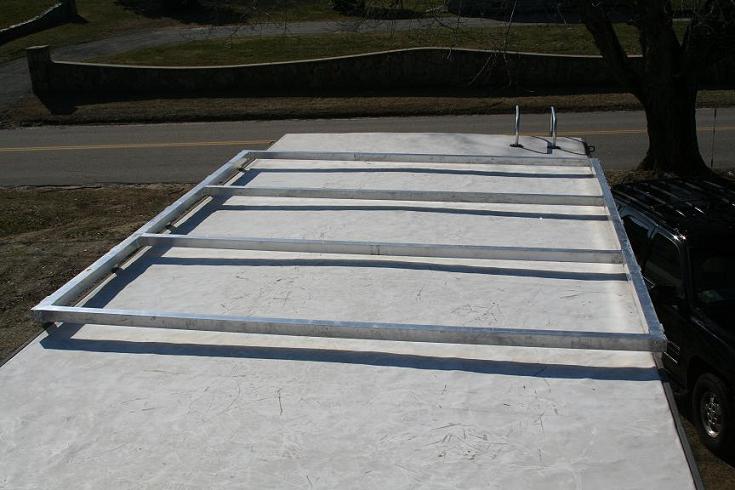
This is the roof rack view from on top of the trailer. It is fabricated from 2"x2" aluminum
box tubing and riveted at the ends with 2" aluminum angle for solid connections.
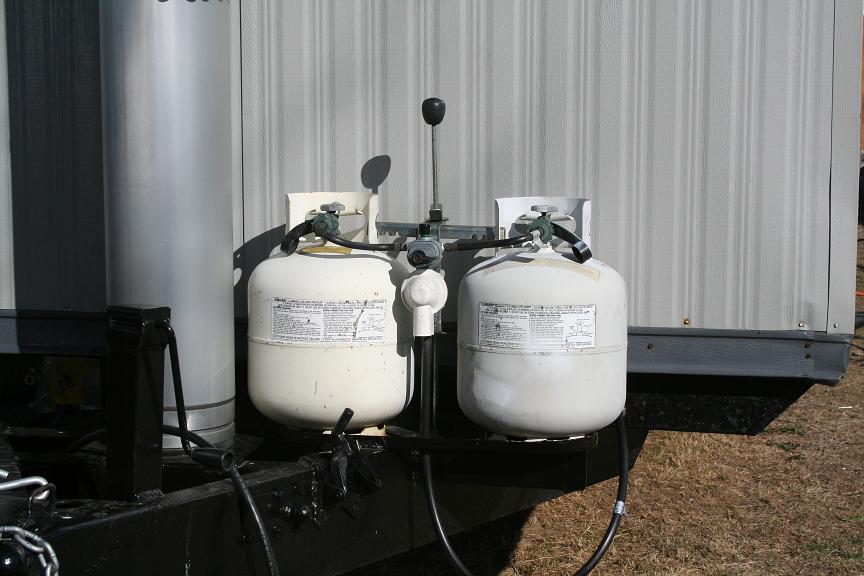
With everything going on at the front of the trailer there was still
enough room for a couple of propane tanks. This was another treasure
scavenged off the burnt out camper. The valve on this setup is cool because it
only draws off one tank until it is empty, then automatically switches to the full tank.
This allows you to swap out tanks without ever shutting the gas supply off.
To compliment the HAMCOW, W2DAN has put
together this 30 ft. aluminum tower with a TA-33Jr tri-band
Yagi with a 100 ft. long umbilical cable to get it away from
the HAMCOW. The tower sits on a heavy duty aluminum
base plate that gets staked into the ground and the guy ropes
are high quality sailboat lines for low stretch and high strength.
The tower is light enough that is stores on the HAMCOW roof
racks all assembled, and is placed on the roof easily by 2 people.
UPDATE 5/27/2008: The HF Yagi is being upgraded to a larger antenna!
The new antenna is almost completely refurbished and will be modified for
quick assembly similar to the 6M Yagi design by N1JOY.
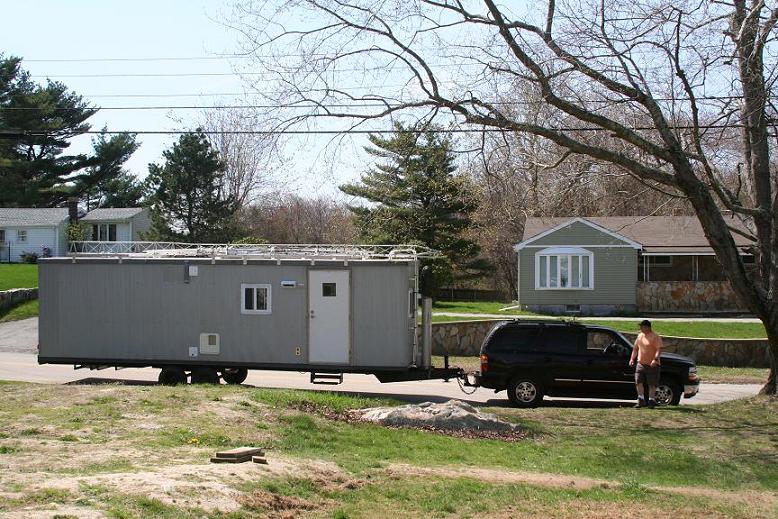
This shows the HAMCOW connected to the Tahoe just after we took our first
ride around town to test things out. It rode well even on a bumpy back
road.
You can really feel the wind resistance at highway speeds, but I don't plan to
be racing around towing this behemoth.
HOME