G(m)0ONX/M

Prior to retiring I only lived about 10 minutes from my office and mobile operation is not really practical most of the time as I park the car in a multi-storey car park. I do however have to make occasionally drive south to England on RSGB business. If the meeting is at Bedford I can normally fly in quite cheaply but other locations are more difficult and I elect to drive there to prevent an overnight stay.  To say the drive is boring is to understate things, particularly in the winter in the dark.


The normal FM  radio in the car doesn't work particularly on the southern parts of the M74 in Scotland or the M6 near the Lake District. 2m VHF repeater coverage is Spartan at the best of times and often non existent early in the morning 
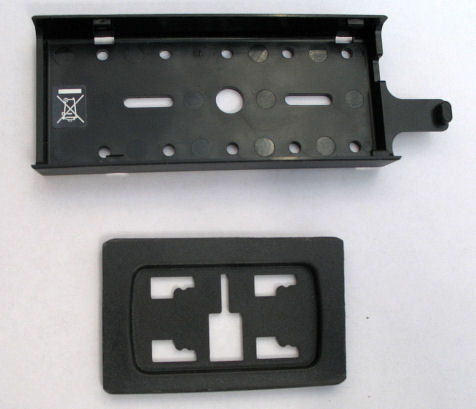
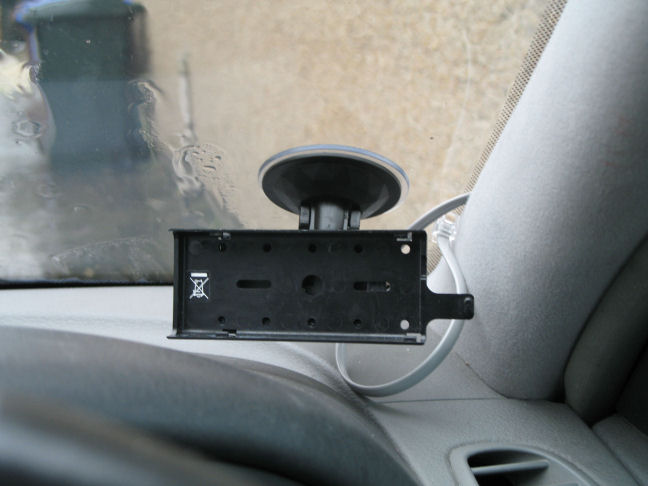
on the weekends.

A number of the club members of my club the Kilmarnock and Loudoun Amateur Radio Club are into HF mobile and thought this would be an ideal solution to the boring drive and help me get on the air a bit more often.

As my HF mobile activities are only occasional I wanted as a set up that could be quickly installed and removed. I decided to use a Yaesu FT857 with a remote head mounted on the corner of the front windscreen fed via a homemade separation cable made from two FCC68 (6 pin) connectors and FCC68 data cable allowing the RF deck to be remotely mounted in the rear of the car.

The remote head is mounted to the window using a cheap model phone suction mount intended for a HTC smart phone about £2 from Hong Kong (eBay) and a Yaesu FT857 face holder bought from Yaesu UK as a spare part for about £6.

The exact model suction mount model is irrelevant as they all appear to have a standard clip to attach to the balljoint socket and you are going to trim of the excess plastic to match the size of the FT857 mounting plate anyway.


What you get for your money. Window suction cup, ballsocket

clip and model specific backing plate.

Trim model specific mounting plate and superglue it to

the FT857 remote mounting plate

Finished mount, removed in seconds by a flick of a lever.


Mobile Aerial Mount

For the last 20 years or so I have run estate cars (station wagons for our American cousins) and although most of them have come with built in roof rails they are comparatively few commercial aerial mounts that are suitable for use with with roof rails.

Maldol make a good mount suitable for use with roof fails and this gave many years of service even with 7/8th dualband 2m/70cm antennas fitted.

After a little modification to improve the earthing it even gave a good account of itself with the Yaesu ATAS 120 aerial on HF for a while but finally succumb to metal fatigue under the enormous load of the ATAS 120. As luck would have it, it failed at 70mph on a motorway.

Fortunately the extra earthing  retained aerial on the car and saved the day but it was clear that the aerial mount was not up to the job.

Yaesu only recommend one aerial mount for the ATAS, the Diamond K700S with is designed for a boot or tailgate mount not a rail mount.


Standard 50mm x 50 mm square U bolt on the right

with tread length extended  version on the left.

     
At £300 at time for an ATAS I didn't really want to take the chance on another commercial 'light weight' aerial mount and I decided to design my own using a 12mm by 50mm square section U bolts intended for making trailers bought from eBay for a couple of pounds. On reflection a 10mm diameter U bolt would have done.

The tread on the U bolts was too short to I extended the length of the tread using a die tap bought from eBay again bought for a couple of pounds. The excess bolt length was then trimmed off.

The mounting plate was made from two pieces of 5mm thick aluminium plate bolted together found in the scrap bin as I couldn't find a  big enough bit to do on its own.

Although not clearly shown in the photo there is a supplementary earth wire runs from the plate to the body of the car. The last section of the roof rail on my car is made from plastic and this unclips to allow access to the bolt holding the roof rail on which is connected directly to the car body. By using a earth wire made from good quality RG58 cable covered in heat shrink, the clip can be put back on without damage to the part or the rest of the car.

Additional earthing is installed at the RF deck where is mounted. Without this additional earthing the ATAS 120 will not tune properly on 40m.

Although not an office under the The Road Vehicles (Construction and Use)

(Amendment) (No. 4) Regulations 2003 to use a mobile mic in the UK you are better avoiding arguing this point with the traffic cops by using a hands free mic as you still have a requirement to be in control of the vehicle at all times.

Well that's the mobile setup at GM0ONX, others go to greater lengths to get better performance, but my set up has the advantage being able to be installed and removed in minutes and it helps while away the long drives down to  'Englandshire' and the autotune facility of the ATAS makes HF mobile so easy. Working Japan at 70 MPH handsfee on the M6 south of Carlisle certainly takes the boredom away.

Hope to catch you on the air /M.

73

Len GM0ONX


Home page