Useful Tools
1. PC Pin Pliers
These are particularly useful for fitting tapered or splined pins into a PC board where the recommended hole is slightly smaller than the overall pin diameter.
You will require an old pair of conventional pliers, not the long nosed variety and preferably with smooth surfaces on the inner jaws -
Make a mark, just before the end of the slot, on the inner surface of the other jaw and drill a small 'dent' about 1mm deep at this mark so that a PC pin can pass through the cut slot and rest in the dent. Now you can place the pin in its hole in the PC board, place the pin pliers each side of the board and carefully push the pin firmly into place with the pliers. The dent ensures that a plain PC pin fitted in place will always remain a short length above the board surface for soldering.
2. Sheet Metal Saw
Ever tried to cut a large sheet of aluminium with a conventional hack-
The simple solution is to convert an old wood saw into a sheet metal saw by removing the old cutting teeth, shortening the blade and suspending a hack saw blade immediately below the wood saw blade. You will need a wood saw that does not have any additional support or thickening of the blade. Ideally the saw blade should be slightly thinner than a hack saw blade but if not it can be ground down if you have a suitable power grind stone. I did try using two hack saw blades side by side to obtain a wider cut slot but it was not very reliable and the two blades often separated during cutting.
Cut the wood saw blade down in length so that the part after the handle is a little longer than the hack saw blade -
Cut two pieces of 16swg steel to 2 inches by 0.5 inch (50mm by 12.5mm) and file the edges smooth -
You may have problems with the old wood saw blade being too thick. It must be a little thinner than the flat part of the hacksaw blade otherwise it will jam in the saw cut. I had to grind about 3 thou off my blade using a powered bench grindstone, lower the remaining highlights with a sharp file and finish off with a coarse whetstone to ensure that it is reasonably smooth. Clean up, fix the hacksaw blade in position and you now have a sheet metal saw. You may need to apply some grease or light lubricant to the blade prior to use.
The two photos below show the first and second versions. Bolt sizes (I used 4BA steel) are left to the constructors judgement.
The first version immediately below used a standard hacksaw blade which was only marginally thicker than the supporting wood saw blade and often jammed in the slot being cut.


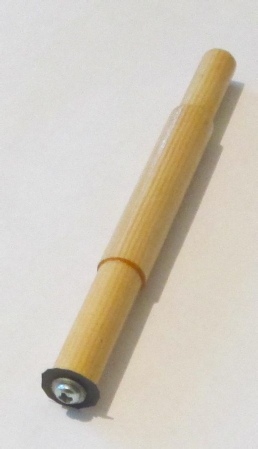
3. Tap Seat Cleaner
I live in a hard water area and have to change my tap washers on a regular basis. In order to clean the seat of the tap valve I made the simple tool shown on the right.
The object here is to remove any chalk and other hard water deposits from the metal valve seat without adding any grooves to the seat so a very fine rubbing down paper is required.
The wood is a softwood dowel turned down to size on a small lathe with very sharp cutting tools and then varnished. When dry, the wet and dry paper can be fitted. You may have to use different dimensions at each end demending on your tap sizes.
I use P600 or finer wet and dry rubbing down paper held in place with a round head wood screw and a plated (4BA) washer, both of which should fit inside the hole in the seat. The paper can be fitted oversize and then cut to size to fit over the seat.
When using this tool, use a back and forth manual rotation but do not press very hard. When the valve seat is shiny you have completed the cleaning process and can fit the new washer. Any debris can be flushed out when the tap body is back in place and the water turned back on.

The second version below used a heavy duty machine hacksaw blade which was considerably thicker than the supporting wood saw blade and is unlikely to jam.