Heathkit Spares and Repairs
Heathkit spare parts are increasingly difficult to obtain now and the SB-
1. Control knobs
The transmitter loading and bandwidth control knobs on the SB-
1. The upper unit has been repaired by replacing the broken off lug with a small switch spacer which is held in place using a tapped 10BA brass bolt held in place in a small hole on the main body of the knob using a two pack epoxy adhesive. This is the strongest method of the two.
2. The lower unit: The alternative is to drill a small hole through the broken lug and into the main body. A cut down dress-
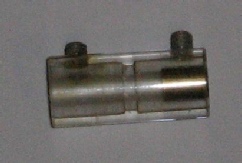
2. PA Tune Insulated coupler
These frequently crack, often due to being over-
One option might be to find a piece of brass tube that is a tight fit over the coupler to use as a strengthening sleeve at each end with a clearance hole in each for the grub screw. The outer diameter of one sample was 0.503inches or 12.776mm.
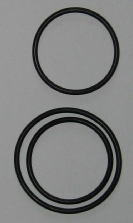
3. Preselector and PA Loading O Rings
Almost every SB/HW unit that I have seen has O rings that are perished beyond reasonable use. They can be replaced with dial cord and a spring but the O rings are more convenient and are available at a reasonable cost from a Heath spares supplier in the USA. Three O rings are required, two identical smaller ones for the preselector and one larger one for the PA loading control.
As near as I can measure they are made of a solid circular material of 0.14 inch diameter and the inner diameters are 2 inches and 2.5 inches respectively.

4. Dial Vernier Adjuster
Most of my SB-
The shaft of diameter 0.123 inches was cut from a retaining bolt from a wafer switch which was exactly the right diameter to fit the dark green front panel moulding and only tapped for a very short distance.
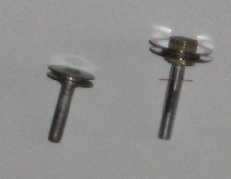
The original is on the left and my new one is on the right. The fixing nuts have been locked with varnish and two washers have been fitted to the front of the shaft to space it off the plastic moulding.