|
|
|
|
|
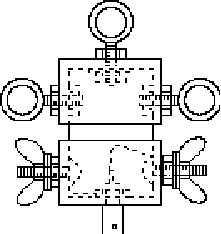
Pete's Center Insulator
by Pete, KA1AXY
After years of inadequate dipole antennas, I have been looking for a cheap center insulator which will take the strain of a dipole, yet allow easy reconfiguration. Like most hams, I'm cheap. I can't see buying something that I can build myself. Besides, when I build it myself, I can get every detail "just right". I present here a center connection unit for a dipole antenna based loosely on the "PVC Gusher", and incorporating some ideas I stole from a military dipole I once saw.
The hardware is really the designer's choice (heavier gauge for more durability vs lighter gauge for less weight), but here's what I used:
Eye bolts: 3/16" with nuts and washer on the top one, under the cap. I used elastic stop nuts on the inside so they wouldn't come loose.
Brass connecting hardware: 1/4" pan head bolts with nuts and washers. I used Loctite on the threads on the clamping bolt.
Chassis mount BNC connector
Copper sheeting, with holes for BNC and 1/4" bolt
The first step is to acquire some 1 inch PVC pipe (10' length :-) and two 1 inch PVC pipe caps. Using a drill press, drill holes in the center of the pipe caps. One should clear the BNC body (3/8") and the other should clear the eye bolt (probably 7/32").
If there's a moulding "blivet" on the inside of the pipe cap (there was a 1/2" dia bump inside mine), use a 5/8" spade bit to trim it down with the pipe cap held upside down (like a cup) in a vise.
Cut down the ends of the eye bolts so there's just enough thread to make it through the PVC and a washer and two nuts (see drawing).
Install the top eye bolt, washer and nuts. Use elastic stop nut on the inside, or lock with Loctite. You're going to glue this shut and you don't want nuts rattling around inside.
Press the piece of 1 inch PVC tubing into the top end cap. Should be a jam fit, no glue needed.
With the tubing and pipe cap assembly held horizontally in the vise, drill a 7/32"
|
|
|
|
|
|
|
|
|
|
|
hole through one side of the assembly, and out the other side.
Install the two side eye bolts. Again, use thread locker or elastic stop nuts on the inside. No washers needed. Set the top assembly aside.
Prepare a piece of copper sheet (I used copper EMI tape), which will have a 3/8" hole in one end (for the BNC connector) and a 9/32" hole in the other end (for the brass bolt).
Take the second pipe cap, the one with the hole for the BNC drilled in it, and chuck it in the vise under the drill press, so you can drill through both sides of the pipe cap, about half way between the open end and the inside bottom. Use a 9/32" drill and drill all the way through both sides.
Add the 1/4" brass bolts, pass them from the inside of the pipe cap to the outside. One of them should go through the copper sheet first.
|
|
|
|
|
|
|
|
|
|
|
the top assembly in the vise again. Drill a hole through the bottom of the PVC pipe which will clear the heads of the brass bolts, plus a little bit. For my unit, it ended up being a 5/8" hole. This is drilled just like the 7/32" hole you did up above...through both sides of the pipe. You're trying to clear the bolt heads when the bottom pipe cap is installed, so you need to make two saw cuts down from the end of the pipe to the edge of these holes. This is best done with the assembly held vertically in a vise, with the uncapped end of the pipe facing up. You should end up with two large slots with rounded bottoms extending from the end of the pipe down about an inch or so. Your goal here is to clear the brass bolt heads as the pipe slides into the pipe cap. Do some test fits to make sure this happens. You shouldn't be able to see the holes when the pipe is bottomed.
If everything looks alright, use some PVC cement and glue the bottom cap onto the top assembly.
You now have a rugged, fairly watertight (you can use RTV around the bolts if you want) dipole center insulator for around five bucks. You also have about 9 feet, 9 inches of 1 inch PVC pipe left over :-)
I used crimp on ring terminals on 14 gauge stranded insulated wire. You can make loops in the wire and attach it to the side eye bolts with string, or, for a quick set up, just run the wire from the brass bolt up and through the eye bolt and out to the end of the dipole.
Of course, you can use an N type connector or a SO-239 if you want. You should probably paint this if you're going to leave it out, so it doesn't degrade in the UV. But hey, it should last several years without paint.
I used mine in a recent QRP contest. It worked great!
|
|
|
|
|
|
|