Theory of Longyagi-Designing by DK7ZB
|
The highest gain for a long Yagi is only possible with reduced bandwidth and bad pattern. Therefore we need a compromise for all parameters. I assume that such a Yagi will be only work in the range of 144,0-144,4 MHz for EME and serious terrestrial work in SSB, CW and WSJT. Significant more bandwidth means distinct lower gain! On 6 m and 2 m you do not need any special constructions like "low temperature Yagis", neither for terestrial work nor for EME. A good, clear pattern and high gain guarantee a maximum of success. On 432 MHz you can test ist out, if your Yagi or your Yagi-group needs a "low temperature"-design for a maximum sidelobe surpression, but combined with less gain. A long Yagi system consists of four zones,which have influence to the construction principles. My best results I got with impedances of 28 or 12,5 Ohm. But in the last time it gives a lot of good designs with a 50-Ohm-direct feed. But remember: You must compare all parameters. A wideband Yagi has lower gain, also a design with a lower temperature. If you are interested in good 50-Ohm-designs look here: G4CQM-Yagis or YU7EF-Yagis 1. The Radiation Zone To the radiation zone belong the reflector, the radiator and the first 1-2 directors. This region influences the radiation resistance (feedpoint impedance) of the Yagi. The system folded dipole-director 1 in a high-gain 50-Ohm-Yagi-system mostly is very critical, because the mutual influences change with the frequency more than with a system of a streched dipole and a D1 not so close, which causes lower impedance. Is the impedance to low (<25Ohm), you can have losses in the impedance network. Therefore I prefer the medium impedance of 28 Ohm, which is easy to match and gives good antenna performance. 2. The Transition Zone The next 1-2 directors couple the travelling wave zone to the radiation zone. 3. The Travelling Wave Zone The length of the travelling wave zone decides for the gain of the system. The maximum space beetween the directors can be 0,45 lambda, lower space is unnecessary, greater space disturbs the Yagi structure. This zone can be used, too, for "low-temperature"-constructions. That means extremly reduced first sidelobes, but with less gain. For that principles the transition zone must be changed slightly, too. 4. The Endzone The endzone couples the waves to the free space, incorrect dimensions lead to internal reflections and a bad pattern. You get he best compromize with a closer space between the last two directors and a more shortened last director. The next to the last director is longer than the end directors in the travelling wave zone for a better current profile and and higher gain. But keep in mind that this decision will reduce the bandwidth above the design frequency and makes the structure more susceptible for the influence of rain, ice and the surrounding. |
|
The element currents in the directors should fall not to fast (low current means low efficiency!) to the end of the Yagi. Leaps in the current profile show a wrong designing and leads to lower gain and worse patterns. How to construct a Yagi in practise? I start with a proven design like DL6WU and use the program YO (Yagi-Optimizer) from K6STI for optimizing. With various "weights" for gain, F/B, impedance and SWR you can find a design, which is worth to be realized. The fine-tuning will be made "by hand" with EZNEC+5 by W7EL, which is more accurate for the radiation resistance. Then I compare the data with well known designs of the VE7BQH-list. If you have run thousands of simulations, you get a feeling how changed lengths and parameters will influence the practical data. Against other statements it is possible to use "YO" to design Yagis with a low Ta and better G/T (but reduced gain!) if you want and if you know how to use with the K6STI-optimizer. See the new OWM- and OWL-Yagis by DK7ZB. Then the Yagi must be built in the real world and I measure the impedance, the SWR and the horizontal pattern. Normally you need only to cut the radiator for best SWR on the design frequency, which should be <1,2. If the verified data for these parameters correspond to the predicted data, you can assume that the gain will be ok, too. Measuring the gain with amateur equipment will have a failure of +/- 0,5dB and is not a real help. I got a lot of feedback from EME- and contest-stations using DK7ZB-Yagis, they do not have trouble with rain and fog. The DK7ZB-Yagis are the most used Yagis by 2-m-contest-stations in central Europe. Easy to build and easy to tune with the given hints. |
|
F/B-ratio versus frequency |
Gain versus frequency |
|
|
The Yagi should have the best F/B at the designing
frequency. The maximum gain is above the design frequency. If the point
where the gain is dropping down is to close nearby, the design is to
critical and not trustworthy.
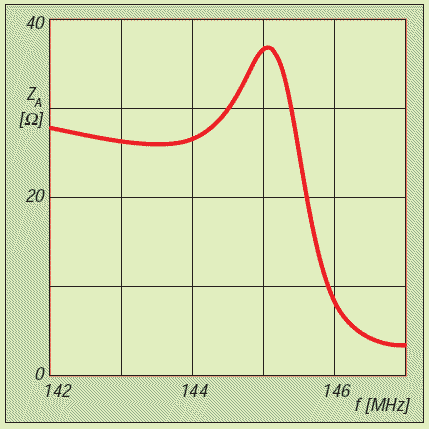
In picture 5 you see the reason for the trend of gain and F/B versus frequency: The impedance is dropping down, because D1 came into resonance with its length (lambda/2) and acts as second radiator and not as a director. All pictures refer to the 12-El.-28Ohm-Yagi for 144MHz and 8m boom.
Impedance versus frequency |
How to measure antenna data with amateur equipment?

Picture 6: The test arrangement for the pattern and for F/B |
Yagi 1 is fed with 10-20Wtts RF on 144 MHz or
432 MHz.
Yagi 2 is connected with a coax-cable to a simple detector circuit. With a Millivoltmeter you can take the radiation diagramm, the F/B and if you have a good reference for Yagi 2, the gain. To avoid ground reflections Yagi 1 should have a gain of 10 dBd (no dipole!)
Picture 7: The measuring circuit |