Photo etching
At my first approach to photo etching I realised rather fast that it was not
so easy as I thougt before. This page is here for everyone wanting to start
with photo etching without having an expensive an professional equipment.
How to bring the project on to the foil:
I do not have a laser printer and this was the first problem, because
I could not stamp my project directly on a foil (try to do that with an ink printer and see what happens :-) ). I wanted to solve this problem simply by stamping
the layout with my ink printer on normal paper and then use a copy machine to bring the
layout on a transparent foil.
Maybe the Idea was good but the result was not! First thing I learnd is that
even a laser copy machine is not able to make a dark black color. The foil
looks as shown here below (left):

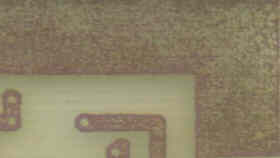
The foil seems to look rather good, but if you see through it holding it
against the sunlight or any light source you can see that the dark part is
not regular and there are a lot of nearly transparent little dots.
The effect is, that you get a non useable PCB because
when exposed the light passes through the lillte dots, and these parts will
obviously be etched away, as you can see above (right).
The solution of this problem is, like so often rather simple when you found it.
There is a transparent spray called "Pausklar 21" in german, that makes
the paper transparent. So I don't need a laser printer nor a copy machine.
Only thing to pay attention is to get out all the air bubbles trapped between
the layout paper and the PCB before exposing. Also you have to rinse the PCB
with soap and water to get rid of the spray before developing it!
The method explained here is surely not the fastest and easyest but it is
the cheapest. Otherwise you could buy the extra transparent foil for ink-printers,
but they are very espensive and you always need to use two foils (one over the
other) because the result of the printing, using only on foil, is not sufficient
for the exposure (the light will come through using only one foil).
This might be also a matter of the printer, but I tested it with two
different ones, and both were not able to print an even black color layer
on the transparent foil.
Finding the corect exposing time:
This is very important and unfortunatly you can not rely on the instructions
coming with your UV-lamp. I got a 250W Nitraphot lamp and according to the
manual, exposing time at a distance of 30cm should be about 12-15 minutes.
I expirienced that this time is far to much! But how can you determine the
necessary exposing time?
Take a photo PCB (of course) an cut the protecting coat in for example 10
stripes. Take off the first stripe and expose it for 20 seconds, then take
off the next stripe and expose all again for 20 seconds. Go on like this
until you exposed also the last stripe (always for the same time at the same distance). Now the
first stripe should have been exposed for 10 x 20s = 200s, and the last one for
only 20 seconds. Develope the board for 1 minute and then rinse it under water.
You now should have something that looks like this:
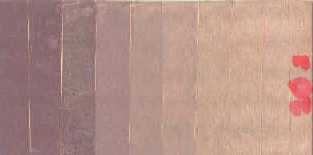
The right side is the one you started with so this stripe was exposed for
200s the left stripe (darker) was exposed only 20 seconds. The 7th
stripe from the left is the first one that has been completley developed
after 1 minute. That means: 7 x 20s = 140s add another 10-20s to be on the
safe side and you get about 2,5 minutes exposing time.
Etching:
If you want to use the good old ferric chloride, you don't need to read
this. I personally use ammonium persulfate. The little problem (but also huge
advantage) is that this stuff becomes etchant only at at temperatures of ~50�C.
So what you need to do is heat it. But you have to keep in mind that it is an
etchant to most metals, so the question was how to heat it without professional
and expensive equipment.
- One solution is to get one better two car lamps (21W, those for the brake lights),
and fix them head (glas side) down in the solution, in such way that the etchant
will not reach the metal base or thread. Notice that if you use two lamps
you need a powerfull supply unit able to deliver at least 4-5A.
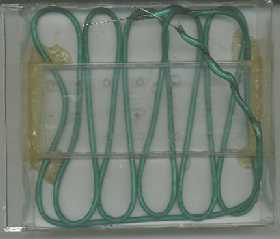
- Second solution is to use a clothesline as heater, which has a metal wire inside. The one
I found has exactly 1,5 Ohm/meter. Fix several turns in a glas or plastic bowl.
It depends on the material of the clothesline but due to the fact that it gets
hot, the line should not be to short, otherwise it will melt the plastic protection.
Maximum current of the heater in my case was about 3A (~3m of line). You could
take also a shorter line with a resistor to reduce the current.
- Third solution (and my favourite) is to use an old coffee machine as heater.
But don't put the etchant where you usually put the water for the coffee!
I do not know how the inside heater for the water works, so it could
happen that something gets destroyed because of the etchant and somewhere there
are also 220V around! So just put it in the coffeepot and wait until the heater of the machine has warmed it
up in the pot. This method is the fastest and easyest, but works only for small pcb's
(10x7,5cm), depending on the size of the coffeepot.
to go back click "back" on your browser or use the link here below
go back