Contents of this chapter / file 'startins.htm'
-
System Requirements
-
Installation and directory structure
- Configuration data files
-
Setting up the soundcard (or other input devices)
- Avoiding audio bypass from 'Line-In' to 'Line-Out' in the soundcard
- Avoiding audio drop-outs (caused by thread priorities / high CPU load)
- Stop windows from hiding audio devices that are not 'plugged in'
- Windows 10 camera, microphone, and privacy
- Running SL 'as administrator', if certain functions don't work properly
- Notes on various soundcards
-
Quickstart for QRSS (very slow Morse code
viewer)
-
Program start with command line arguments
-
Running multiple instances of the program
-
Creating shortcuts for different configurations
Special topics ('after installation') :
- Running SL 'as administrator', if certain functions don't work properly
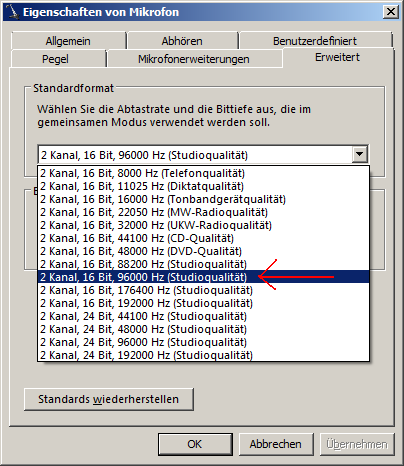
- Selecting higher sampling rates under Windows 7 (separate file)
- How to install and run Spectrum Lab under Linux / Wine
- How to use SL with software-defined radios like SDR-IQ or PERSEUS
See also: Spectrum Lab's main index,
'A to Z' (keyword index).
You will need the following to use "SpecLab":
- a PC with Win95, Win98, WinME, Win2k, WinXP, Windows 7 / 8, or Linux+Wine
- a soundcard with an audio input resolution of 16 bits
- a color graphics mode with at least 800*600 pixels with 256 colors
(a graphics mode with higher resolution and "true color" is preferred,
and even required under WinXP and any later version of Windows)
back to top
2. Installation and directory structure
To install the program on your PC, follow the instructions of the installation
program. An uninstaller will be configured too, so you can remove this
software easily if you don't need it any longer.
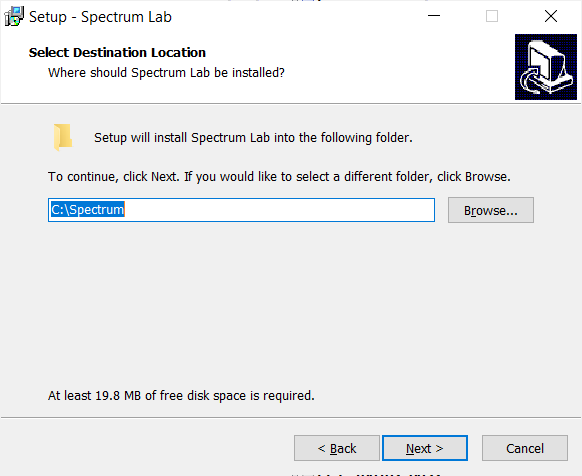
The default folder for the installation is C:\Spectrum :
It is recommended not to install SL in the Windows 'Programs'
folder (or whatever that 'Programs'/'Programme'/'Programmi'/'Program Files (x86)'
folder may be now) because you will run into all kinds of trouble
with windows "Vista", Windows 7 / 8 / 10 / 11, and whatever comes next,
because programs installed in the Windows 'Programs' folder often
don't have write permission for the files located there (including subdirectories).
If you insist on having a strict separation of "the program" (SpecLab.exe)
and its "data" (like configuration files, frequency lists, colour palettes,
logfiles, recorded audio, etc), install the program wherever
you, your admin, or MS Windows wants to have it, and let SpecLab.exe know
where the "data" are as explained here
(in an extra document, data_folders.htm).
In the interest of simplicity, throughout this documentation, we assume
you installed Spectrum Lab to the recommended folder, C:\Spectrum.
Some subdirectories will also be created by the installer:
-
..\Data\
-
default directory for data files, like logged data files from long-term
observations etc.
Because Spectrum Lab must have write-access permission for this directoy,
the installer may have to place it somewhere else (very annoying,
but that's what windows Vista wants..).
To simplify the task of 'finding' this (and other) writeable directories,
the installer will write a short text file which contains the DIRECTORY PATHS
to all 'writeable' directories ... thanks Microsoft for changing this over and over ...
the ugly details are here ("data folders").
-
..\Export\
-
contains some export file definitions and example user settings.
Beginning with Windows Vista and Windows 7, the directory path for this folder
also had to be moved somewhere else (because any folder under 'Programs' doesn't
have write permission by default) - more details here ("data folders").
-
..\Goodies\
-
contains additional information and special files. More info in a
readme-file in the subdirectory.
-
..\html\
-
Contains the online help system. When missing (in the folder with the executable),
Spectrum Lab will try to load the help page from the author's website,
which used to be http://www.qsl.net/dl4yhf/speclab/ .
-
..\palettes\
-
contains a lot of different colour palettes for the spectrogram. When making a 'portable'
application (on a memory stick), copy this folder to the memory stick along with the files
listed further below.
-
..\configurations\
-
contains a lot of different configurations for Spectrum Lab, in addition to the built-in
"defaults" in SL's Quick Settings menu.
Alternatively, instead of 'installing' Spectrum Lab completely on a PC, you can let it run
directly from a USB memory stick or memory card without installation
(in geek speak, make a "portable application" on the storage medium).
As of December 2014, the only files which are essential to run the program on a windows PC were:
- SpecLab.exe (executable file)
- OggVorbis4SL.dll (contains libraries which SL needs to read certain audio files and streams)
Of course, with only those files copied to the portable storage medium, there will be
no selectable colour palettes,
and (without an internet connection) no help system, etc.
2.1 Configuration data files
A lot(!) of configuration parameters are saved between two SpecLab sessions
in old-fashioned INI files (not in the registry ! ). One file contains
machine-specific data (and should not be copied from one PC to another),
the other only stores application-specific data (and can safely be copied
from one PC to another, to run the program with the same settings there).
The machine configuration data contain:
-
the information which audio device (soundcard etc) shall be used, and how
it is accessed
-
calibration tables for the audio device (true sample rates etc)
-
interface setup to control a transceiver (COM-port, control lines etc)
-
and possibly something more
The user configuration data contain:
-
screen setup
-
sample rate, frequency range, FFT resolution,
-
amplitude range
-
waterfall scroll rate, display colors, etc etc etc
The above, and other configuration- and "data" files,
are usually located in the same folder (directory) as the
executable file (SpecLab.exe). But optionally, the directory
path can be modified as described in
settings.htm#filenames.
back to top
After "installation", you may optimize some parameters for your
requirements. You should (but you don't have to).....
-
Adjust your soundcard settings for proper audio levels
-
Check the level of the soundcard input with the input monitor
-
Define the difference between UTC("GMT") and your local
timezone
-
Verify everything in the Configuration-Dialog
-
Adjust the amount of memory used for buffering
-
Test the digital filter on your PC
-
Check if there is an unwanted audio bypass
from the soundcard's input to its output, which spoils the software-DSP
-
If you intend to use Spectrum Lab with the SDR-IQ (by RFSPACE), read
this document .
-
Users of PERSEUS (a software defined radio by Microtelecom in Italy), read
this .
back to top
3. Setting up the soundcard (or other input devices)
By default, Spectrum Lab uses the windows multimedia system for audio input
and -output. Details on setting up the soundcard properly are
here (separate file; link doesn't work in the PDF).
If your soundcard (or similar audio device) supports ASIO, look
here because ASIO works better with some cards
(especially at sampling rates above 48 kHz and resolutions above 16 bit).
To use SL with SDR-IQ or SDR-14 (by RFSPACE), install
SpectraVue too. This will install the necessary USB drivers (by FTDI) which
are not included in SL. Alternatively (when available for your radio and OS),
you could use a Winrad-compatible ExtIO-DLL as interface (applies to many other radios, too).
To use SL with PERSEUS (by Microtelecom s.r.l), install the Perseus software,
and the WinUSB drivers for your particular OS. More details
here .
To use SL with SDRplay's RSP (Radio Spectrum Processor, for 100 kHz .. 2 GHz),
download and install their ExtIO-compatible interface from the Plugins page.
Then (as for other SDRs), select the DLL as input device in Spectrum Lab as described here.
To process samples from your own A/D converter, consider using the
file-based audio input, or send the
audio stream towards SpecLab via UDP or TCP/IP (UDP is best suited for simple
microcontrollers with Ethernet interface).
back to top
3.1 Unintended audio bypass between the soundcard's Line-In and -Output
For real-time signal processing with SpecLab's internal DSP functions, an
analog audio signal must get into the PC somehow, and to make to
processed signal audible it must get out of the PC so we can listen
to it with headphones or external speakers. This should be no big problem
nowadays, because modern cards support "full duplex" operation, which means
their analog-to-digital converter (ADC) and digital-to-analog converter (DAC)
can run simultaneously. So we can use the DAC to produce test signals, and
the ADC to analyze a different signal at the same time. Or we can
use the ADC to digitize a signal, run it through some digital processing
algorithm, and convert it back into an analog signal in real-time.
Sounds easy, because our brand-new soundcard has two audio jacks for this
purpose, labelled "Line-In" and "Line-Out". So what's the point ?
Often things are not that easy. There are a lot of different signal
paths inside a soundcard, different sources and
destinations, and very different (and incompatible) ways to connect
all these. The default settings of many cards are not suitable for us,
because they feed the signal which enters the card through the "Line-In"
port directly to the "Line-Out" port, for whatever reason. This is not very
helpful here, because we only want the PROCESSED signal to appear at the
"Line-Out" port. We also do not want the signal at "Line-Out" to be fed back
into the analog-to-digital converter, because this may cause heavy feedback
or heavy oscillation (making the stereo speakers jump through the living
room !). Too bad ! Both situations must be avoided. In other words:
Be prepared to spend a few hours playing with your soundcard's own "volume
control panel" (or whatever the manufacturer called it), until you managed
that the audio input (from the "line-in" jack) only(!!) goes
into the A/D converter, and the card's audio output (the "line-out" jack)
is only fed from the D/A converter, without annoying bypass.
The standard audio volume control program (SoundVol32.exe) is often all we
have. If can be launched from SpecLab's
Options menu, to show the settings for
"recording" (analog-to-digital conversion) and "replay" (digital-to-analog
conversion). Just a few points to be aware of:
-
On the "Recording Gain Control" screen ("Aufnahmesteuerung" in German) ,
only select the "Line-In" signal as recording source, or mute all other sources
for recording. Unfortunately sometimes there is no "Line-In" as recording
source, but an "Analog Mix" which makes it more complicated (as for the Audigy,
see below).
-
On the "Playback Volume Control" screen ("Wiedergabe", or "W-gabestrg." as
CL likes to call it), only select "Wave" as playback source, or mute all
the others. "Wave" often means the D/A converter.
-
On some cards like the Audigy 2 (you have to enable "Line-In" also on the
playback volume control screen, otherwise it won't record !!), the cure is
not simple but possible then .. see below !
-
Also enable the "Master Volume" on the playback panel, otherwise you won't
hear anything from the speakers.
-
Sometimes all these problems are gone if you use an ASIO
driver instead of a standard multimedia audio device !
3.2 Avoiding audio drop-outs (caused by thread priority settings / high CPU load)
On a heavily loaded system (soundcard running at circa 192 kSamples/second, GPS-stabilized sample rate,
GPS-based resampling to exactly 192.00000 kS/sec, etc), the following strange symptom happened,
which may be a showcase how to avoid such problems.
While SL was running, causing almost 90 % CPU usage, the
'ADC' function block (in SL's circuit window)
occasionally turned yellow and green again when rapidly scrolling a large HTML document in Firefox !
The reason was a sporadic overflow of the soundcard input buffers, which in turn was caused by SL not being able to drain those buffers fast enough
(in the real-time audio processing thread). The problem could be fixed as follows:
- In SL's 'Options' menu, select 'System Settings', 'Miscellaneous'.
- There is a rarely used field labelled
'Audio thread priority (0=standard, >1 = higher)
- The default value (in any SL version before V2.81 b10) was '0',
which seems to be too low on a heavily loaded system,
under the conditions mentioned above
- Change the 'Audio thread priority' from zero to 1 (one) or even 2.
- Exit from SL and start it again, to make the new thread priorities effective
With the higher thread priorities, the audio processing thread seemed to be able
to 'interrupt' the CPU-hungry vertical scrolling in Firefox (or similar activities)
whenever audio data were waiting for processing.
This completely eliminated the 'lost audio samples', and a long-term phase measurement
didn't show any 'kinks' in the plotted phase graph (in the case, the carrier phase
of DCF77 using a GPS-receiver with 1-PPS-output as reference).
See also : Audio settings, Configuration window, Phase- and Amplitude monitoring .
3.3 Stop windows from hiding audio devices which are not 'plugged in'
Windows 7 (and possibly any later version) has the bad habit to 'hide' installed audio hardware
when nothing is plugged into the device's audio jack.
Even when properly installed, such devices do not appear in SL's audio device list (under Windows 7, etc).
A solution was found in the internet by searching for 'disable windows sound card jack sensing'.
Found in various forums on the subjects :
- Open registry Editor with elevated privileges
- Go to HKEY_LOCAL_MACHINE\SYSTEM\CurrentControlSet\Control\Class\{4D36E96C-E325-11CE-BFC1-08002BE10318}\0000\GlobalSettings
- Change the value EnableDynamicDevices from hex:01,00,00,00 to hex:00,00,00,00 .
- Restart your system.
3.4 Windows 10 camera, microphone, and privacy
Windows 10 (and possibly any later version) came along with another 'nice surprise'
for developers: Even if the user has selected a certain audio device for input,
this OS 'silently' blocks access to the microphone per default, and in that case,
Spectrum Lab only receives .. well ... silence from the audio input.
Other kinds of analog audio inputs (like "Line-In") besides "microphones" may be
affected by the same block-by-default madness.
Software-defined radios that present themselves like an 'audio device' to
the system will most likely be plagued by the same. But radios like e.g.
the Icom IC-7300, IC-9700, IC-705, when connected to the PC via USB,
all appear as "soundcards" (with braindead names like "Microphone (USB Audio Codec)")
to the system, and thus may be subject to the "privacy"-madness mentioned
in this subchapter.
There used to be an article titled
Windows 10 camera, microphone, and privacy
on the Microsoft website explaing how to grant "an app" access to the microphone again.
In November 2018, the article was at
https://privacy.microsoft.com/en-us/windows-10-camera-and-privacy
See also: Toubleshooting / 'More fun with Windows 10'
3.5 Running SL 'as administrator', if certain functions don't work properly
Under Windows 7, certain functions didn't seem to work properly when running SL without administrator privileges.
The following list is most likely incomplete:
Functions which did not work properly without admin privileges, and required 'Run as Administrator' :
- Setting the PC's system date and time from the time signal decoder
- furthermore, if for some reason you need to install SL in the default windows "Programs" folder
(or whatever they call it this time), you will have to run it with admin privileges
because otherwise SL may not have permission to write its own configuration files (in its own folder).
It's crazy, isn't it ?
Here's how to run SL as administrator (by modifying its desktop icon under Windows 7 - thanks Rob ! ):
- Right click desktop shortcut icon
- Select properties
- Click 'Advanced' button
- tick box for Run as Administrator
- Close up
- Click apply
- Close up
This will set Spectrum Lab with administrator permission until the checkbox is unticked again if you so wish.
3.6 Notes on various soundcards
(just a loose compilation of feedback from other Spectrum Lab users)
... has been moved to a separate file
(qrss_quickstart.htm) ...
5. Program Start with Command Line Arguments
For special purposes, you can pass a command line to the program when starting
it. This is required only if you...
-
want to have multiple instances of the program running at the same time,
with each one using its own configuration file;
-
want to have multiple instances of the program running at the same time,
with one of them passing audio data (as master) to other instances (slaves).
-
have a system with more than one soundcard, and you want to create desktop
icons to start an instance of Spectrum Lab which uses a certain card (instead
of the first detected audio device);
-
want to help me debug the program, especially if the program crashes on
your system but not on the author's ;-)
An overview of parameters which can be set through the command line is
here.
If you only have a single soundcard on your system, or only need a single
configuration, don't read any further on this page. It may be getting
complicated.
The general syntax to start Spectrum Lab with command line arguments is like
this:
SpecLab.exe <Machine-Config> <User-Config> [ <"Main Window
Title"> ]
There are also some command line switches (options) which will be explained
later.
Without using command line arguments, all parameters are saved in an old
style INI-file named "SETTINGS.INI" in the current directory of the spectrum
analyzer.
Usually, in this file both machine- and user-dependent data are saved.
To have multiple instances
of the program running at the same time, using different
configurations, you can tell the program which configuration file shall
be used (instead of the default filename "SETTINGS.INI"). If you don't specify the name
of the configuration file in the command line, the program uses "SETTINGS.INI"
for the first running instance, "SETTING2.INI" for the second, "SETTING3.INI"
for the third, etc. The same principle is used for the machine-depending data
(MCONFIG.INI, MCONFIG2.INI, etc), unless the 'machine configuration' shall be located
in the same file as the 'user' configuration (more on that
here - option "no extra file"
for SL's machine configuration data).
This can be achieved by passing one or more arguments to Spectrum Lab during
program start. The first character in each argument must be a lower case
letter defining the type of the argument, followed by a '='-character and
the assigned value (e.g. a filename). Example:
SpecLab.exe m=Machine1.ini u=BandView.ini "t=Full Range Band View"
This will force Spectrum Lab to load the machine configuration data from
"Machine1.ini" and the user configuration data from "BandView.ini". The main
window will have the title "Full Range Band View".
A more-or-less complete overview of command line parameters is in the
next chapter.
Command line parameters prefixed with a slash, which are not listed below,
will be passed on to Spectrum Lab's internal command interpreter (see the
"capture"-example below).
Using a <key>=<value> syntax explained further below,
Spectrum Lab can be instructed to use a different window title, load a certain configuration, etc.
For special purposes, a few more command line
options were implemented . There are:
-
<filename.wav> Any string ending with the extension ".wav" is considered
an audio file, which will be played (instead of processing the input from
the soundcard, or whatever used as standard audio source).
-
/si single-instance option. If the program
is invoked with this switch, it will check if there is another instance already
running. Instead of launching a new instance, the rest of the command line
will then be sent automatically to the first (already running) instance,
which will then evaluate it a few milliseconds later. See examples below.
-
/q tells the program to quit automatically when "finished" with playing an
audio file. If it does not play an audio file, it terminates itself
immediately. Can be used together with the /si-option to fill Spectrum
Lab's internal playlist !
-
/w tells the program to wait until the specified
audio file has been played (or analysed), similar to the /q option mentioned
above. The rest of the command line (after the /w) will be parsed -or at
least "executed"- after finishing the file analysis. This allows, for
example, to produce a screenshot of the spectrogram *after* the file has
been analysed (see examples below).
-
/debug runs the program in "debug" mode. This creates a logfile as explained
in the troubleshooting guide.
-
/noasio do not use ASIO drivers (only standard multimedia drivers).
Implemented 2011-08-09 when the program seemed to crash
while trying to enumerate the available ASIO drivers.
-
/inst=N overrides the
instance-detection, and instructs the program
to run as the N-th instance (N=1 to 40, if your PC's RAM permits such a large
number of simultaneously running instances).
-
Command line parameters in the form <key>=<value>
are explained in another chapter.
Some special examples:
-
SpecLab.exe C:\Spectrum\SpecLab.exe /si
"C:\Musik\Joe_Jackson\Classic_Collection\T03_Steppin_Out.wav" /q
plays a certain wave file from the harddisk, and terminates itself when finished.
-
SpecLab.exe /si /q
Checks if there is an instance of SL already running, terminates that first
running instance (by sending the /q command = quit to the first instance),
and finally terminates itself. Can be used in a batchfile to close down Spectrum
Lab automatically.
-
SpecLab.exe /si /capture
Sends the command to produce a screen capture of the waterfall (etc) to the
first instance of SpectrumLab. The same way, most
interpreter commands can be invoked
through the command line !
-
SpecLab.exe /si "t=Oops, what happend to my title ?"
Changes the window title of the first instance (which already ran before
this command was executed).
-
SpecLab.exe test.wav /sp.print("Test") /w /capture("test.jpg") /q
Analyses the file "test.wav", prints a message into the spectrogram, waits
until the analysis is done, captures the (spectrogram-)screen as "test.jpg",
and finally quits. Note the importance of the sequence, especially the
/w option.
See also: Communication with external programs,
Audio Clients and Servers,
Using a system with more than one audio device,
Overwiev of command line parameters,
Running multiple instances (with different configurations),
Creating shortcuts for different configurations,
back to top
The following command line parameters are specified in the form <key>=<value>.
Besides those key=value pairs, the command line parser also recognizes
switches (beginning with a slash, listed later in this chapter)
and filenames (already described at the begin of this chapter).
There must be no spaces between the key (keyword), the '=' character, and the value in a single
key=value pair. Like other command line arguments, multiple pairs are separated
by spaces (not commas).
If the value is a string with space characters, the command line argument must be embedded in double quotes
(so the windows command line parser will recognize it as a single argument).
m= sets the name of the machine configuration file
u= sets the name of the user configuration file
t= sets a new title for Spectrum Lab's main window only
 T= sets a new title for the main window
and the text in the windows task bar.
T= sets a new title for the main window
and the text in the windows task bar.
Example (see screenshot on the right):
SpecLab.exe "T=VLF Spectrogram"
width= sets the width of the main window in pixels.
height= sets the height of the main window in pixels.
top= sets the horizontal position of the main window in pixels.
top= sets the vertical position of the main window in pixels.
By specifying any (or all) of the four parameters above, the settings loaded from the
*.usr or *.ini file are overridden, and a casual operator CANNOT move or resize the main window anymore.
It's your responsibility to make sure the 'vital parts' fit on the screen with the above option.
The following command line switches are prefixed with a slash character (or backslash).
Most of them do not use a <key>=<value> syntax:
/si : option (switch) to send the rest of the command line to the
first running instance. Explained here
in detail.
/q : quit option. Instructs the program to terminate itself when "finished",
usually with playing a wave file etc.
/w : wait option. Waits for file analysis, before the rest of the command
line is executed. Details here .
/nomenu : hides the main menu (and the window borders) after launching the
program. To restore the main menu, press ESCAPE.
/inst=N : overrides the instance-detection,
and instructs the program to run as the N-th instance (N=1 to 6) .
/noasio : Do not use ASIO drivers (only standard multimedia drivers).
Implemented 2011-08-09 when the program seemed to crash
while trying to enumerate the available ASIO drivers.
/debug : For debugging purposes, specifiy the option
/debug on the command line when launching
Spectrum Lab. The program will write a file named "debug_run_log.txt" into
the current directory, which may help me tracing bugs (answering
questions like "how far did it get" - "where did it crash" - "why did it
load so slow" - etc ).
This proved to be a very helpful debugging aid, when the program crashed
on certain machines, using a certain windows version, a certain soundcard,
etc. The contents of this debug log may look like this (just an example,
when the program terminated "normally") :
19:38:45.9 Logfile created, date 2012-10-15
19:38:45.9 checking instance...
19:38:45.9 Executable: c:\Spectrum\SpecLab.exe
19:38:45.9 Compiled  : Oct 15 2012
19:38:45.9 Data Files: c:\Spectrum
19:38:45.9 init application...
  ... (many lines removed here) ...
19:38:55.7 Beginning to close ....
  ... (many lines removed here as well) ...
19:38:59.4 Deleting SPECTRUM objects
19:38:59.4 Deleting other buffers
19:38:59.4 FormClose done
19:38:59.4 Ok, all 85 dynamic memory blocks were freed.
19:38:59.4 Reached last termination step; closing logfile.  (this message indicates that the program closed "as it should")
If you find any messages like "Serious Bug", "Fatal Error", "Allocation Error",
"Application Error" etc in that list, please let me know.
More details about running Spectrum Lab in 'debug' mode, and how/where to report bugs, is in the 'Troubleshooting' notes.
back to top
If is possible to have more than one instance of Spectrum Lab running at
the same time on a single PC. The number of instances depends on the CPU speed
and amount of installed RAM. Multiple instances must be launched from the
same executable file, located in the same directory, to avoid
wasting RAM for the executable code (window "maps a file into memory" to execute it,
and it seems to be smart enough to map the same file into memory only once,
even when multiple instances are running with different configurations).
In the "old days", a single soundcard could only be opened by a single program,
but these days (unless you need to use an ASIO driver) a single soundcard can
be used by multiple programs, preferrably all using the same sampling rate.
See "Using a system with more
than one audio device" in the description of the configuration dialog.
If two (or even more) instances of Spectrum Lab run side-by-side on the same PC,
the program ensures that different configuration files are used as described
above.(at least for the first and second started
instance). This allows you to start two instances with the same shortcut
icon on the desktop. Even different window positions and sizes are saved
in the configuration files. During program start, Spectrum Lab checks if
it "already runs" in another instance. If so, the title of the 2nd instance's
main window will display something like this to avoid confusion:

The "[2]" in the window title also appears on some of the second instance's
child windows.
-
Programmer's Information:
-
The detection of other instances uses mutexes. The first instance
creates a mutex called "SpecLab1", the second a mutex "SpecLab2". This is
also a method to detect the presence of Spectrum Lab for other programs.
To bypass the instance-detection (which may be necessary in very rare cases),
use the /inst=N command line option (N=1...40).
back to top
You can create a shortcut ICON with command line arguments / parameters.
Right-Click on an empty space of the desktop, then select "New..Shortcut
(?? on a german PC: "Verknüpfung"), then find your way to the directory
where SpecLab is installed, and append the command line parameters (using
hyphens). The complete string should look like this (just an example, the
path may be different on your machine !):
C:\Spectrum\SpecLab.exe "m=Machine1.ini" "u=BandView.ini" "t=My Title"
back to top
See also: Spectrum Lab's main index
Last modified : 2020-10-23
Benötigen Sie eine deutsche Übersetzung ? Vielleicht hilft dieser Übersetzer - auch wenn das Resultat z.T. recht "drollig" ausfällt !
Avez-vous besoin d'une traduction en français ? Peut-être que ce traducteur vous aidera !