
I've been a Microsoft programmer and user for many a year. I used the Mac at work almost 20 years ago, and was impressed at the efficiency of the operating system. I finally made the switch from Microsoft Windows to the Apple Mac in Feb 2008. These pages chronicle the transition from Windows to OS X.
Contrary to popular opinion, I've found better ham radio application software for the Mac than on the PC. There's still more programs available for the PC for specialty use, but for what I do, I no longer really need a PC for day-to-day amateur radio use. With Don Agro VE3VRW's support of satellie keplerian elements (keps) from Celestrak into MacDoppler, and Kok Chen W7AY's inclusion of CW support into cocoaModem, I'm set.
This info does not necessarily constitute an endorsement of the products and services below.
Enjoy, and feel free to drop me an e-mail if you have any questions.
Why go Mac?
- If I have to buy a new computer and buy new software all over again, why not buy it for a robust, solid platform.
- The user interfaces are simple and clean. You see only what you need to see in order to get things done. While surprising at first, it actually becomes quite welcome and addicting.
- No more unresponsive windows, especially when browsing the web or composing emails. I now get annoyed with XP at work when it does that to me several times a day.
- No more Blue Screen of Death!
- No more monthly Windows patches! There's patches for OS X, but not as frequent or intrusive.
- The Mac asks nicely BEFORE it updates the software if you wish to be bothered with a system reboot. It gives you a chance to close all your programs BEFORE you install the updates and reboot.
- I get a lot of performance and throughput for a Core 2 Duo processor. My programs start quickly.
- You can start programs such as a web browser before the user interface has fully completed populating the desktop, etc. It gets to that point faster than Windows.
- It shuts down faster than Windows. About 3 seconds, compared to 6-8 for Windows.
- Pretty decent battery life. Lasts over 1.5 hours easily.
- The speaker audio on the MacBook is pretty darn good. No need for external speakers.
- The Mac is more expensive, but it has audio and video software built-in.
- Has a built-in web cam and microphone. The microphone did such a good job that I didn't need to hook up wires to transfer audio from an audio recorder to the laptop. I'm impressed, and so's the recipient.
- I like the way and ease of setting up backups using the built-in Time Machine. Real easy and simple. Once you've set it up, it automatically backs up once an hour -- right out of the box. I actually back up my Mac once a week by connecting the external hard drive, canceling the anti-virus scan, then click Time Machine > Back Up Now. One click, one move of the mouse, and the ending click. Let it run while I read web pages and emails, and I'm done.
- The MacBook has WiFi and Bluetooth built-in. It auto discovers devices in a very clean user interface. It found the Apple Mighty Mouse bluetooth device very nicely and so easily I forgot how I did it.
- If you're into HF ham radio, you've got to see MacLoggerDX in operation with it's station automation features, including real-time monitoring of the spot reports on the Internet. It's amazing!
- MacDoppler has a full screen mode that looks like a real-time screen saver. Very beautiful!
- Kok Chen W7AY's cocoaModem blows away the other PC HF digital mode programs. If you want more details on how to make a killer CW home station, click on this link.
- I'm working on installing XASTIR when I have time. If you've done it, send me an email.
- I'm looking forward to installing a dual-boot option for Windows, so I can run some previous ham radio and non-ham software. That should speed up my migration from Windows to Mac OS.
- Instead of downloading dozens of small programs to view files, the Mac has one "Preview" program that can handle many file formats. So, if it's not an Office download file like a .doc or .ppt, there's a good chance of viewing the file by letting it default to "Preview". Handles .jpg, .PDF, .png, etc.
- It has Unix built-in, and you can download development tools for free.
- The menu bar is consistently at the top of the screen, not jumping around in each window. As a result, you get to see all the menu choices available.
- If you like to do screen shots, the Mac allows you to select the area and size of the screen shot right out of the box. (Command+Shift+4), drag and select the area. When you let go the mouse button, you hear the sound of a camera shutter, and it leaves the screen shot as a file on your desktop as a .png file. You can then attach it via email. How simple.
- In short, it does things so well, I'm not wasting any more time on Windows.
- To migrate the files from the PC to the Mac, I just made sure all my desired PC files were on the hard drive with a USB cable, disconnected the hard drive's USB cable from the PC, and connected it to the Mac. The Mac can read Windows' NTFS file system USB hard drives in read-only mode. So it was a simple matter to copy the file folders from the USB hard drive to the Mac, and when it was all done, dismount the USB hard drive using the "eject" button in Finder (the Mac's equivalent of Windows File Explorer). Of course, you'll need to buy/install Mac versions of your desired programs, and Microsoft offers a Mac version of Microsoft Office.
- You can migrate files between a Mac and a PC by copying them to USB thumb drives which are formatted with FAT-32.
Transition to Mac OS X
These links point to sites which have hardware and software I've incorporated into my Mac.
- RAID Level 1 External Hard Drive for backups
- Built-in Backup Software for OS X - Time Machine
- Anti-virus - Symantec/Norton Internet Security for Mac
- Web Browser - Firefox
- Email Program - Thunderbird
- Zip and Unzip Utility - Stuffit
- Windows Media Viewer for the Mac - Flip4Mac
- Word, Excel, Powerpoint - Microsoft Office
- Cyberduck - FTP Software for updating Web Pages
- Logging Program and Ham Shack assistant - MacLoggerDX
- Satellite Tracker - MacDoppler for Cocoa
- cocoaModem - HF Digital Modes program for Cocoa and the Mac
- TNC Terminal program - MacTNC V1.2
- EchoMac - an Echolink client for Macintosh OS X
- FAQ for EchoMac
- Router settings for EchoMac
- Open Source APRS Program - XASTIR
- Mac software for Ham Radio
A few words about the Mac keyboard. What is marked as Backspace on the PC keyboard is marked as delete on the Mac. To get the traditional Delete function on the Mac, press and hold the fn (function) key while pressing the delete key, and you'll delete the character to the right of the cursor.
Instead of pressing ctrl and the x, c, and v keys for cut, copy and paste, you use the command key instead of the ctrl key.
USB to Icom CI-V Radio Control
A word about MacDoppler, MacLoggerDX and West Mountain Radio RIGTallk.
I previously bought a West Mountain Radio RIGTallk for Windows XP to control an Icom IC-910H. Since I migrated platforms to the Mac, I needed to find a way to move the connection to Mac OSX. The technique is to install the Mac OSX software driver from West Mountain Radio (which is not officially supported, but it seems to work with Leopard. The documentation below pertains to Leopard. It no longer works with Snow Leopard, but see the note below.) Go to their support website and download the Mac OSX Drivers for RIGTalk. When you open the .zip file, it'll ask you confirmation to proceed, as it will do a shutdown or reboot. You should close out your other applications before proceeding. As usual, it'll ask for the password, prompt you for a shutdown or restart, and continue. The driver installation has to update the boot caches, which will take about 25 seconds.
When the reboot completes, open your DogPark software application, select the menu option Preferences > Radio > Serial Port, and select WMRRIGtalkRT1. Set the to the default address of C0, or whatever address you choose. You can check this web page for more information on the default CI-V address for your radio. Use the information in the column marked addr, and leave off the "$" dollar sign. Set the baud rate to 9600 baud, or whatever speed you choose. Note that I use Icom radios, so I'm familiar with CI-V formats. I am not familiar with Yaesu's CAT formats.
Dave N2IRO reports on October 5, 2009 that he had trouble with the RIGTalk Mac driver and Snow Leopard.
Ron KF5JRA
reports on June 3, 2011 that the RIGTalk Mac drivers for Snow Leopard can be found at
this link.

In the meantime, you can also use the USB interface II. If you have Snow Leopard, the suggested interface is the Microham USB Interface III).).
USB to RS-232C adapter
For the programs such as MacTNC using the KPC-3Plus (and other) TNC, I just happen to have a Cables Unlimited USB-2920 USB 2.0 to RS-232C DB-9M Serial Adapter lying around. The following documents what I did. It is not an endorsement or recommendation. Also, check the web site for the latest and appropriate versions.
I installed the VCD Drivers. The PDF instructions are here.
Download the Mac OSX (Intel) driver on this web page. Download the V2.2.9 driver DMG volume. Follow the instructions, and start the installation program. The install process requires a restart. Allow for more time at the blue screen upon startup.
When the desktop appears, plug in the device. To verify that the device is visible, go to Application > System Preferences > Network. It should show a new USB Serial device detected. Modify the configuration as needed. You can then configure MacTNC as needed. Works fine with the Kantronics KPC-3+.
cocoaModem: The Ultimate Home Computer-Morse Code Radio Setup?
Trying to figure out the ultimate home computer setup to run morse code? Give this a look. I've been at this a long time, and believe this is the simplest, most robust solution to keyboarding morse code (CW) on a home computer right into your ham radio.
- Icom IC-706 MK II G, or any decent HF radio with a 6-pin Mini DIN data/packet connector in the rear
- Tigertronics SignalLink USB interface/sound card, be sure to get the SLUSB6PM assembly/6-pin Mini DIN cable
- A MacBook, not a PC
- Kok Chen W7AY's cocoaModem for the Mac, configured for CW
I've looked at CWGET on the PC. The program is a good program, but it's just not as slick and polished as what W7AY has done with cocoaModem.
Ernie, NH7L clued me in to Kok Chen W7AY's work when I first got my Mac. It took a while for me to get around to trying out this program, but when I took a look at it, I was very pleased. A part of it was it took me a while to buy a Tigertronics Signalink USB. I owned the non-USB version and finally got around to ordering the USB version to Richard Garriott W5KWQ's work with SSTV aboard the ISS in November 2008. I never got the ISS, SSTV mode and the PC at the same place and same time, so that effort failed. Three months later, I made the time to try out cocoaModem on the Mac.
cocoaModem does all the popular HF digital modes, including CW Morse Code. It uses only the sound card interface to hook up the computer to the radio. You don't have to fool around with an extra RS-232 Comm port cable or parallel printer port cable (which are getting harder to do with USB computers) to get the radio to transmit. The Tigertronics SignalLink USB does all the interfacing for CW. If you want to simultaneously use frequency control with MacLoggerDX, you need to add a computer control interface, such as the RigTALK above.
I plugged all the elements together, spent about ten minutes configuring cocoaModem for CW, and it was on the air!

Audio/PTT Interface using the SignaLink USB
If you use the TigerTronics SignaLink USB, configure the jumper wires within the SignaLink USB for the radio connector(s) you are using, then just plug in the USB end into the USB port on the Mac, and the radio connector(s) end into the radio. If you use the 6-pin mini-DIN (preferred, if your radio has that connector), then it's just one connection, usually to the back of the radio and you leave your microphone and speaker connections untouched.
Note that the 6-pin mini-DIN data connectors are found on some mobile/base radios manufactured since 1995. It was advanced by the amateur radio manufacturers as a means of standardizing connecting a packet TNC to VHF/UHF radios. The 6-pin mini-DIN brings out the mike audio, Push-to-talk, discriminator receiver audio and the equalized post-discriminator receiver audio to the connector at the back of the radio.
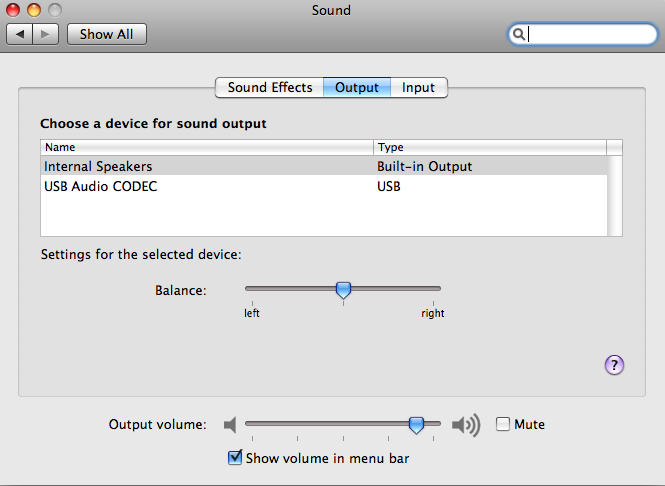
To verify that the SignaLink USB picked up the drivers correctly, in your Finder window, click on:
- Application
- System Preferences
- Hardware Sound
- Output
You should see this screen, showing that USB Audio CODEC has been loaded.
If you wish to use your internal sound card (usable, but not recommended), and not an external sound card (which is highly recommended), you'll need to get a USB-to-RS-232 adapter to derive signalling to drive the PTT (push-to-talk) to the radio. Kok Chen describes the hardware PTT interfacing and the software PTT interfacing on his web page.
You could try this interface for additional information, but you're on your own. Echolink interface. Here's a second web site.
If you are using walkies to key the CW, you're going to have a much harder time interfacing the PTT for the walkie. Each walkie manufacturer has their own means of keying the PTT for their walkie.
Configuring your radio
Assuming you are using cocoaModem for morse code (CW), set your radio to USB (Upper Side Band) mode.
I have not tried the setup for PSK or RTTY, so I'll entertain an email from someone who's tried it and has made a contact. I believe it's USB for PSK-31, and LSB for RTTY.
You'll need to adjust the audio levels on the SignaLink USB interface to find the right balance for transmit and receive. If you're using the 6-pin mini-DIN interface, that's the only audio level you need to adjust. If you're connected to the radio's microphone and speaker jacks, you'll need to also adjust the mike gain and radio receiver volume to find the right balance with the SignaLink USB device. (For that reason, I use the 6-pin mini-DIN jack -- you only have to adjust the audio level on the external SignaLink USB, as the internal levels have been preset at the factory for a reasonably good transmit and receive level.)
It helps if you can get another friend on the air to listen to your signal, and report back the volume and clarity as you set up and try this for the first time.
Configuring CocoaModem for the SignaLink USB Audio Interface/PTT
To configure CocoaModem for the SignaLink USB, in the Window > Config section,
- for the "Main Receiver", set the Input to USB Audio Codec.
- for the "Sub Receiver", set the Input to USB Audio Codec.
- for the "Transmitter", set the Output to USB Audio Codec.
- If you want to hear sidetone while you transmit, for "Aural", set the Output to Built-in Output and click in the "Active" button.
You can also verify the other settings for the Main/Sub receivers, and the Transmitter.
I set the carrier frequency in the waterfall display to 500 Hz, to pick up the incoming morse code. A vertical hairline should appear at the 500 Hz location. Adjusted the audio levels on the SignalLink (RX knob at the 12 o'clock position), and in the program. Set the speed to "25 wpm" or whatever speed you desire.
In this example, when you tune your radio, set it for the USB mode, and tune the radio frequency 500 Hz below where you want the CW carrier to appear. You can change the offset frequency in the Window > Config > Transmitter window to 500 Hz. You can change the combination of the receive and transmit offset frequencies to suit your needs.
To prepare the transmitter, on the Tx Select, click in the Main button. You also want to set/verify that QSK on the right is pressed in. Set the speed to "25 wpm" or whatever speed you desire. When you are ready, click the Transmit button on the right side to enable the setup and the keyboard.
You can program macro key definitions by clicking on the Edit button in the lower right hand corner, and keying in the definitions to your one-click buttons. To activate the macro keys, press and hold the "command" key to the left or right of the space key, and press the number 1, 2, 3, etc keys. That will send the sequence of characters you've previously defined.
All this computing horsepower makes operating CW a joy!
MacLoggerDX: Great Logging Software for the Mac
If you're looking for a good logging software tool that goes beyond logging, take a look at MacLogger DX. Not only does keep your contacts organized in a logging database, but it also monitors the DX spots on the Internet, tunes your HF radio to the spot automatically so you can determine if you can hear that station -- and if you do, go right ahead and make the contact. If you confirm the contact, just fill in the rest of the entry and press a button, and it'll log the contact for you!
Configuring MacLoggerDX for your station
To configure MacLoggerDX with information your station, in the menu, click File > Station Info...
- enter your callsign.
- enter your registration code.
- enter your location information, address, etc.
Configuring MacLoggerDX for the RigTALK Interface (Leopard)
If you're going to use the RigTALK with MacLoggerDX, it's best to plug in the RigTALK to your Mac and radio before you start the MacLoggerDX program. To configure MacLoggerDX for the RigTALK interface, on the main display click the Prefs button towards the right, or in the menu, select Panels > Preferences
- in the lower right hand section, select your Radio.
- for the "Port", select WMRRIGtalkRT1.
- for the "Type", select Serial Port.
- for the "Radio", select your radio.
- for the "CI-V", select the address in hexadecimal that represents your radio. You can check this web page for more information on the default CI-V address for your radio. Use the information in the column marked addr, and leave off the "$" dollar sign.
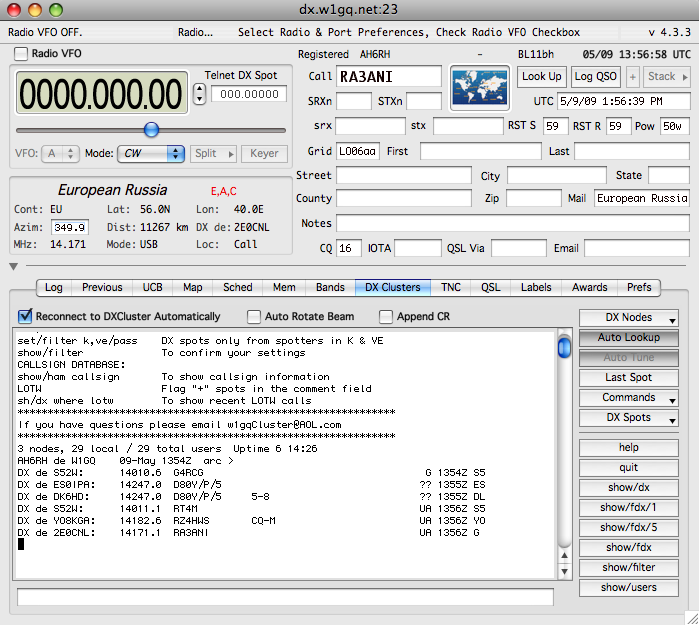
Configuring MacLoggerDX for DXCluster Spots
You can use MacLoggerDX to monitor the DX Cluster spots if you have an Internet connection, or a packet radio connection to a DX Cluster host server. I'm only familiar with how to make an Internet connection
- To configure MacLoggerDX for the DX Cluster spots, on the main display, select DX Cluster.
- On the right hand side, click on DX Nodes.
- Chose one of the nodes on the list.
- When MacLoggerDX logs into one of these nodes, you may have register your callsign and name.
- You may chose to check on the option "Reconnect to DXCluster Automatically".
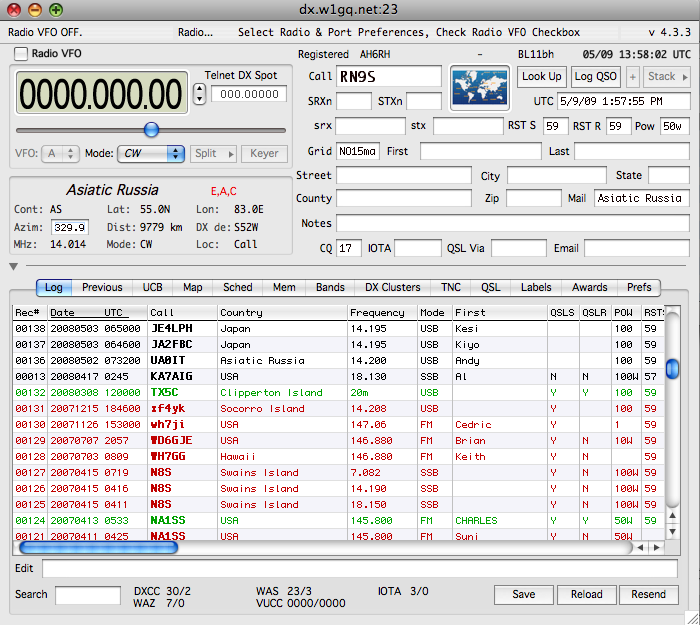
Configuring MacLoggerDX for your station log
As you make contacts in the DX Cluster mode, you can press the Log QSO button and log the QSO information.
Integrating MacLoggerDX and cocoaModem
It's possible to integrate and combine MacLoggerDX and cocoaModem, so that your digital mode contacts from cocoaModem can be logged into MacLoggerDX. I haven't tried this myself, but according to the documentation, it should work. These are my notes, which I'm researching and writing up before I test it out in a live hookup. You can try this at your own risk and let me know the results.
According to the MacLoggerDX FAQ, in MacLoggerDX:
- (This is a placeholder for future comments).
In cocoaModem:
- You can add an AppleScript which should help you in logging from cocoaModem to MacLoggerDX. An AppleScript from Richard Proven�al (VE2OTT) is available through this MacLoggerDX web page. Download it into one of your folders.
- Select Menu > cocoaModem 2.0 > Preferences... > AppleScript.
- In the QSO Log section, click on the Browse button, navigate to the location where you stored the downloaded Applescript, and click Open.
- Select Menu > Window > Config > Transmitter.
- Click on the PTT pulldown, and change it from VOX to MacLoggerDX.
If you've configured the QSK mode in cocoaModem (press in the QSK button on the right side of the transmit section of the display), cocoaModem should key up the radio through MacLoggerDX.
I'll write more in the days to come.
RUMPed: DX-pedition style logging program
If you work contests or are considering making a DX-pedition, you should check out RUMPed. I haven't had the opportunity yet to try it first hand, but it looks promising.
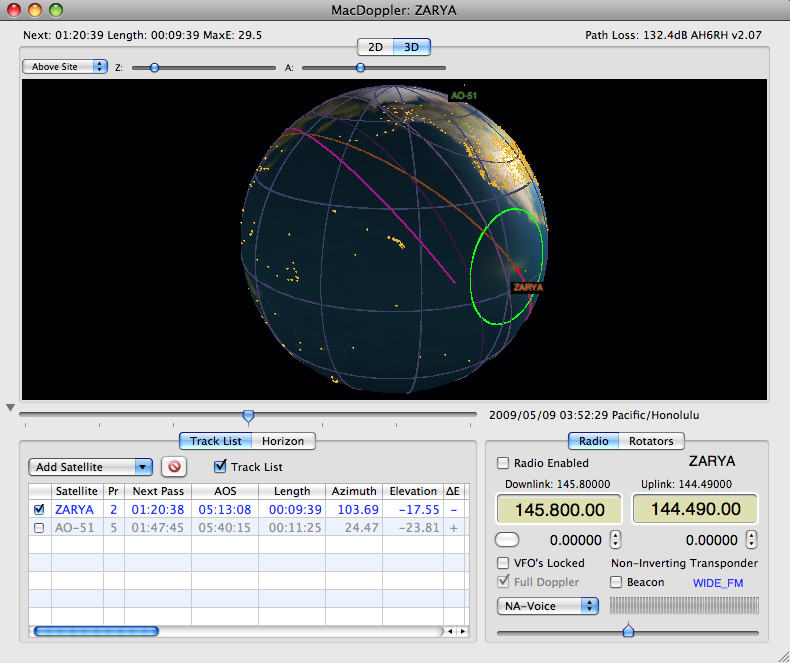
MacDoppler: Satellite Tracking Software for the Mac
If you work any of the satellites, you should check out MacDoppler. It's very easy to use, and updates your screen with information about the current and upcoming satellite passes. It can also auto-tune your radio for compensating for the doppler shifts, if you have a conputer assisted tuning (CAT) interface, such as the RigTALK from West Mountain Radio.
Configuring MacDoppler for the RigTALK Interface
If you're going to use the RigTALK with MacDoppler, it's best to plug in the RigTALK to your Mac and radio before you start the MacDoppler program. To configure MacDoppler for the RigTALK interface, in the menu, select MacDoppler > Preferences
- select Radio.
- for "Radio Driver", select your Radio.
- for the "Serial Port", select WMRRIGtalkRT1.
- for the "Baud Rate", select 9600, or whatever baud radio that have set your radio.
- for the "Icom CI-V Address", select the address in hexadecimal that represents your radio. You can check this web page for more information on the default CI-V address for your radio. Use the information in the column marked addr, and leave off the "$" dollar sign.
I download my keplerian elements from Celstrak. You can get it from Menu > File > Download Keps (Celestrak).
xastir: APRS Software for the Mac
If you have a Mac and are interested in running APRS, you should check out and the Xastir website and the Xastir Wiki.
Installing Xastir
I found this wiki explaining how to install xastir for Leopard. I haven't installed it yet, so I am unable to report how well it works.
Ham Mac: The Ham Mac email forum
If you want to subscribe to an email group, you can try out Ham Mac.
WSJT on ZS6TW's Blog
Keith ZS6TW writes that he's installed WSJT (Weak Signal - Joe Taylor) on the Intel Mac which can be used for moonbounce and other weak signal work. Take a look at WSJT on ZS6TW's Blog.
If you want more info on WSJT, take a look at WSJT on K1JT's web page.
Software by W1HKJ
W1HKJ writes cross-platform software that uses the sound card and a radio to provide transfers of data and messages. Take a look at W1HKJ's web page.
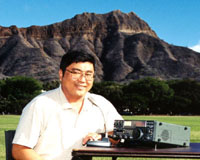
Hawaii Hams running Mac OS X
These are some of the hams in Hawaii running the MacIntosh.
Copyright © 1997-2015 Ron Hashiro
March 9, 2008 Updated: January 12, 2013 DISCLAIMER: Ron Hashiro Web Site is not responsible for the content at
any of the external sites that we link to and therefore
are not necessarily endorsed by us.