


Links:
QRZ Latest
Solar Activity
WWV
Solar Forcast


|

|
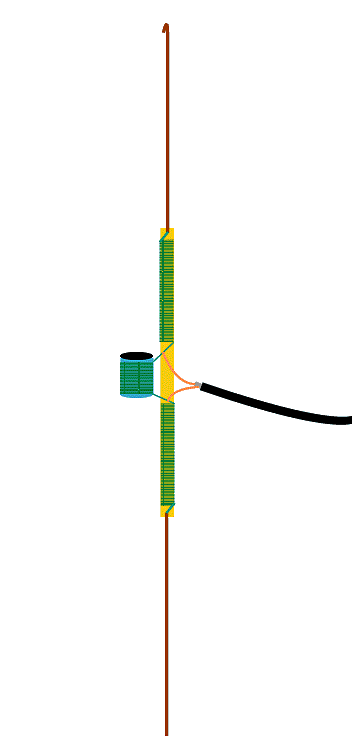
AG4RQ's Homebrew � Wave Vertical Dipole for Apartment Balconies
 Parts List:
- A wooden dowel or bamboo pole �� in diameter by 2' long
- A straightened 36� coat hanger cut into two 18� sections
- A small plastic cylinder 3� high by 2� in diameter
- Enough 18 Gauge insulated wire for three � wave sections for the band that you are constructing the antenna for
- Enough RG-58U coax to run between the antenna on the balcony and the antenna tuner inside the apartment
Building the Antenna:
In the center of the top and bottom of the dowel, drill a hole just wide enough to fit the wire hanger whips through, and about �� deep. Drill another hole perpendicular and connecting to the first one (on the top and bottom), connecting to the first hole. Strip and tin 1/8� off the end of the spool of wire. Slip this into the perpendicular hole and play with it until the wire comes out the top of the pole. Solder the end of the wire to the wire hanger whip, and pull down until the whip fits snuggly on top of the pole. Measure � wave from the top of the whip all the way down the spool of wire, and cut the wire when both the whip and the wire measure � wave. Wind the wire around the dowel, and when you reach the end, drill a hole right through the dowel. Slip the wire through the hole. This will hold the loading coil in place. Do the same on the opposite end of the dowel, so that you have whips on top and bottom, with 2 loading coils. Make sure all the wire is wound in the same direction. I usually do it clockwise. Take the plastic cylinder and drill 2 holes on the side, one toward the top, and the other toward the bottom. Measure out and cut � wave of wire. After stripping and tinning both ends, slip the end of the wire through the top hole and wind a coil around the cylinder (in the same direction as the loading coils), slipping the other end of the wire through the bottom hole. This is your balun. Solder the ends of the balun to the loading coils. Then take the coax, solder a PL-259 on one end. Strip 2� off the center conductor and braided shield and tin them. Then, solder the center conductor to the top loading coil and the top of the balun. Solder the braid to the bottom loading coil and bottom of the balun. Take a pliers and bend about � to 1� of the top of the top whip down into a �U� shaped hook. On the balcony, all the way toward the front, drill a small hole in the ceiling, just large enough to mount a small screw. Take a piece of string no more than 4� long and tie a loop on one end. Tie the other end of the string to the screw in the ceiling of the balcony. Hook the top of your antenna to the loop in the string, dangling the antenna. Try to run the coax away from the antenna perpendicularly. Run the coax in through the sliding glass patio door to your antenna matcher. I don't have to tell you how to hook up the matcher to the radio. You're done! Happy Dxing, ragchewing or whatever you do on the radio.
Note: The size of the plastic cylinder is just right for 20m. A 35mm plastic film canister will do fine for a 10m antenna. I have both.
If you live in Florida like I do, you know how important it is to be able to dismantle an antenna installation quickly when you're under a hurricane warning. It takes me about 10 minutes to take down the 2 HF dipoles and my � wave coat hanger ground plane for 2m / 70cm. It takes just another 10 minutes to put them back outside after all is clear.
|

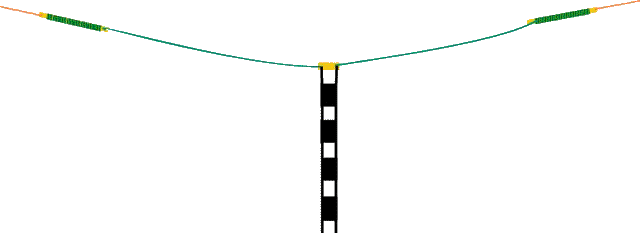
AG4RQ's Homebrew � Wave Horizontal 16' 40 meter Dipole for Apartment Balconies
 Parts List:
- Two wooden dowels or bamboo poles �" in diameter by 2' long
- A spool of 16 gauge insulated stranded copper wire at least 75'
- A 2" section of an old toothbrush handle
- 2 sheet metal screws with plastic anchors
- Heavy-duty twine
- Enough 450 ohm Ladder Line to run between the antenna on the balcony and the antenna tuner inside the apartment
Building the Antenna:
In the center of the top and bottom of the dowel, drill a hole just wide enough to fit the wire through, and about �" deep. Drill another hole perpendicular and connecting to the first one (on the top and bottom), connecting to the first hole. Slip the wire from the spool into the perpendicular hole and play with it until the wire comes out the top of the pole. Measure � wave, which for 40 meters should be about 33' . Wind 27' of the wire around the dowel, and when you reach the end, drill a hole right through the dowel. Slip the wire through the hole. This will hold the loading coil in place. You will have 6' of loose wire on one end of the dowel. Do the same with the other dowel. You now have two loading coils, each with 6' of loose wire on one end. Make sure all the wire is wound in the same direction. I usually do it clockwise. With each of the two legs of the antenna, do the following. Strip 2" off the short end of the loading coil and tie into a loop. Then tin it. Take the 2" piece of the toothbrush handle. There should be a hole at one end already. Drill a hole in the opposite end of it. This is your insulator and feedpoint. Strip 2" off the end of the loose wire, fasten it around one hole of the insulator. Do the same with the other loose wire end. You now have a finished 40 meter dipole. Solder the ladder line to the wires on the insulator. Drill 2 holes in the walls on both ends of the balcony, insert the plastic anchors, and mount the screws with at least 1/2" protruding from the anchor. Tie the end of the twine to the screw on one side. Tie the other end of the twine (use your judgement on how long the twine should be) through the tinned loop of the wire from the loading coil. Do the same at the opposite end. I mounted mine somewhat loose, allowing the dipole to sag slightly. Try to run the ladder line away from the antenna perpendicularly. Run the ladder line in through the sliding glass patio door to your antenna matcher. Attach each lead from the ladder line to the binding posts on the matcher used for balanced feedline or a long wire antenna. I don't have to tell you how to hook up the matcher to the radio. You're done! Happy Dxing, ragchewing or whatever you do on the radio. With a decent matcher, you should be able to load the antenna up with a flat SWR on 10, 12, 15, 17, 20, 30, 40 and 75 meters. If the antenna won't load up on all the bands, you may need to place capacitance hats at the 2 ends. Two small pie plates soldered to the ends of the dipole should do fine. I didn't get to that point. I used two 12" alligator clip jumper cables with both clips fastened to the the end of each leg to supply the needed capacitance. The antenna works great, and is even more efficient on 15, 17 and 20 meters than the 20 meter vertical dipole that I built.
Build a Ground Plane for VHF/UHF from Coat Hangers

This site was last updated on 07/26/2009

|