Integrating NOGAwatt into MFJ Tuner
well.....almost
by Sam Billingsley AE4GX, Atlanta, GA
(Click photo for full-size view)
|
Some years ago I picked up an MFJ compact tuner at a local hamfest for $5. I thought it would be good for use in the field with my QRP gear since it was small and functionally sound looking. I took it home and it stayed on the shelve for a year or two until I thought about using it with my W3EDP long wire. (My favorite field antenna). I was missing a few features I like and the single meter with the manual power range setting was designed for 30/100 watt ranges too high for me on QRP. I initially tried to modify the infernal SWR board to accommodate the QRP power levels but could never get it to the point it was easy to use. So back on the shelve it went.
Last weekend a group of the NOGA QRP club members when camping in northeast Georgia and one of our goals was to try out as many antennas for the field as possible but still have some fun too. I always wanted to setup two W3EDP antenna aligned at 90 degrees to see if the lobes and nulls would be noticeable in the field at fairly low horizontal wire heights (~ 25 feet). the camp site was perfect for this and one was oriented N-S and the other E-W. For fast switching we need to switch the rig end of the antenna wire so quickly make the observations. With each antenna at the same height and same length the SWR would be close enough for non-critical testing, I pulled out my old MFJ and decided to manually setup the antenna tuning with it so the rig would see a relatively constant tuner load. But the SWR couldn't be brought down to less than 3 to 1 on any band so we knew something was wrong with the tuner. After several attempts I by-passed the internal SWR board (that I had previously modified about a year earlier) and lo and behold the tuner began working as expected. So I made a note that when I got back home I would incorporate an NOGAwatt unit into the tuner to eliminate my previous dislikes with the commercial arrangement.
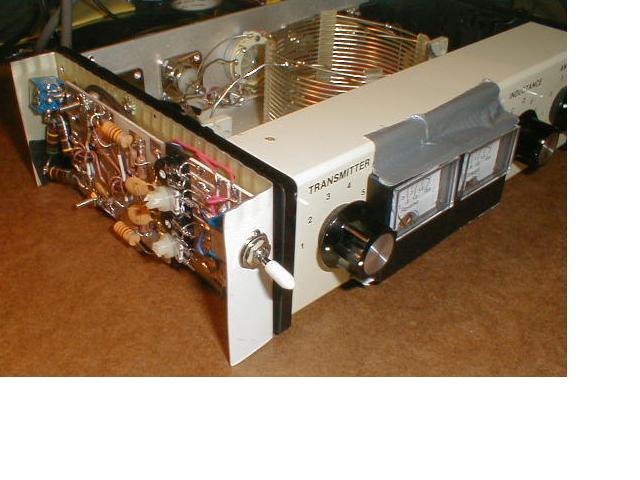
Back at home I gutted the old SWR board from the tuner and began playing with how to get the NOGAwatt board, scale switching circuits and resistor bridge , the two new meters (forward/reverse pwr) and bypass switching into the little enclosure. I did manage to get the nogaboard, meters and scale switching into the tuner but I experience some interaction with the almost touching tuner inductor and TX Cap. The Nogawatt board had to be mounted as a 45 degree angle and the ground symmetry I sure suffered. So, with the don't give up yet spirit, I decided to build the three components of the desired NOGAwatt into a small shielded HB enclosure and attach it to one end of the tuner. The two meters would be inside the tuner enclosure and be fed by shielded wire. |
(Click photo for full-size picture)
|
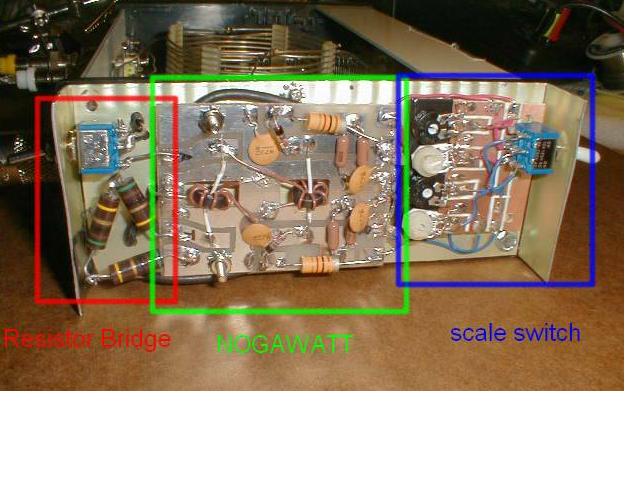
Resistor Bridge and NOGAwatt
bypass circuit
|
Standard NOGAwatt board
|
Power 2W/6W meter scale
switching circuit
|
|
Resistor Bridge and NOGAwatt bypass Circuit The rear panel DPDT toggle switch (1) bypasses the entire NOGAwatt unit or (2) puts the bridge and NOGAwatt between the rig and the input to the tuner. Resistor Bridge The bridge is composed of three 51 ohm 2W composition resistors. The four leg (the missing resistor is the input to the tuner). The purpose of the bridge is to provide the QRP rig with some level of reasonable resistive load and limit the SWR seen by the rig during tune-up to less than 2 to1 SWR. Many QRP rigs are very sensitive to high SWRs and unprotected finals can get blown during slow tune-ups where it is difficult to find a quick match.
|
|
Nogawatt board The only thing I did special was mount the meter POTs on the regular Nogawatt board and put them on a separate power switch board. I wanted a simple clean way to setup the four POTs needed for the 2 power options and forward and reverse independent meter readings. |
|
Power/Scale Switch board The power scale switch board housed the 4 POTs and a DPDT toggle switch. The switch was on the small edge of the housing and faced the front of the tuner. I used Demel tool to cut isolation Pads and soldered the switch and POTs to the Pad strips. Larger than necessary but easy to do and still fitted into the height of the tuner. |

(Click photo for full-size picture)
|
View of rear and inside top of MFJ tuner. The area highlighted in RED was the original space I was using. I like the external but attached final version better. If I ever want to move the NOGAWatt enclosure to another piece of gear it's just the matter of desoldering four wires into the MFJ tuner enclosure. |
|
Notes: I have a matching cover for the NOGAwatt board unit but left it off for the pictures. Looking back on the original problem of internally mounting the board I'm not sure that some operator error was the real problem but I am much happier with the layout and reusability of the final format. The unit has all the features I wanted:
I want to thank Mike Branca W3IRZ, Conyers, GA ( member of NOGA and technical advisor for ARRL) for prototyping and designing the Nogawatt for all of us to use. It's hard to remember what we did before it existed. |